
In my previous post “Google CTF (2018): Beginners Quest - Web Solutions” we covered the web challenges for the 2018 Google CTF, which covered a variety of security issues ranging from topics such as the improper use of client side scripts, and other simple vulnerabilities like cross-site scripting (also known as XSS).
In this post we will cover the Reverse Engineering solutions for the Beginners Quest, which touched on the topics of… well, Reverse Engineering and issues such as hardcoded passwords.
For those that have never done any sort of binary reverse engineering before, then I believe this post will be a great introduction to it. But before you dive into these challenges, I highly suggest you read and familiarize yourself with the x86 Assembly Guide and also read “Getting Started with Reverse Engineering” which will be beneficial to your learning.
Firmware
Upon reading the challenge description we learn that we got access to a binary file, and have to see if we can’t find anything. Interesting enough, the description states that it’s “now time to walk around the firmware” which makes me suspect that we need to use binwalk.
First, let’s download the attachment, and extract the file. We should be presented with the following challenge file.
root@kali:~/Google-CTF/Firmware# ls
challenge2.ext4
root@kali:~/Google-CTF/Firmware# file challenge2.ext4
challenge2.ext4: Linux rev 1.0 ext4 filesystem data, UUID=00ed61e1-1230-4818-bffa-305e19e53758 (extents) (64bit) (large files) (huge files)
Right from the start we notice that the file is of type ext4, which is, as stated by the file output, a Linux filesystem.
So if we were to run binwalk against this file, we should see a lot of Unix paths.
root@kali:~/Google-CTF/Firmware# binwalk challenge2.ext4 | head

DECIMAL       HEXADECIMAL     DESCRIPTION
--------------------------------------------------------------------------------
0             0x0             Linux EXT filesystem, rev 1.0, ext4 filesystem data, UUID=00ed61e1-1230-4818-bffa-305e19e519e5
399144        0x61728         Unix path: /lib/x86_64-linux-gnu/ld-2.19.so
405416        0x62FA8         Unix path: /lib/systemd/systemd
406312        0x63328         Unix path: /lib/systemd/systemd-udevd
611240        0x953A8         Unix path: /etc/alternatives/w.1.gz
617000        0x96A28         Unix path: /etc/alternatives/awk.1.gz
617256        0x96B28         Unix path: /etc/alternatives/nawk.1.gz
Awesome, our assumptions were right! So to access this filesystem, we can simply create a new directory and then use the mount command to mount that filesystem to our newly created directory. We should then be able to access all the files via the mount point.
In this case I created a new directory in root called mnt and mounted the filesystem there.
root@kali:~/Google-CTF/Firmware# mkdir /mnt
root@kali:~/Google-CTF/Firmware# mount challenge2.ext4 /mnt
root@kali:~/Google-CTF/Firmware# ls -la /mnt/
total 45
drwxr-xr-x 22 root root  1024 Feb  4 22:12 .
drwxr-xr-x 24 root root  4096 Feb  8 16:09 ..
drwxr-xr-x  2 root root  3072 Jun 22  2018 bin
drwxr-xr-x  2 root root  1024 Jun 22  2018 boot
drwxr-xr-x  4 root root  1024 Jun 22  2018 dev
drwxr-xr-x 52 root root  4096 Jun 22  2018 etc
drwxr-xr-x  2 root root  1024 Jun 22  2018 home
drwxr-xr-x 12 root root  1024 Jun 22  2018 lib
drwxr-xr-x  2 root root  1024 Jun 22  2018 lib64
drwx------  2 root root 12288 Jun 22  2018 lost+found
drwxr-xr-x  2 root root  1024 Jun 22  2018 media
-rw-r--r--  1 root root    20 Jun 22  2018 .mediapc_backdoor_password
-rw-r--r--  1 root root    40 Jun 22  2018 .mediapc_backdoor_password.gz
drwxr-xr-x  2 root root  1024 Jun 22  2018 mnt
drwxr-xr-x  2 root root  1024 Jun 22  2018 opt
drwxr-xr-x  2 root root  1024 Jun 22  2018 proc
drwx------  2 root root  1024 Jun 22  2018 root
drwxr-xr-x  4 root root  1024 Jun 22  2018 run
drwxr-xr-x  2 root root  3072 Jun 22  2018 sbin
drwxr-xr-x  2 root root  1024 Jun 22  2018 srv
drwxr-xr-x  2 root root  1024 Jun 22  2018 sys
drwxr-xr-x  2 root root  1024 Jun 22  2018 tmp
drwxr-xr-x 10 root root  1024 Jun 22  2018 usr
drwxr-xr-x  9 root root  1024 Jun 22  2018 var
Great, we can read the files! Right away I see that the .mediapc_backdoor_password file looks interesting! Let’s see what’s inside.
root@kali:~/Google-CTF/Firmware# cat /mnt/.mediapc_backdoor_password
CTF{I_kn0W_tH15_Fs}
There we go, we found our flag! Now before we move on, let’s make sure we unmount this filesystem from our Linux box. We can simply use the umount command against the mount directory.
root@kali:~/Google-CTF/Firmware# umount /mnt
root@kali:~/Google-CTF/Firmware# ls -la /mnt/
total 8
drwxr-xr-x  2 root root 4096 Feb  8 16:09 .
drwxr-xr-x 24 root root 4096 Feb  8 16:09 ..
FLAG: CTF{I_kn0W_tH15_Fs}
Gatekeeper
Upon reading the challenge description we learn that we got access to some sort of remote control service binary from a PC we purchased. Again we notice a slight hint in the description where it states that “nothing is the right way around”. I wonder what that might mean… oh well, let’s dig into the binary!
As previously, download the attachment and extract the file. We should then be presented with the following ELF binary.
root@kali:~/Google-CTF/Gatekeeper# ls
gatekeeper
root@kali:~/Google-CTF/Gatekeeper# file gatekeeper
gatekeeper: ELF 64-bit LSB pie executable, x86-64, version 1 (SYSV), dynamically linked, interpreter /lib64/ld-linux-x86-64.so.2, for GNU/Linux 2.6.32, BuildID[sha1]=a89e770cbffa17111e4fddb346215ca04e794af2, not stripped
Alright, so I always like to play around with the binary first to see how it functions before I start reverse engineering it. So let’s execute the binary and see what happens.
root@kali:~/Google-CTF/Gatekeeper# ./gatekeeper
/===========================================================================\
|               Gatekeeper - Access your PC from everywhere!                |
+===========================================================================+
[ERROR] Login information missing
Usage: ./gatekeeper <username> <password>
Okay, without providing any arugments we get usage instruction which let us know that we need to pass a username and password into the program. Let’s see what happens if we pass in the combination of admin:admin.
root@kali:~/Google-CTF/Gatekeeper# ./gatekeeper admin admin
/===========================================================================\
|               Gatekeeper - Access your PC from everywhere!                |
+===========================================================================+
 ~> Verifying....
ACCESS DENIED
 ~> Incorrect username
Access Denied… of course. So it seems that we need to find a valid username and password. I’m going to guess that these values are hardcoded.
What we can do to make life easy, and try to go for a quick “win”, is to use a tool like strings against the binary. This in turn will print out all the printable characters from the binary, possibly revealing the username and password!
NOTE: I trimmed some of the output for readability.
root@kali:~/Google-CTF/Gatekeeper# strings ./gatekeeper
---trim---
/===========================================================================\
|               Gatekeeper - Access your PC from everywhere!                |
+===========================================================================+
ACCESS DENIED
[ERROR] Login information missing
Usage: %s <username> <password>
 ~> Verifying.
0n3_W4rM
 ~> Incorrect username
zLl1ks_d4m_T0g_I
Correct!
Welcome back!
 ~> Incorrect password
---trim---
Right away we can see all the strings the binary uses, including what seems to be a username and password! I’m going to assume that 0n3_W4rM is the username as it comes first, and the password is zLl1ks_d4m_T0g_I since it follows after.
Let’s test this to see if we are right!
root@kali:~/Google-CTF/Gatekeeper# ./gatekeeper 0n3_W4rM zLl1ks_d4m_T0g_I
/===========================================================================\
|               Gatekeeper - Access your PC from everywhere!                |
+===========================================================================+
 ~> Verifying.......ACCESS DENIED
 ~> Incorrect password
Okay, we got the right username, but the password for some reason doesn’t work. Alright, it’s time we tear this program apart and dig into it a little bit deeper to see why this password doesn’t work.
Let’s open this binary using IDA. If you don’t have IDA yet, you can download the Free Version of it here.
Using IDA should be pretty self explanatory and I’ll try to explain as best as I can, but if you’d like - you can read the Reverse Engineering with Ida Pro slides by Chris Eagle to get a better idea of how to use it.
Okay, moving on. Once you open the binary up and have it loaded, press Shift+F12 together to open the Strings Window. This window will display all the strings in the binary. Once done, scroll down and find the password that we entered.

Once we find the password, go ahead and double click that password. This will bring us directly to the .rodata segment which is a memory segment utilized for constant data. As you can see, the password characters will be highlighted in yellow.

Since the .rodata memory region for where the password is located is already highlighted, press the x button on your keyboard to cross reference the password. This will bring up a new screen that will show us where this string is used or called from.

By double clicking the cross reference, we should be taken directly into the IDA Graph View, which will show the disassembled application and it’s function calls/flows.

Initially right above and below the password I see a mov instruction that seems to load data from memory at [rbp+dest] and then moves it to the rax register. We then see that the lea or “load effective address” instructions loads the password string into the rsi or Source Index register.
Then another mov instruction is called that sets the rdi or Destination Index to that of the rax register which should be the data that was loaded from memory. This then calls the strcmp function against these two strings.
So my question is… what’s it comparing it to? If we scroll up in the Graph View, we will see the following.

Take note that I explain what’s going on in the image. Simply this portion of the program get’s the length of an argument, which in our case is arg[2] or our password, and then allocates data on the heap which is equal to the string length plus 1. The password we passed into the program is then written to the allocated space.
So to give you a better visual representation of what the assembly is doing, I can show you what the the C code for this will look like. It should look like the following:
v1 = strlen(argv[2]);
dest = (char *)malloc(v1 + 1);
strcpy(dest, argv[2]);
First the strlen function is called to get the size of the password (size of the character pointer array) and sets it to a new variable.
You can then see that malloc is being used (both in C and in the dissasembly) to allocate data on the heap for the dest variable, which will be where the password is being stored.
Finally strcpy is called to move the password into the allocated destination buffer.
At the end we see that another mov instruction is called that set’s the memory value located at [rbp+var_8] to 0.
This then jumps to loc_B2A, which is the string reverse function loop.
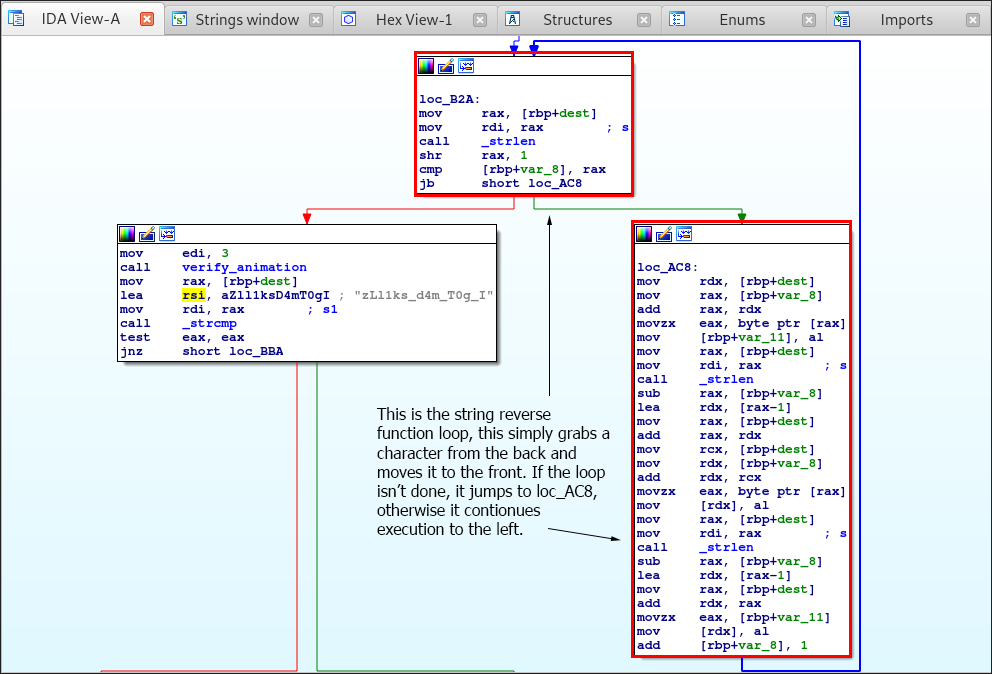
Simply this is a string reverse function that takes the last character of the password and moves it to the front.
Now there’s one thing that you need to understand about string in C, and that’s that a string is simply an array of character pointers to the characters in memory. This allows for the manipulation of strings as an array because… well because it’s an array!
If you’re confused you can read “C Strings (Arrays vs. Pointers)” to better understand it.
The C code for this function will look like the following:
for ( i = val; i < strlen(dest) >> 1; i++)
{
    v2 = dest[i];
    dest[i] = dest[strlen(dest) -i - 1];
    dest[strlen(dest) - i - 1] = v2;
}
As you can see, the rax register stores the string length which is contained in the memory location [rbp+dest]. The shr instruction then simply shifts the bits of the operand destination by 1. This is used as the loop counter, so when the counter is equal to the string length, as we see the cmp instruction doing, then the program will continue execution to the left.
Otherwise it will jump to loc_AC8 and will move the last character of the string to the front, thus reversing it.
Alright, so we know that the password is being reversed. Let’s reverse it ourselves and see if it works.
root@kali:~/Google-CTF/Gatekeeper# echo "zLl1ks_d4m_T0g_I" | rev
I_g0T_m4d_sk1lLz
After getting the reversed password, let’s test it!
root@kali:~/Google-CTF/Gatekeeper# ./gatekeeper 0n3_W4rM I_g0T_m4d_sk1lLz
/===========================================================================\
|               Gatekeeper - Access your PC from everywhere!                |
+===========================================================================+
 ~> Verifying.......Correct!
Welcome back!
CTF{I_g0T_m4d_sk1lLz}
And there we have it! We got our flag!
FLAG: CTF{I_g0T_m4d_sk1lLz}
Closing
The Reverse Engineering challenges were pretty easy to be honest! They weren’t too overly complex if you knew what you were looking at. For those who are struggling with reverse engineering I always suggest looking at the what’s being called via the call to see what functions are being called - this makes it easier to try and understand what’s going on.
If you had trouble understanding the assembly then I suggest you take the Introductory Intel x86: Architecture, Assembly, Applications, & Alliteration by Open Security Training. They have a lot of courses that can help you get started in assembly and reverse engineering.
Also, Malware Unicorn has a great Reverse Engineering 101 workshop that I highly suggest you read!
At the same time I believe that the book, “Hacking: The Art of Exploitation” and “Practical Reverse Engineering: x86, x64, ARM, Windows Kernel, Reversing Tools, and Obfuscation” are great books if you want to get started in exploitation and reverse engineering.
With that being said, I hope you all learned something new from this write up! Stay tuned for my next post as we cover the final PWN challenges!
Just note, the PWN challenges will be split up into two separate posts for easier readability.
Thanks for reading!
Leave a Comment