In my previous post “Red Team Tactics: Utilizing Syscalls in C# - Prerequisite Knowledge”, we covered some basic prerequisite concepts that we needed to understand before we could utilize syscalls in C#. We touched on some in-depth topics like windows internals and of course syscalls. We also went over how the .NET Framework functions and how we can utilize unmanaged code in C# to execute our syscall assemblies.
Now, if you haven’t read my previous post yet - then I highly recommend that you do so. Otherwise you might be lost and totally unfamiliar with some of the topics presented here. Of course, I’ll try to explain the best I can and provide links to external resources for some topics - but everything (mostly everything) that will be talked about here, is in the previous post! 😁
For today’s blog post, we will focus on actually writing the code to execute a valid syscall by utilizing everything that we learned. In addition to writing the code, we’ll also go over some concepts to managing our code so that we can prepare it for future integration between other tools. This integration idea will be similar to how SharpSploit by Ryan Cobb was developed to be integrated with other C# projects - but our’s won’t go to such an extent.
My initial idea for this part of the blog post was to walk you through developing an actual tool that we could use during operations - like Dumpert or SysWhispers. But after some consideration to how long and complex the blog post would get, I instead opted to code a simple PoC (Proof of Concept) demonstrating the execution of a single syscall.
I truly believe that after reading this blog post and going over the code example (which I will also post on GitHub), you’ll be able to code a tool on your own! I’ll also include a few links to tools that utilize the same syscall concepts in C# at the end of this post if you need more inspiration.
Who knows, maybe I’ll opt to do a live stream where we can all write a cool new tool together! 😏
Alright, with that out of the way, let’s open up Visual Studio or Visual Code, and get our hands dirty with some code!
Devising our Code and Class Structure
If there’s one thing that I learned when writing custom tools for red team operation - be it malware or some sort of implant - is that we need to organize our code and idea, and separate them into classes.
Classes are one of the most fundamental C#’s types. Simply, a class is a data structure that combines fields and methods (as well as other function members) in a single unit. Of course classes can be used as objects and support inheritance and polymorphism, which are mechanisms whereby our derived classes can extend and specialize other base classes.
Upon creation, these classes can then be utilized across our code base by adding the “using” directive inside another source code file. This will then allow us to access our previous classes static members and nested types without having to qualify the access with the class name.
For example, let’s say we had a new class called “Syscalls” that housed our syscall logic. If we didn’t add the using directive to our C# code, then we would need to qualify our function with the full class name. So if our Syscalls class contained a syscall assembly for NtWriteFile, then to access that method inside another class, we would do something like Syscalls.NtWriteFile. Which is fine, but it get’s tiresome after a few times of calling the class repeatedly.
Now, some of you might ask - “Why do we need this?”
Two reasons. One, it’s for organizational purposes and to keep our code “clean”. Two, it allows us to debug and fix issues in our code with ease instead of scrolling through a massive blob of text and trying to find the hide and seek champion known as the semicolon.
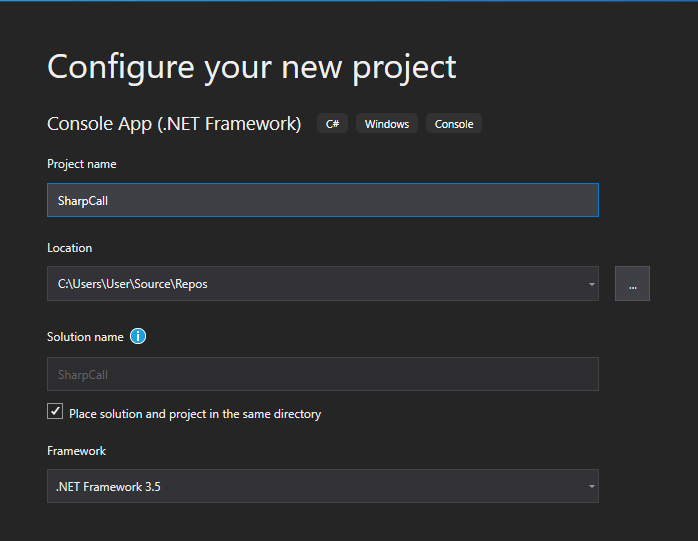
With that aside, let’s try being by organizing our code! For starters, let’s create an new project for a .NET Framework Console App and set it to use the 3.5 .NET Framework - like so.
Once completed, you should now have access to a new C# file called Program.cs. If we look at the right hand side of Visual Studio, we will notice that in our Solution Explorer we have the following solution structure.
+SharpCall SLN (Solution)
|
+->Properties
|
+->References
|
+->Program.cs (Main Program)
Our Program.cs file will house the main logic of our application. In the case of our PoC, we will want to call and utilize our syscalls in this file. As seen before, system calls occur within the CPU when the syscall instruction is called along with a valid syscall identifier. This instruction causes the CPU to switch from user mode to kernel mode to carry out certain privileged operations.
If we were to utilize just one syscall, then we could just simply included it in the Program.cs file. But, by doing so, we would cause ourselves some headaches if later down the line we decided to build this program out for either more modularity or flexibility to easier integrate with other applications - be that droppers or malware.
So we need to always think into the future - and to start, it would be a good idea to separate all our syscall assemblies into a separate file. This way, if the need was to arise for the integration of more syscalls, then we can just add them into one class and simply call the assemblies from our program.
And that’s exactly what we are going to do here! We’ll start by adding a new file inside our solution and call it Syscalls.cs. Our solution structure should now look similar to the following.
+SharpCall SLN (Solution)
|
+->Properties
|
+->References
|
+->Program.cs (Main Program)
|
+->Syscalls.cs (Class to Hold our Assembly and Syscall Logic)
Great, we can start coding now, right? Well not really - we’re forgetting one major thing here. Remember that since we’ll be using unmanaged code, we also need to instantiate the Windows API functions so that we can call them from our C# program . And to utilize unmanaged functions, we need to platform invoke (P/Invoke) their structs and parameters, as well as any other additional flag fields.
Again, we can do this in the Program.cs file, but it will be much more cleaner and organized if we did all the P/Invoke work in a separate class. So, let’s add another file to our solution and call it Native.cs - since it will house our “native” windows functions.
Our solution structure should now look similar to the following:
+SharpCall SLN (Solution)
|
+->Properties
|
+->References
|
+->Program.cs (Main Program)
|
+->Syscalls.cs (Class to Hold our Assembly and Syscall Logic)
|
+->Native.cs (Class to Hold our Native Win32 APIs and Structs)
Now that we have our application organized, and know what goes where, we can finally start coding!
Writing our Syscall Code
Since this is a proof of concept, I will use the NtCreateFile system call to create a temporary file on our desktop. If we can get this to work then it’ll validate that our code logic is solid. Afterwards, we would then be able to focus on writing more complex tools and expanding our syscalls class with additional system calls.
Also, quick note - all of the code written below will only work on x64 systems and not x86.
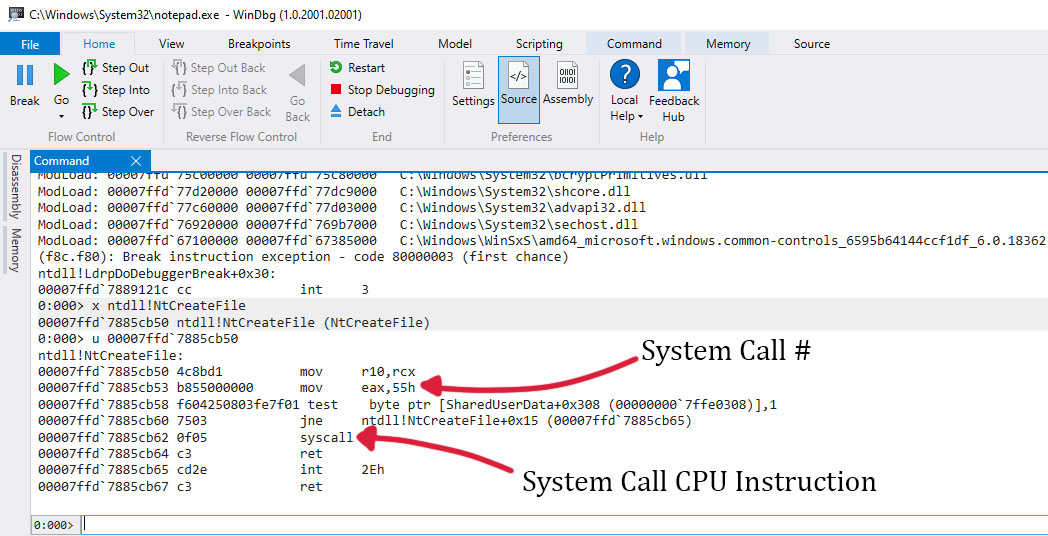
Alright, to start, we need to get the assembly for our NtCreateFile syscall. As explained and detailed in my previous post, we can do so by utilizing WinDBG to disassemble and inspect the call function of NtCreateFile in ntdll.
Upon getting the memory address of the function, and dissembling the instructions at the memory address, we should now see the following output.
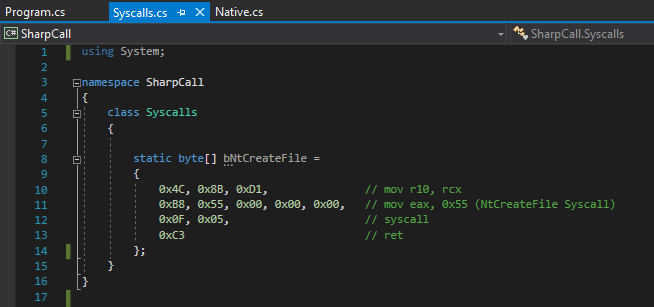
Upon looking at the disassembly, we see that our syscall identifier is 0x55. And if we look to the left of the assembly instructions, we’ll see the hexadecimal representation of our syscall instructions. Since there is no inline assembly in C#, we’re going to utilize these hexadecimal as shellcode, which will be added to a simply byte array.
We’ll do this by navigating to our Syscalls.cs file, and inside out syscalls class, we’ll create the new static byte array called bNtCreateFile - as shown.
Awesome, so we have our first syscall assembly completed! But how are we going to build out the code to execute this? Well, if you paid attention in my previous post then you would have learned about something called delegates.
Delegates are simply a type that represents references to methods with a particular parameter list and return type. When you instantiate a delegate, you can associate its instance with any method that has a compatible signature and return type. We can then can invoke our delegated method through the delegate instance.
This might sound a little confusing, but if you recall, in my last post we defined a new delegate called EnumWindowsProc and later defined the delegates implementation via OutputWindow. This implementation for the delegate simply told C# what we want to do with the data that is passed to this function reference - be it from managed or unmanaged code.
We can do the same thing here in our Syscall.cs class by defining a delegate to our unmanaged function - which in this case will be NtCreateFile. Once that delegate has been defined, we can go ahead and implement the logic that will handle transforming our syscall assembly to a valid function.
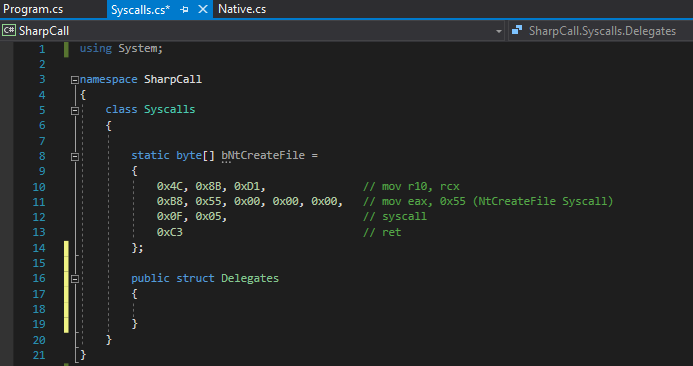
But let’s not get ahead of ourselves. First, we need to define the signature for our NtCreateFile delegate. To do so, we’ll start by creating a new public struct type called Delegates within our Syscall class.
This struct will house all our native functions (delegate) signature so they can be utilized by our syscalls.
Before we define our delegate, let’s take a look at the C syntax of NtCreateFile.
__kernel_entry NTSTATUS NtCreateFile(
  OUT PHANDLE           FileHandle,
  IN ACCESS_MASK        DesiredAccess,
  IN POBJECT_ATTRIBUTES ObjectAttributes,
  OUT PIO_STATUS_BLOCK  IoStatusBlock,
  IN PLARGE_INTEGER     AllocationSize,
  IN ULONG              FileAttributes,
  IN ULONG              ShareAccess,
  IN ULONG              CreateDisposition,
  IN ULONG              CreateOptions,
  IN PVOID              EaBuffer,
  IN ULONG              EaLength
);
After looking at the syntax, we quickly notice a few things that we haven’t seen before.
Fist of all, we notice that the NtCreateFile function has a return type of NTSTATUS which is a struct that contains an unsigned 32-bit integer for each message identifier. We also see that a few of the function parameters accept a set of different flags and structures, such as the ACCESS_MASK flags, OBJECT__ATTRIBUTES structure, and the IO_STATUS_BLOCK structure.
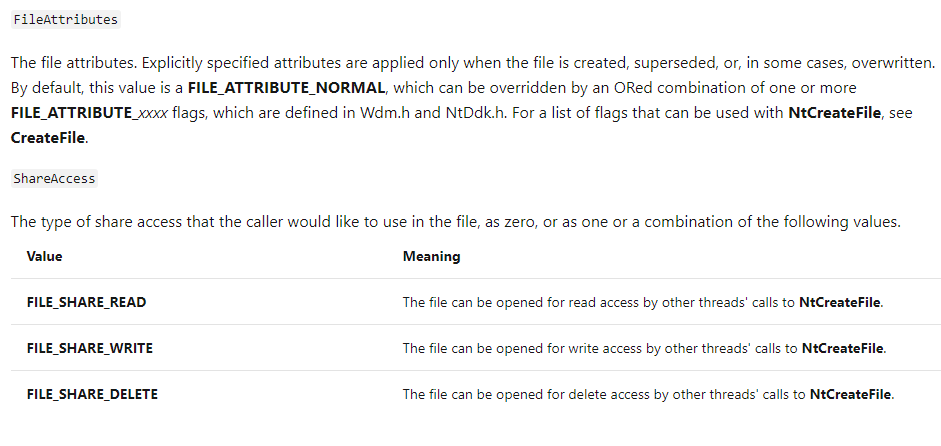
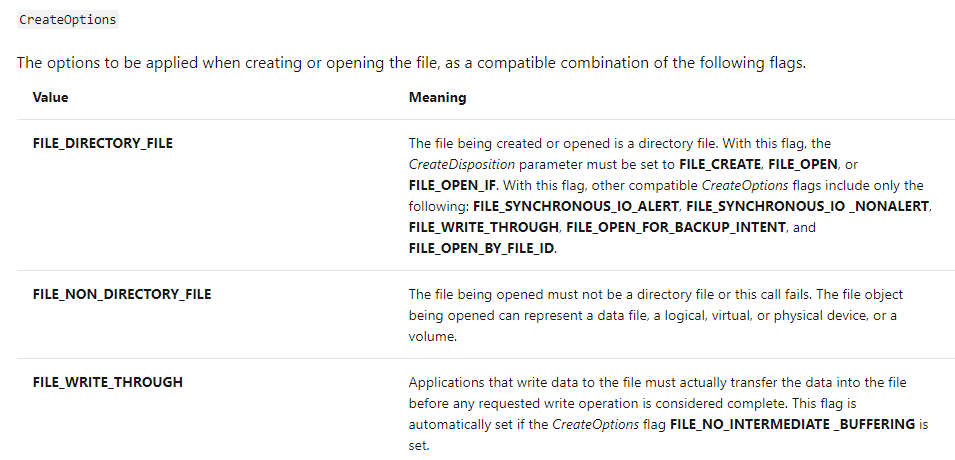
If we take a peek at the other function parameters like FileAttributes, and CreateOptions, we’ll see that they also accept specific flags.
So here lies the core problem of utilizing unmanaged code in C# - which is the fact that we need to manually create these flag enumerators and structures to contain the same value codes that Windows has. Otherwise if the parameters we pass into our syscall contain unexpected values, it will then cause the syscall to either break or return errors.
Thankfully for us, the P/Invoke wiki comes to the rescue. Here we can lookup how to implement our native functions, structs, and flags.
You can also use the Microsoft Reference Source website and search for the specific structures and access flags you need. These will be much closer to the original Windows references then what P/Invoke might have.
The following links should help us implement the necessary structures and flags needed to execute NtCreateFile with the proper parameter values:
- NTSTATUS
- ACCESS_MASK
- OBJECT_ATTRIBUTES & IO_STATUS_BLOCK
- FileAttributes, ShareAccess & CreateDisposition
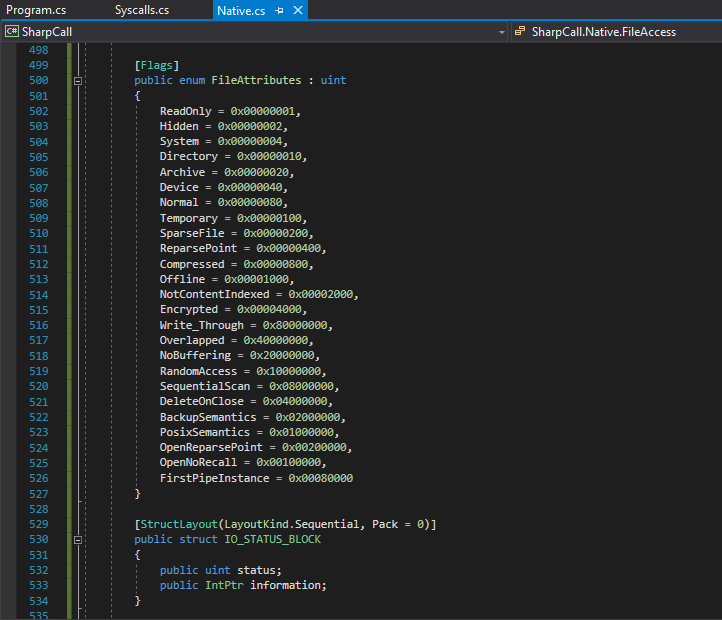
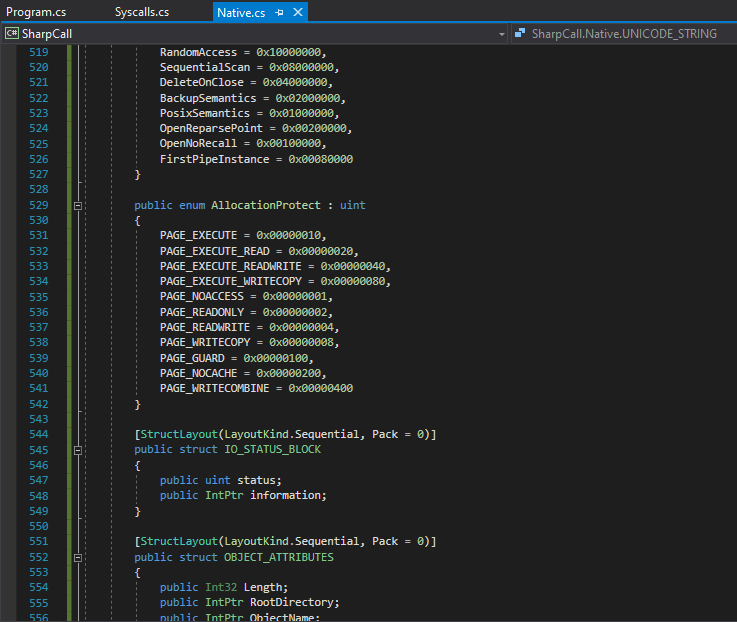
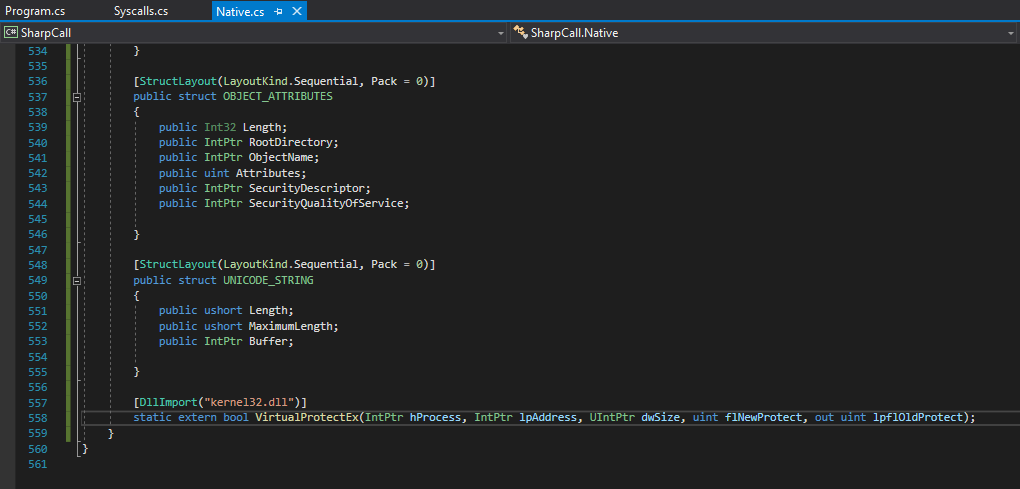
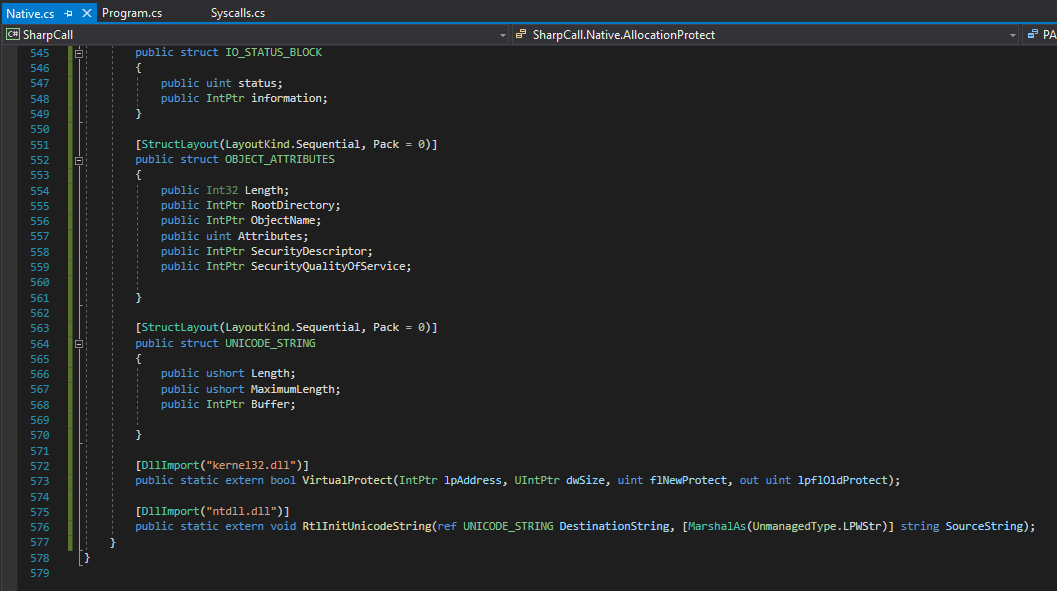
Since these values, structures and flags are all “native” to Windows, let’s go ahead and add them to the Native.cs file under the Native class.
After everything is implemented and cleaned up, part of your Native.cs file should look almost something like this.
As a side note - this is just a small subset of the implemented native structs and flags. If you want to see the full implementation, then take a look at the Native.cs file from the SharpCall project on my GitHub.
Also, take note on how we call the public keyword before each struct and flag enumerator. This is done so that we can access the objects from other files in our program.
Awesome, now that we have those implemented we can go ahead and convert the C++ data types of NtCreateFile to C# data types. After conversion your C# syntax should look like this:
NTSTATUS NtCreateFile(
  out Microsoft.Win32.SafeHandles.SafeFileHandle FileHadle,
  FileAccess DesiredAcces,
  ref OBJECT_ATTRIBUTES ObjectAttributes,
  ref IO_STATUS_BLOCK IoStatusBlock,
  ref long AllocationSize,
  FileAttributes FileAttributes,
  FileShare ShareAccess,
  CreationDisposition CreateDisposition,
  CreateOption CreateOptions,
  IntPtr EaBuffer,
  uint EaLength
);
Now, before we implement this structure as a delegate, let’s just brief over some of the converted data types.
As said before, usually any pointers or handles in C++ can be converted to an IntPtr in C#, but in this case you will notice that I converted the PHANDLE (a pointer to a handle) to be that of a SafeFileHandle data type. The reason we do this is because a SafeFileHandle represents a wrapper class for a file handle that C# will understand.
And since we are dealing with creating files and will be passing this data via delegates from managed to unmanaged code (and vice versa), we need to make sure that C# can handle and understand the data type it’s marshaling, otherwise we might encounter errors.
The rest should be self explanatory, as the FileAttributes, FileShare and those data types are simply a representation of the varaibles and values inside the structures and flag enumerators that we added to the Native class. This just tells C# that whenever data is passed into these parameters - be it a value or descriptor - then it needs to be referenced against that specific struct/flag enumerator.
A few others things you might have noticed is that I added the ref and out keywords to some of the parameters. Simply, these keywords indicate that arguments can to be passed by reference and not by value.
The difference between ref and out is that for the ref keyword, the parameter or argument must be initialized first before it is passed, unlike out where we don’t have to. The other difference is that for ref, data can be passed bi-directionally and any changes made to this argument in a method will be reflected in that variable when control returns to the calling method. For out, data is passed only in a unidirectional way and whatever value is returned to us by the calling method is set to the reference variable.
So in the case of NtCreateFile, we set the out keyword for FileHandle since this will be a pointer to a variable that receives the file handle if the call is successful. Which simply means that data is only being passed back “out” to us.
Makes sense? Good!
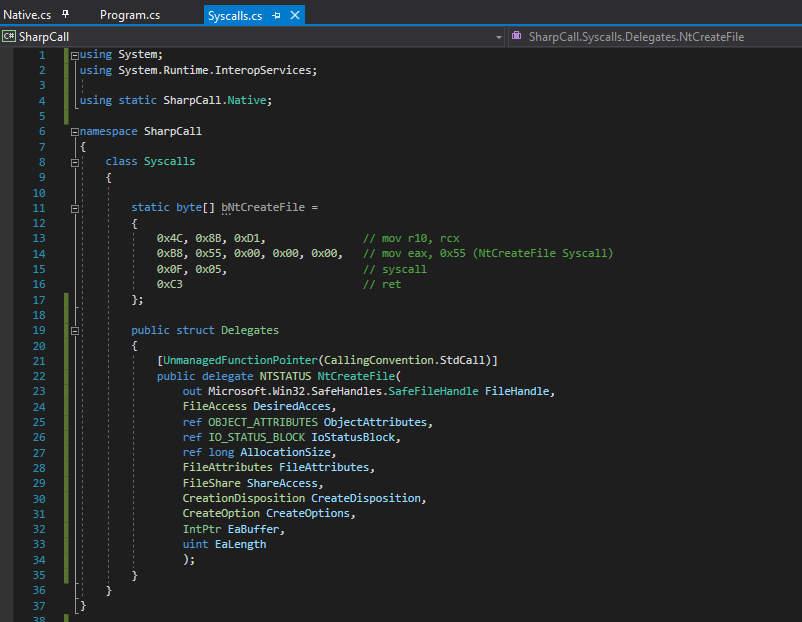
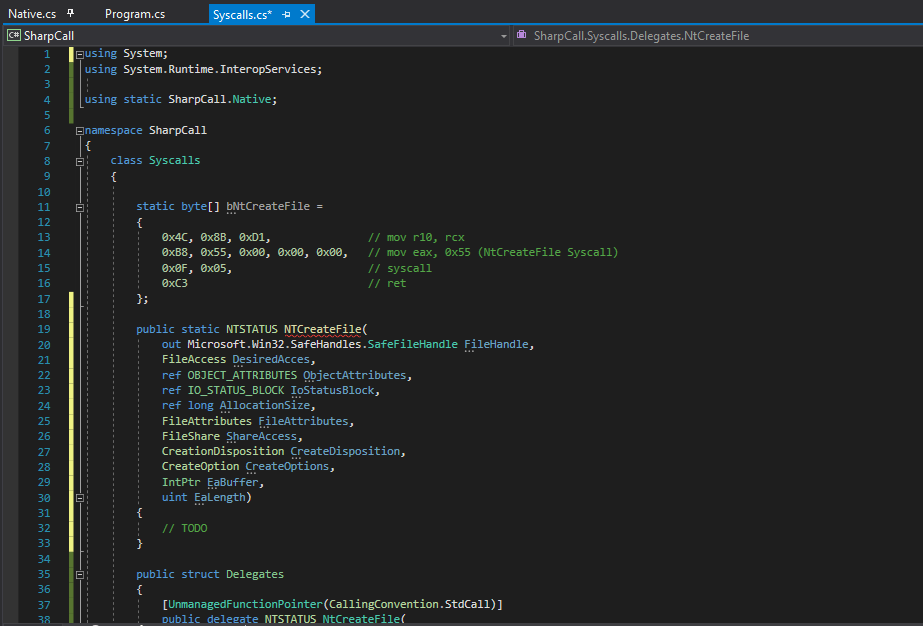
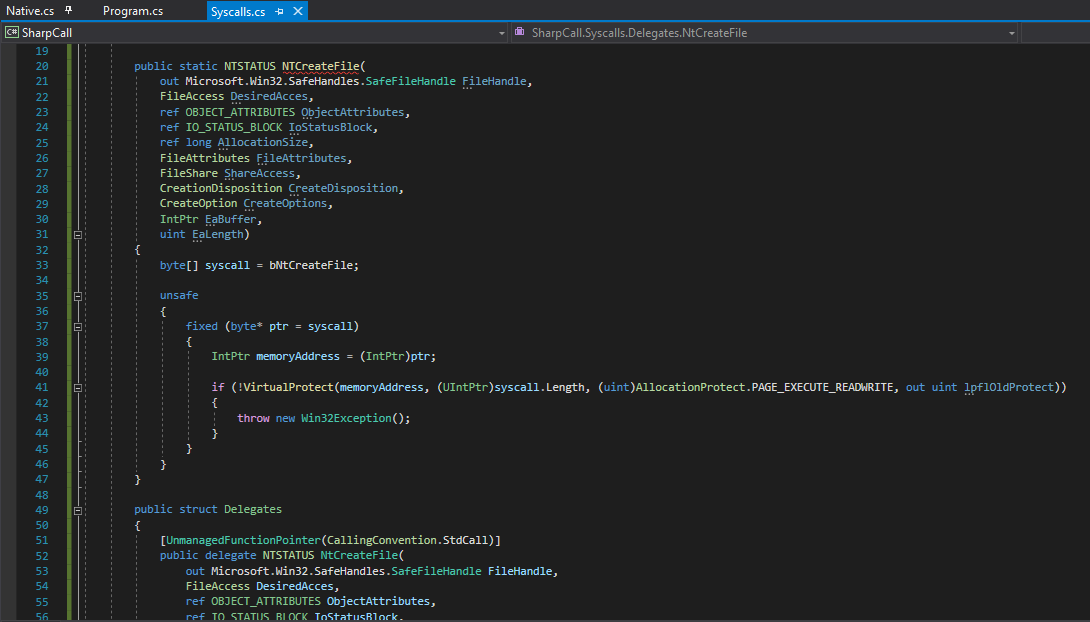
Now that we have this, we can finally add our C# syntax for NtCreateFile inside our newly added Delegates structure within our Syscalls class.
Once done, our Syscalls class should now look something like this.
NOTE: You might notice that I added using static SharpCall.Native at the top of the file. This simply tells C# to use the static class called Native. As explained before, we do this so we can directly use our native functions, struct and flag imports.
Alright, before we go on any further, take note that in the delegates structure, before we set up our NtCreateFile delegate, I’m calling the UnmanagedFunctionPointer attribute. This attribute controls the marshaling behavior of a delegate signature as an unmanaged function pointer when it’s passed to or from unmanaged code.
This is a critical piece of information that we need to include since we will be using unsafe code to marshal our unmanaged pointer from the syscall assembly to these function delegates - as explained in my previous post.
Awesome, we’re making some progress! Now that we have our structures, flag enumerators, and our function delegate defined, we can now go ahead and begin implementing the delegate to handle any parameters passed into it. These parameters will initially then be handled by our syscall assembly.
Let’s go ahead and create (or in other words instantiate) our NtCreateFile function delegate. We can do this directly after our syscall assembly.
Once done, your Syscalls.cs file should look similar to whats shown below.
The brackets with the TODO comment (right after our instantiated delegate) is where we will add the code to handle the data being passed to and from managed and unmanaged code.
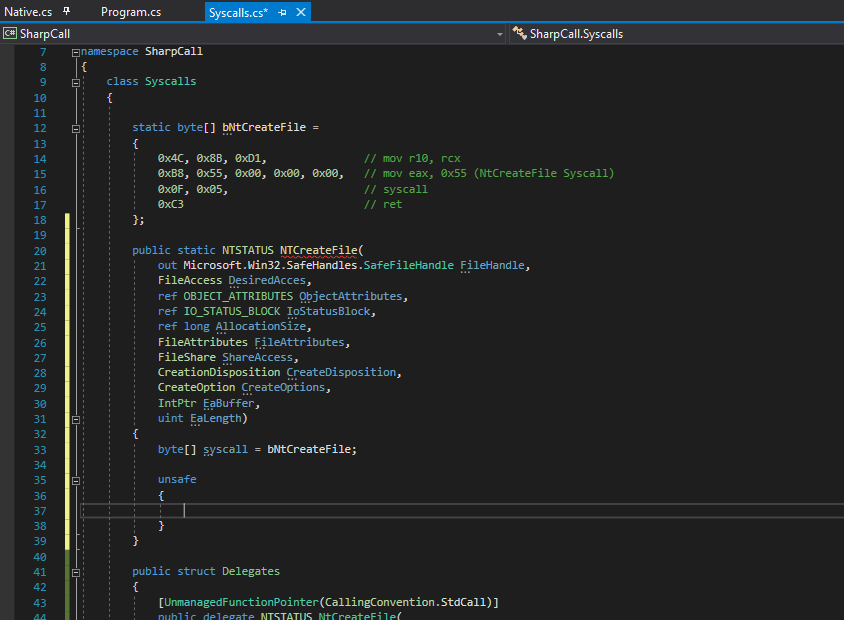
If you recall from my last post, I explained how the Marshal.GetDelegateForFunctionPointer allows us to convert an unmanaged function pointer to a delegate of a specified type. By using that with the unsafe context, it would allow us to create a pointer to a memory location where our shellcode is located (which would be our syscall assembly) and will allow us to execute the assembly from managed code via the delegate.
We’ll be doing the same thing here. So for starters, let’s make sure that we create a new byte array called syscall and set it to the same value as our bNtCreateFile assembly. Once done, specify the unsafe context and add some brackets which will house our unsafe code.
Once completed your newly updated Syscalls.cs file should look similar to the following.
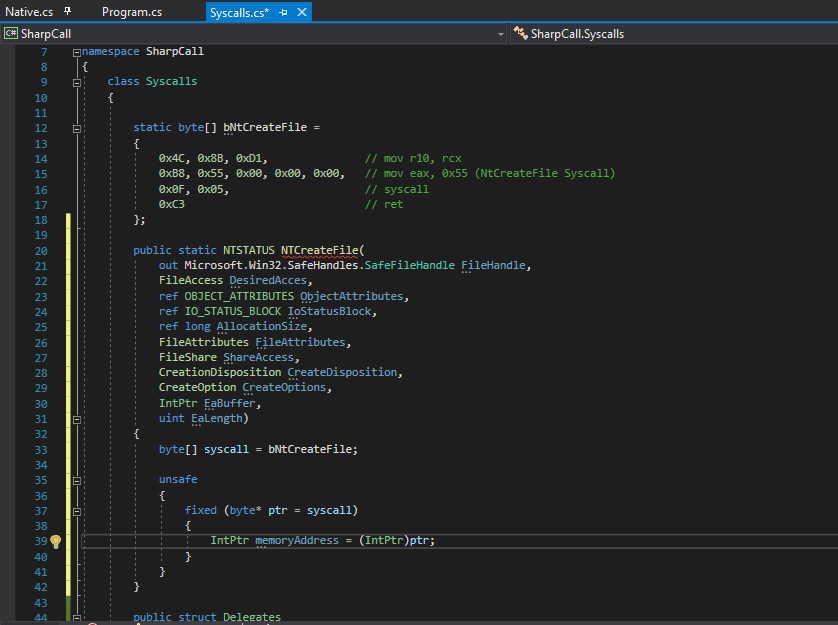
Now, just as I explained in my previous post - within that unsafe context, we will initialize a new byte pointer called ptr and set that to the value of syscall - which houses our byte array assembly.
As you will see below and as explained previously, we utilize the fixed statement for this pointer so that we can prevent the garbage collector from relocating our syscall byte array in memory.
Afterwards, we will simply cast the byte array pointer into an IntPtr called memoryAddress. Doing this will allow us to obtain the memory address of where our syscall byte array is located within our application during execution.
Upon doing the above, our updated Syscall.cs file should look like the one presented below.
Now for this part, I suggest you pay close attention as this is where the magic happens! 😉
Since we now have (or will have) a memory address of where our syscall assembly is located during application execution, we need to do something to make sure that it will execute properly within it’s allocated memory region.
If you’re familiar with how shellcode works during exploit development - whenever we want to write, read, or even execute shellcode within our target process or targeted memory pages, then we need to make sure that those memory regions have proper access rights. If you’re unfamiliar with this, then go read about the how the Windows security model enables you to control process security and access rights.
For example, let’s see what kind of memory protections NtCreateFile has within notepad when it’s executing.
0:000> x ntdll!NtCreateFile
00007ffb`f6b9cb50 ntdll!NtCreateFile (NtCreateFile)
0:000> !address 00007ffb`f6b9cb50

Usage:                  Image
Base Address:           00007ffb`f6b01000
End Address:            00007ffb`f6c18000
Region Size:            00000000`00117000 (   1.090 MB)
State:                  00001000          MEM_COMMIT
Protect:                00000020          PAGE_EXECUTE_READ
Type:                   01000000          MEM_IMAGE
Allocation Base:        00007ffb`f6b00000
Allocation Protect:     00000080          PAGE_EXECUTE_WRITECOPY
Image Path:             ntdll.dll
Module Name:            ntdll
Loaded Image Name:      C:\Windows\SYSTEM32\ntdll.dll
Mapped Image Name:
More info: lmv m ntdll More info: !lmi ntdll More info: ln 0x7ffbf6b9cb50 More info: !dh 0x7ffbf6b00000 Content source: 1 (target), length: 7b4b0
As shown above - notepad has Read and Execute permissions for NtCreatreFile within it’s processes virtual memory. The reason for this is that notepad needs to make sure that it can execute the syscall and also must be able to read the return values.
In my previous post I explained how each applications virtual address space is private, and how one application can’t alter the data that belongs to another application - unless the process makes part of its private address space available.
Now since we are using unsafe context in C#, and are passing boundaries between managed and unmanaged code - then we need to manage the memory access within our programs virtual memory space since the CLR won’t do that for us! And we need to do this so we can write our parameters to our syscall, execute the syscall, and also read the returned data for our delegate!
But how can we do that? Well let me introduce you to our new little friend and lovely function called VirtualProtect.
What VritualProtect allows us to do is to change the protection on a region of committed pages in the virtual address space of the calling process. Meaning that by using this native function against our syscalls memory address (which we just obtained) we can make sure that the virtual process memory is set to read-write-execute!
So with that, let’s implement this native function inside Native.cs. This way we can use it within Syscalls.cs to change the memory protection on our assembly.
As always, let’s take a peek at the C structure for this function.
BOOL VirtualProtect(
  LPVOID lpAddress,
  SIZE_T dwSize,
  DWORD  flNewProtect,
  PDWORD lpflOldProtect
);
It seems simple enough. We just need to remeber to add the flNewProtect flags along with the function.
Let’s go ahead and add this. Once done, our implemented memory protection flags inside the Native class should look like so.
And the VirtualProtect function will look similar to the following.
Beautiful! We’ve made a ton of progress already and we’re nearing the end! Well… sort of. There’s still a few more things to do.
Now that we have our VirtualProtect function implemented, let’s return to our Syscall.cs file, and execute the VirtualProtect function against our memoryAddress pointer to give it read-write-execute permissions.
At the same time, let’s put this native function inside an IF statement. That way if the function fails, we can throw a Win32Exception to show us the error code and stop execution.
Also, make sure to add the using System.ComponentModel; directive at the top of your code. This way, you’ll be able to use the Win32Exception class.
Upon doing this, our code should look like the following:
Alright, so if the execution of VirtualProtect is successful, then the virtual memory address of our unmanaged syscall assembly (which the memoryAddress variable is pointing to) should now have read-write-execute permissions.
This means that we now have an unmanaged function pointer. So as explained before, and in my previous post - what we need to do now, is we need to utilize Marshal.GetDelegateForFunctionPointer to convert our unmanaged function pointer to a delegate of a specified type. In this case, we will be converting our function pointer to our NtCreateFile delegate.
Now, I know some of you might be a little confused or wondering why we are doing this. It should have became apparent to you what we are trying to do when I explained the memory protections. But either way, let me explain this so we’re all on the same page before we move on.
The reason we are converting our unmanaged function pointer to our NtCreateFile delegate is so that the function will behave like a callback function when our syscall assembly is executed. Take a look back into line 20 of our Syscalls.cs file.
What are we doing there? If you’re answer was “passing parameters into a function” then you’re right!
Once this delegate accepts our parameters to create a file, it will go ahead and update the memory location of our syscall to be read-write-execute. It will then take this pointer to the syscall and convert it to our NtCreateFile delegate - which essential is just converting our syscall to it’s actual function representation.
Once that’s done, we will call the return statement against our initialized delegate along with our passed parameters. It’s essentially at this point that we are pushing the parameters onto the stack, executing the syscall, and returning the results back to the caller - which should be coming from Program.cs!
Makes sense now? Perfect! Consider yourself a graduate of syscall academy! 👨🎓
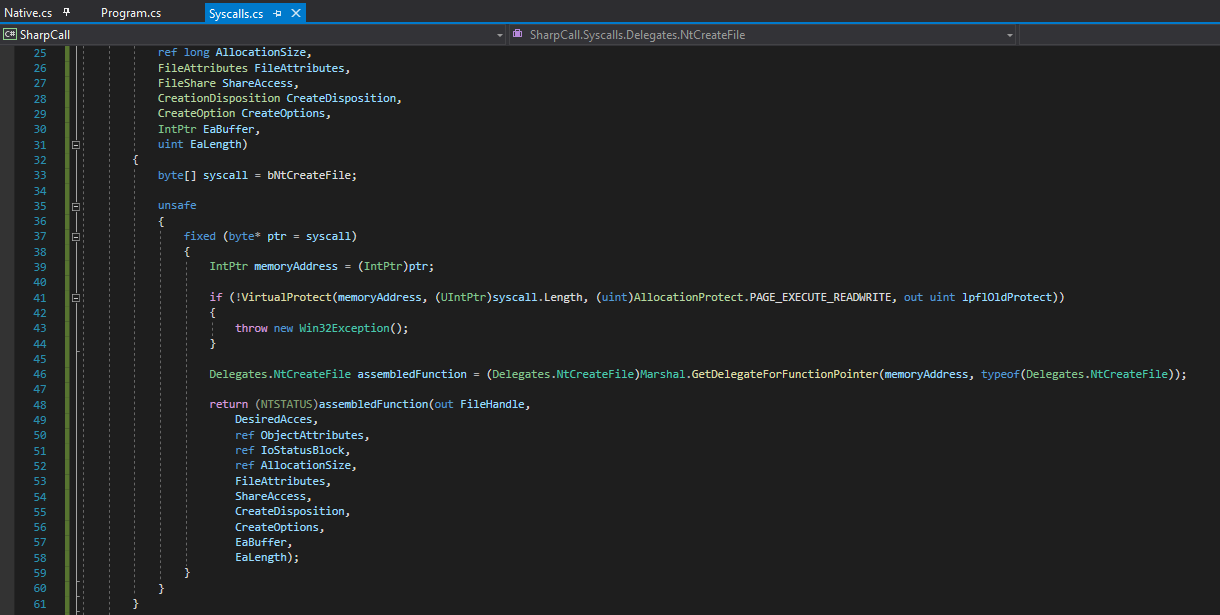
Okay, with all that explained let’s go ahead and implement our Marshal.GetDelegateForFunctionPointer conversion by first instantiating our NtCreateFile delegate and calling it assembledFunction. Once done, let’s carry out the conversion of our unmanaged pointer to our delegate.
After that’s completed, we can write a simple return statement to return all the parameters from our syscall via the instantiated assembledFunction delegate.
Our finalized Syscall.cs code should now look like the following.
And there we have it, the finalized version of how our syscall will execute once it’s function is called!
Executing our Syscall
So, we implemented our syscall logic, now all that’s left to do is to actually write the code in our program to utilize the NtCreateFile function, which will initially execute our syscall.
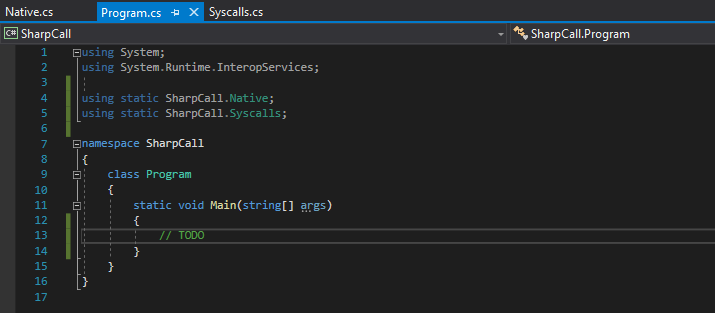
For starters, let’s make sure we import our static classes so that we can use all our native functions and our syscall, like so.
Once that’s done, we can start initializing the structures and variables required by NtCreateFile, such as the file handle and object attributes.
But before we do that, let me just state one thing. The OBJECT_ATTRIBUTES, specifically it’s ObjectName member, requires a pointer to a UNICODE_STRING that contains the name of the object for which a handle is to be opened. Specifically this is the file name that we want to create.
Now, for unmanaged code, to initialize this structure we need to call the RtlUnicodeStringInit function.
So, let’s make sure we add that function inside our Native.cs file so we can utilize that function.
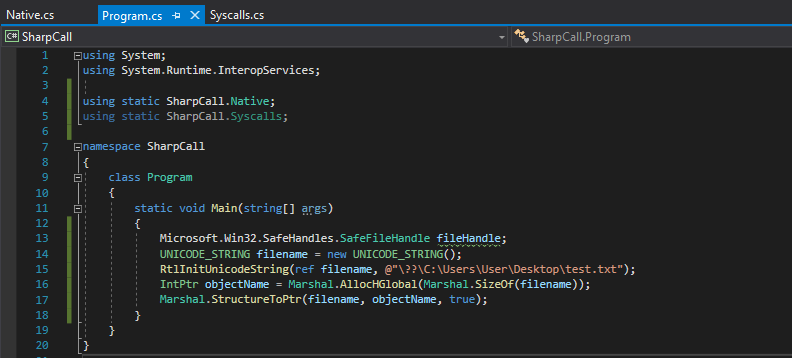
Once we have that, we can then go ahead and initialize our first few structures. We’ll create our file handle, as well as our unicode string structure.
We’ll opt for saving our test file to our desktop, so we’ll set the filename path to be C:\Users\User\Desktop.test.txt as shown below.
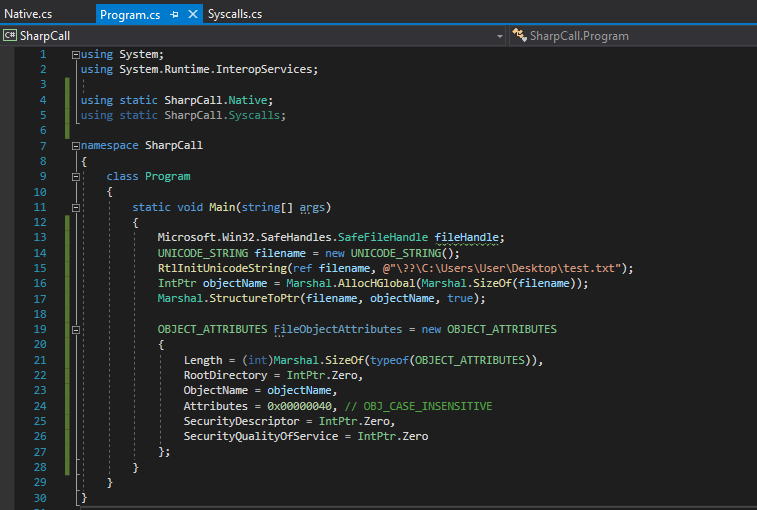
After completing that, we can now initialize our OBJECT_ATTRIBUTES structure.
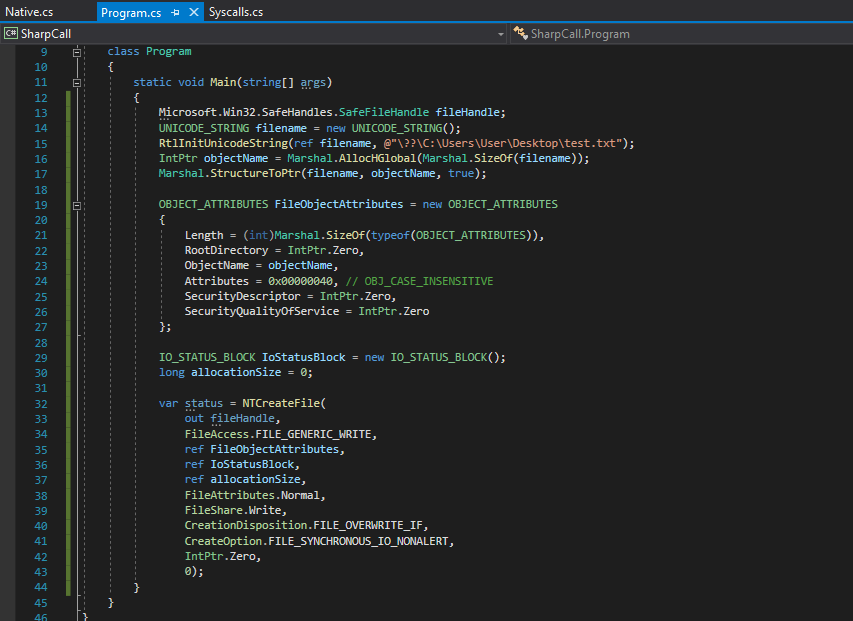
Finally all that’s left to do is to initialize the IO_STATUS_BLOCK structure, and call our NtCreateFile delegate along with it’s parameters to execute the syscall!
After writing all that, your final Program.cs file should look like the following.
Awesome, we finally completed our code! Now comes the most important part - compiling the code!
In Visual Studio make sure we change the Solution Configuration to “Release”. From there, in the toolbar above, click on Build –> Build Solution.
After a few seconds you should see the following output, which shows us that compilation was successful!
Okay, let’s not get too excited! The code might still fail during testing, but I’m sure it won’t! 😁
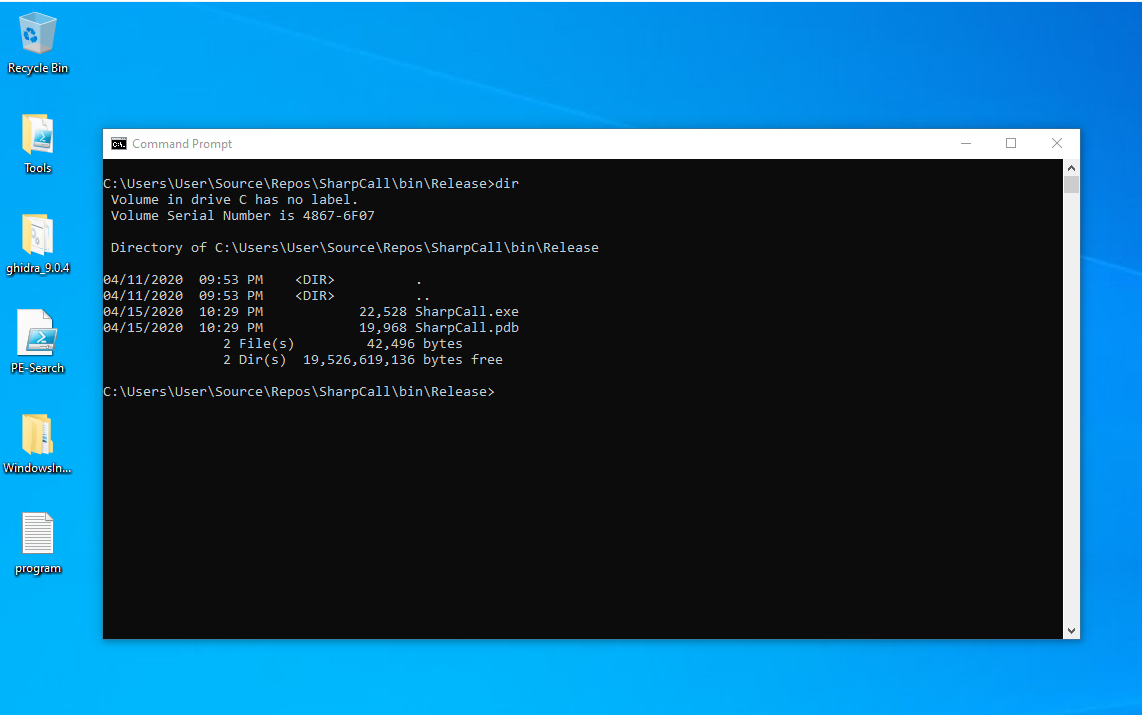
To test our newly compiled code, let’s open up command prompt and navigate to where our project is compiled. In my case that’s C:\Users\User\Source\Repos\SharpCall\bin\Release\.
As you can see, there is no test.txt file on my desktop, as shown below.
If everything goes well, then upon executing our SharpCall.exe executable, our syscall should be executed, and a new test.txt file should be created on the desktop.
Alright, the moment of truth. Let’s see this bad boy in action!
And there we have it! Our code works and were able to successfully execute our syscall!
But, how can we be so sure that it was the syscall that executed and not just the native api function from ntdll?
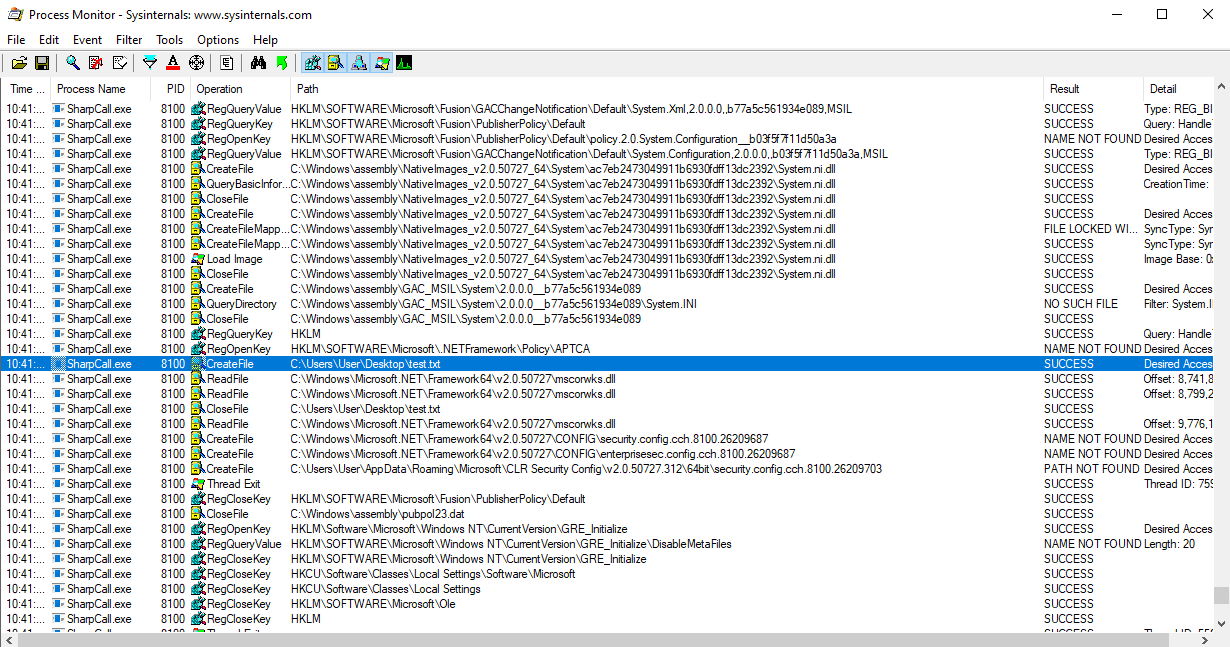
Well to make sure that it was our syscall that executed, we can once again utilize Process Monitor to monitor our executable.
From here, we can view specific Read/Write operation properties and their call stack.
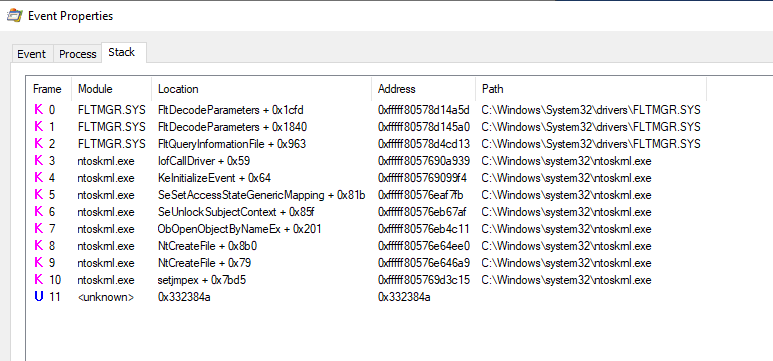
After monitoring the process during execution, we see that there was one CreateFile operation for our test.txt file. If we were to view the call stack of that operation, we would see the following.
Well look at that! No calls from or to ntdll were made! Just a simple syscall from an unknown memory location to ntoskrnl.exe! We made a valid syscall!
This essentially would bypass any API hooking if there was one implemented on NtCreateFile! 😈
Closing
And there we have it ladies and gentleman! After learning a lot about Windows Internals, Syscalls, and C#, you should now be able to utilize what you learned here to create your own syscalls in C#!
The final code for this project has been added to the SharpCall reposiroty on my Github.
Now I did mention at the start of this blog post that I’ll post a few links to projects that utilize that same functionality. So if you get stuck or just want some inspiration then I suggest you look at the following projects.
Alright, we’ll that’s pretty much it! I really appreciate everyone for reading these blog posts and for making Part 1 such a shocking success! I wasn’t expecting it to be so well received. Hopefully you enjoyed this part as much as part 1, and I also hope you learned something new!
Thanks for reading everyone! Cheers!


Leave a Comment