
Web browsers, our extensive gateway to the internet. Browsers today play a vital role in modern organizations as more and more software applications are delivered to users via a web browser in the form of web applications. Pretty much everything you might have done on the internet involves the use of a web browser, and as a result, browsers are among the most utilized consumer facing software products on the planet.
As the gateway to the internet, browsers also introduce significant risks to the integrity of personal computing devices. We hear it almost on a daily basis now, “Google Chrome Bug Actively Exploited as Zero-Day”, or “Google Confirms Chrome’s Fourth Zero-Day Exploit In 2022”. In fact, browser exploits are nothing new, they’ve been occurring for years now with the first known documented remote-code-execution exploit being CVE-1999-0280. The first potentially public disclosure of a browser exploit being used in the wild was the “Aurora” Internet Explorer exploit which affected Google back in December of 2010.
My interest in web browsers first sparked back in 2018 when my buddy Michael Weber introduced me to Offensive Browser Extension Development which really opened my eyes to the potential attack surface. Afterwards, I started to dig deeper into Chrome’s internals and started to become very interested in web browser exploitation. Because let’s be honest here, what kind of Red Team wouldn’t want a “one-click” or even a “no-click” web browser exploit?
When it comes to browsers in the world of security research, they are considered some of the most impressive targets to find vulnerabilities in. They’re also unfortunately some of the most complicated to look at, as the amount of prerequisite knowledge required to even begin researching browser internals makes it seem like an unattainable goal for many researchers.
In spite of that, I took the steps to dive in by taking maxpl0it’s amazing “Introduction to Hard Target Internals” training course. Which I highly recommend you take! This course provided me with a lot of background information on the inner workings and internals of browsers such as Chrome and Firefox. Afterwards, I was off to the races reading everything I could from Chromium blogs to v8 dev posts.
Since my learning method is more of a “learn it, teach it, know it” style, I am releasing this “Chrome Browser Exploitation” blog post series to give you an introduction to browser internals and to explore Chrome browser exploitation on Windows in more depth, all while learning it myself.
Now you might be asking me, why Chrome and why Windows? Well, two reasons:
- Chrome has a market share of ~73%, making it the most widely used browser in the world.
- Windows has a market share of ~90%, making it also the most widely used OS in the world.
By learning to target the most widely used software in the world, as a Red Team, this makes our chances of finding bugs, writing exploits, and successfully using them in engagements much more likely.
WARNING Due to the massive complexity of browsers, JavaScript engines, and JIT compilers, these blog posts will be very, very heavy reads.
Currently, this will be a three (3) post blog series. But, depending on the complexity and amount of information covered, I might split up the material to multiple additional posts.
Do note - I am writing these blog posts as I learn along the way. So please bare with me as it might take some time for me to release follow up posts to this series.
With that being said, if you notice that I made a mistake in my posts, or am misleading the reader, then please reach out to me! Also, any recommendations, constructive criticism, critical feedback, etc. is very much appreciated!
Overall, by the end of this blog post series we will cover everything we need to know to start researching and exploiting potential Chrome bugs. In the final post of this series, we will attempt to exploit CVE-2018-17463 which was a JIT Compiler Vulnerability in Chrome v8’s Optimizer (TurboFan) discovered by Samuel Gross.
So, without further ado - let’s jump into the deep end and into the complex world of browser exploitation!
In today’s blog post, we will cover the basic prerequisite concepts that we need to fully understand before we dig any deeper. The following topics will be discussed:
- The Flow of JavaScript Engines
- JavaScript Engine Compiler Pipeline
- Stack & Register Machines
- JavaScript and V8 Internals
- Object Representation
- HiddenClasses (Map)
- Shape (Map) Transitions
- Properties
- Elements and Arrays
- Viewing Chrome Objects In-Memory
- Pointer Tagging
- Pointer Compression
But, before we begin, make sure to compile v8 and d8 on Windows to follow along. You can read my “Building Chrome V8 on Windows” gist for detailed instructions on how to do so.
The Flow of JavaScript Engines
We start our journey of browser internals by first understanding what JavaScript engines are and how they work. JavaScript engines are an integral part to the execution of JavaScript code on systems. Previously, they were mere interpreters, but today, modern JavaScript engines are complex programs that include a multitude of performance improving components such as optimizing-compilers and Just-In-Time (JIT) compilation.
There’s actually a multitude of different JS engines in use today, such as:
- V8 - Google’s open source high-performance JavaScript and WebAssembly engine, used in Chrome.
- SpiderMonkey - Mozilla’s JavaScript and WebAssembly Engine, used in Firefox.
- Charka - A proprietary JScript engine developed by Microsoft for use in IE and Edge.
- JavaScriptCore - Apple’s built-in JavaScript engine for WebKit use in Safari.
So why do we need these JavaScript engines, and all it’s complexities?
Well as we know, JavaScript is a lightweight, interpreted, object-oriented scripting language. In interpreted languages, the code is ran line-by-line and the result of running the code is immediately returned, so we don’t have to compile the code into a different form before the browser runs it. This usually doesn’t make such languages any good due to performance reasons. In that case, this is where compilation such as Just-In-Time compilation is involved; where JavaScript code is parsed into bytecode (which is an abstraction of machine code) and is then further optimized by JIT to make the code much more efficient and in a sense “fast”.
Now, while each of the above-mentioned JavaScript engines can have different compilers and optimizers, all of them are pretty much designed and implemented the same way based on the EcmaScript standard (also used interchangeably with JavaScript). The EcmaScript specification details how JavaScript should be implemented by the browser so that a JavaScript program will run exactly the same way in all browsers.
So, what really goes on after we execute JavaScript code? Well, to detail that, I have provided a diagram below that shows a high-level overview of the general “flow” or also known as the compilation pipeline of JavaScript engines.
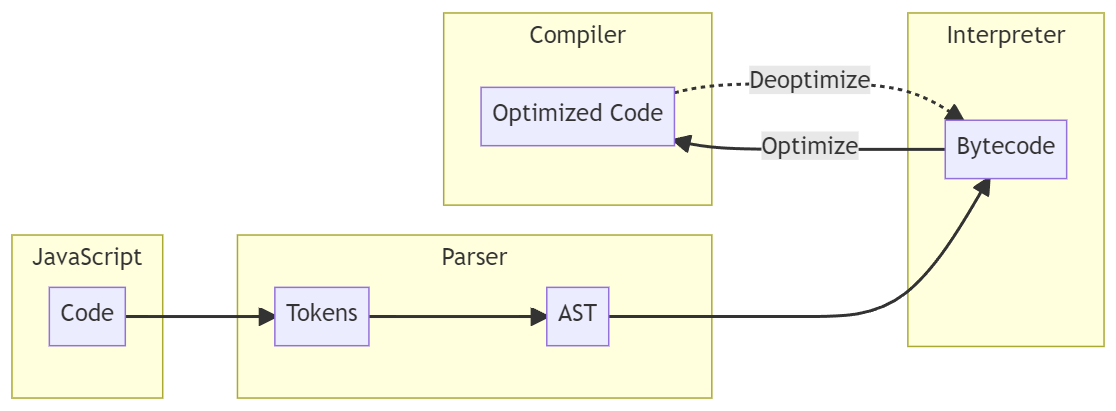
This might look confusing at first, but don’t worry - it really isn’t too hard to understand. So, let’s break down the “flow” step by step and explain what each of these components does.
- Parser: Once we execute JavaScript code, the code is passed into the JavaScript engine and we enter our first step, and that’s parsing the code. The parser converts the code into the following:
- Tokens: The code is first broken down into “tokens”, such as Identifier, Number, String, Operator, etc. This is known as “Lexical Analysis” or “Tokenizing”.
- Example:
var num = 42gets broken down tovar,num,=,42and each “token” or item is then tagged with its type, so in this case it would beKeyword,Identifier,Operator,Number.
- Example:
- Abstract Syntax Tree (AST): Once the code has been parsed into tokens, the parser will convert those tokens into an AST. This part is called “Syntax Analysis” and it does what it says, it checks to make sure there are no syntax errors in the code.
- Example: Using the above code example, the AST for that will look like so:
{
  "type": "VariableDeclaration",
  "start": 0,
  "end": 13,
  "declarations": [
 {
"type": "VariableDeclarator",
"start": 4,
"end": 12,
"id": {
  "type": "Identifier",
  "start": 4,
  "end": 7,
  "name": "num"
},
"init": {
  "type": "Literal",
  "start": 10,
  "end": 12,
  "value": 42,
  "raw": "42"
}
 }
  ],
  "kind": "var"
}
- Example: Using the above code example, the AST for that will look like so:
- Tokens: The code is first broken down into “tokens”, such as Identifier, Number, String, Operator, etc. This is known as “Lexical Analysis” or “Tokenizing”.
- Interpreter: Once an AST has been generated, it’s then passed into the Interpreter which walks the AST and generates bytecode. Once the bytecode has been generated, it is executed and the AST is deleted.
- A list of Bytecodes for V8 can be found here.
- An example of the bytecode for
var num = 42;is shown below:LdaConstant [0] Star1 Mov <closure>, r2 CallRuntime [DeclareGlobals], r1-r2 LdaSmi [42] StaGlobal [1], [0] LdaUndefined Return
- Compiler: The compiler works ahead of time by using something called a “Profiler” which monitors and watches code that should be optimized. If there is something known as a “hot function” the compiler takes that function and generates optimized machine code to execute. Otherwise, if it sees that a “hot function” that was optimized is no longer used, it will “deoptimize” it back to bytecode.
When it comes to Google’s V8 JavaScript engine, the compilation pipeline is pretty similar. Although, V8 includes an additional “non-optimizing” compiler which was recently added back in 2021. Now each component of V8 has a specific name to it, and they are as follows:
- Ignition: V8’s fast low-level register-based interpreter that generates the bytecode.
- SparkPlug: V8’s new non-optimizing JavaScript compiler that compiles from bytecode, by iterating the bytecode and emitting machine code for each bytecode as it is visited.
- TurboFan: V8’s optimizing compiler that translates bytecode into machine code with more numerous, and more sophisticated code optimizations. It also includes JIT (Just-In-Time) compilation.
Putting that all together, the V8 compilation pipeline from a high-level overview is as follows:

Now, don’t worry if some of these concepts or features like compilers and optimizations don’t make sense currently. It’s not necessary that we understand the whole compilation pipeline for today’s post, but we should have a general idea of how the engine works as a whole. We’ll cover the V8 pipeline and its components in more depth within the second post of this series.
Till then, if you want to learn more about the pipeline, I suggest watching “JavaScript Engines: The Good Parts” to get a better understanding.
The only thing you should understand from this compilation pipeline currently is that the Interpreter is a “stack machine” or basically a VM (Virtual Machine) where bytecode is executed. In terms of Ignition (V8’s Interpreter) the interpreter is actually a “register machine” with an accumulator register. Ignition still uses a stack, but it prefers to store things in registers to speed things up.
I suggest you read “Understanding V8’s Bytecode” and “Firing up the Ignition Interpreter” to get a better grasp of these concepts.
JavaScript and V8 Internals
Now that we have some basic knowledge of how a JavaScript engine and its compiler pipeline is structured, it’s time we dig a little deeper into the internals of JavaScript itself and see how V8 stores and represents JavaScript objects in memory, along with their values and properties.
This section is single handedly one of the most important pieces that you need to understand if you want to exploit bugs in V8, and other JavaScript engines as well. Because, as it turns out, all major engines implement the JavaScript object model in a similar fashion.
As we know, JavaScript is a dynamically typed language. Meaning, that type information is associated with runtime values rather than compile-time variables like in C++. This means that any object within JavaScript can have its properties easily modified during runtime. The JavaScript type system defines data types such as Undefined, Null, Boolean, String, Symbol, Number, and Object (including arrays and functions).
In simple terms, what does this mean? Well, it generally means that an object, or primitive such as var in JavaScript can change its data type throughout its runtime, unlike in C++. For example, let’s set a new variable called item in JavaScript and set it to 42.
var item = 42;
By using the typeof operator on the item variable, we can see that it returns its data type - which will be Number.
typeof item
'number'
Now what would happen if we try setting item to a string and then check it’s data type?
item = "Hello!";
typeof item
'string'
Look at that, the item variable is now set to the data type of String and not Number. This is what makes JavaScript “dynamic” in nature. Unlike in C++, if we tried creating an int or integer variable and later tried setting it to a string, it would fail - like so:
int item = 3;
item = "Hello!"; // error: invalid conversion from 'const char*' to 'int'
//     ^~~~~~~~
While this is cool in JavaScript, it does pose a problem for us. V8 and Ignition are written in C++ so the Interpreter and Compiler need to figure out how JavaScript is intending to use some of the data. This is critical for efficient code compilation especially because in C++ there are differences in memory sizes for data types such as int or char.
Aside from efficiency, this also is critical to security since if the Interpreter and Compiler “interpret” the JavaScript code wrong and we get a dictionary object instead of an array object, we now have a Type Confusion vulnerability.
So how does V8 store all of this information with every runtime value, and how does the engine stay efficient?
Well, in V8, this is accomplished through the use of a dedicated information type object called a Map (not to be confused with Map Objects) which is otherwise known as a “Hidden Class”. At times you might hear a Map be referred to as a “Shape”, especially in Mozilla’s SpiderMonkey JavaScript engine. V8 also uses something called pointer compression or pointer tagging in memory (which we will discuss later in this post) to reduce memory consumption and allows V8 to represent any value in memory as a pointer to an object.
But, before we get too deep into the weeds of how all of those function, we first have to understand what are JavaScript Objects and how they are represented within V8.
Object Representation
In JavaScript, Objects are essentially a collection of properties which are stored as key, value pairs - essentially this means that objects behave like dictionaries. Objects can be Arrays, Functions, Booleans, RegExp, etc.
Each object in JavaScript has properties associated with it, which can simply be explained as a variable that helps define the characteristics of the object. For example, a newly created car object can have properties such as make, model, and year that help define what the car object is. You can access the properties of an object either through a simple dot-notation operator such as objectName.propertyName or through bracket notation such as objectName['propertyName'].
Additionally, each objects property maps to property attributes, which are used to define and explain the state of the objects properties. An example of what these property attributes look like within a JavaScript object can be seen below.

Now that we understand a little bit about what an object is, the next step is to understand how that object is structured in memory and where it’s stored.
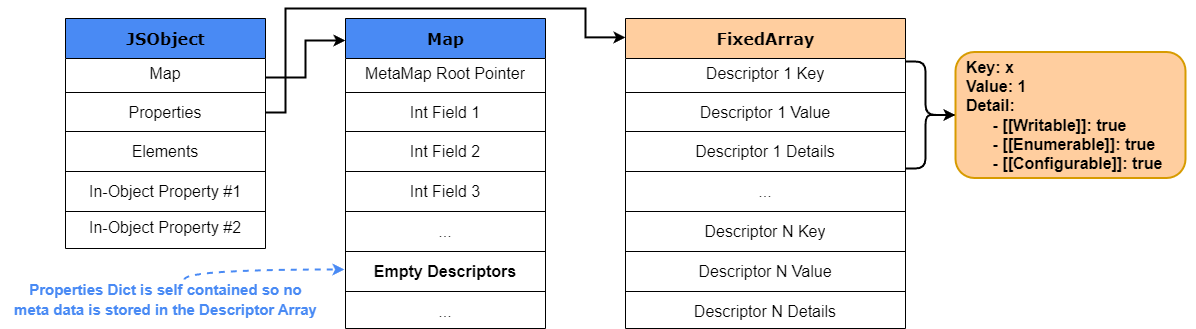
Whenever an object is created, V8 creates a new JSObject and allocates memory for it on the heap. The value of the object is a pointer to the JSObject which contains the following within its structure:
- Map: A pointer to the HiddenClass object that details the “shape” or structure of the object.
- Properties: A pointer to an object containing named properties.
- Elements: A pointer to an object containing numbered properties.
- In-Object Properties: Pointers to named properties that were defined at object initialization.
To help you in visualizing that, the image below details how a basic V8 JSObject is structured in memory.
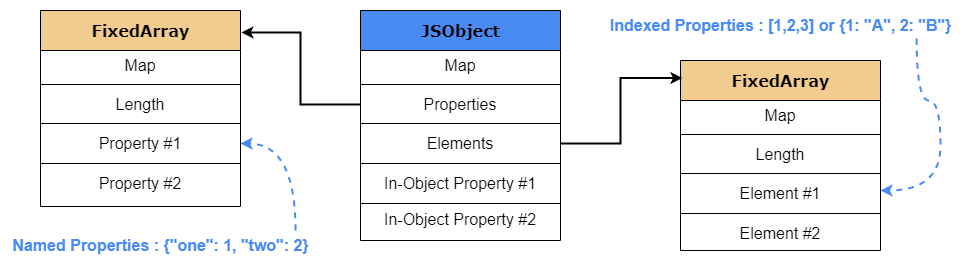
Looking into the JSObject structure we can see that the Properties and Elements are stored in two separate FixedArray data structures which makes adding and accessing properties or elements more efficient. The elements structure predominantly stores non-negative integers or array-indexed properties (keys), which are commonly known as elements. As for the properties structure, if the property key of an object is not a non-negative integer, like a string, the property will be stored either as an Inline-Object Property (explained later in the post) or within the properties structure, also sometimes referred to as an objects properties backing store.
One thing we must note is that while named properties are stored in a similar way as elements of an array, they are not the same when it comes to property access. Unlike elements, we cannot simply use the key to find the named properties position within the properties array; we need some additional metadata. As mentioned before, V8 utilizes a special object called a HiddenClass or Map that’s associated to each JSObject. This Map stores all the information on JavaScript objects which in turn allows V8 to be “dynamic”.
So, before we go any further into understanding the JSObject structure and its properties, we first need to look at and understand how this HiddenClass works in V8.
HiddenClass (Map) and Shape Transitions
As discussed previously, we know that JavaScript is a dynamically typed language. In particular, because of this, there is no concept of classes in JavaScript. In C++ if you create a class or object then you cannot add or delete methods and properties from it on the fly, unlike in JavaScript. In C++ and other object-oriented languages, you can store object properties at fixed memory offsets because the object layout for an instance of a given class will never change, but in JavaScript it can dynamically change during runtime. To combat this, JavaScript uses something called “prototype-based-inheritance”, where each object has a reference to a prototype object or “shape” whose properties it incorporates.
So how does V8 store an object’s layout?
This is where the HiddenClass or Map come into play. Hidden classes work similarly to a fixed object layout where the values of properties (or pointers to those properties) can be stored in a specific memory structure and then accessed with a fixed-offset between each one. These offsets are generated by Torque and can be found in within the /torque-generated/src/objects/*.tq.inc directory in V8. This pretty much serves as an identifier for the “shape” of an object, which in turn allows V8 to better optimize the JavaScript code and improve property access time.
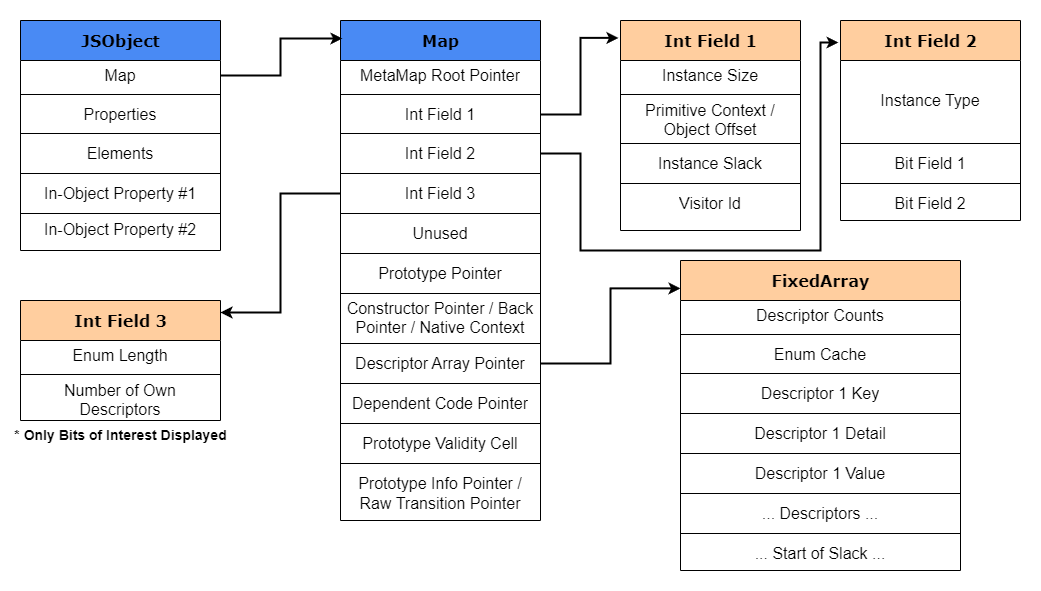
As previously seen in the JSObject example above, the Map is another data structure within the object. That Map structure contains the following information:
- The dynamic type of the object, such as String, JSArray, HeapNumber, etc.
- Object Types in V8 are listed in
/src/objects/objects.h
- Object Types in V8 are listed in
- Size of the object (in-object properties, etc.)
- Object properties and where they are stored
- Type of array elements
- Prototype or Shape of the object (if any)
To help in visualizing how the Map object looks like in memory, I have provided a rather detailed V8 Map structure in the image below. More information on the structures can be found within V8’s source code and can be located within the /src/objects/map.h and /src/objects/descriptor-array.h source files.
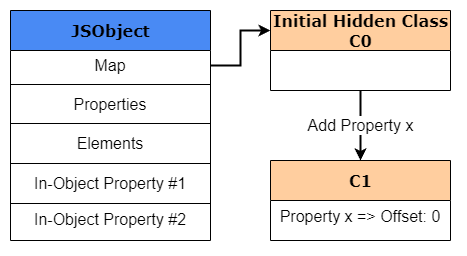
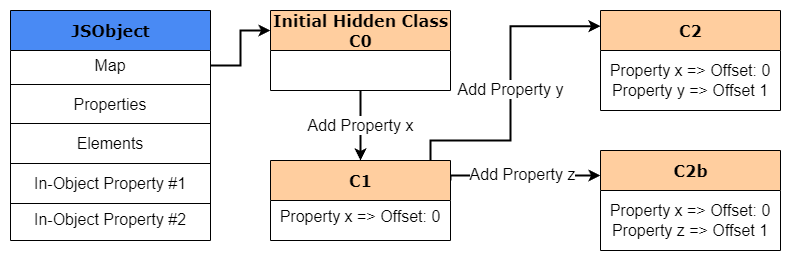
Now that we understand how the layout of the Map looks like, let’s explain this “shape” that we constantly talk about. As you know, every newly created JSObject will have a hidden class of its own, which contains the memory offset for each of its properties. Here’s the interesting part; if at any time that object’s property is created, deleted or changed dynamically, then a new hidden class will be created. This new hidden class keeps the information of the existing properties with the inclusion of the memory offset to the new property. Now do note, that a new hidden class is only created when a new property is added, adding an array-indexed property does not create new hidden classes.
So how does this look like in practice? Well let’s take the following code for example:
var obj1 = {};
obj1.x = 1;
obj1.y = 2;
At the start we create a new object called obj1, which is created and stored within V8’s heap. Since this is a newly created object, we need to create a HiddenClass (obviously), even though no properties have been defined for this object yet. This HiddenClass is also created and stored within V8’s heap. For our example purposes, we’ll call this initial hidden class “C0”.

Once the next line of the code is reached and obj1.x = 1 is executed, V8 will create a second hidden class called “C1” that is based off of C0. C1 will be the first HiddenClass to describe the location of where property x can be found in memory. But, instead of storing the pointer to the value for x it actually will store the offset for x which will be at offset 0.
Okay, I know that at this point some of you might ask, “why an offset to the property and not to it’s value”?
Well, in V8 this is an optimization trick. Maps are relatively expensive objects in terms of memory usage. If we store the key, value pairs of properties in a dictionary format within every newly created JSObject then that’s going to cause a lot of computational overhead as parsing dictionaries is slow. Second of all, what happens if a new object, such as obj2 is created which shares the same properties of obj1 such as x and y? Even though the values might be different the two objects actually share the same named properties in the same order, or as we would call it, the same “shape”. In that case it would be wasteful for us to store the same property name in two different locations.
This is what allows V8 to be fast, it’s optimized so that a Map is shared as much as possible between similarly shaped objects. Since the property names are repeated for all objects within the same shape and because they’re in the same order, we can have multiple objects point to one single HiddenClass in memory with the offset to the properties instead of pointers to values. This also allows for easier garbage collection since Map’s are allocations of a HeapObject just like the JSObject is.
To better explain this concept, let’s side track for a moment from our example above and look at the important parts of the HiddenClass. The two most important parts of the HiddenClass that allow for the Map to have its “shape” is the DescriptorArray and the third bit field. If you look back into the Map structure above, you’ll notice that the third bit field stores the number of properties, and the descriptor array contains information about the named properties like the name itself, the position where the value is stored (offset), and the properties attributes.
For example, let’s say we create a new object such as var obj {x: 1}. The x property is going to be stored within the In-Object properties or Properties store of the JavaScript object. Since a new object is created, a new HiddenClass will also be created. Within that HiddenClass the descriptor array and the third bit field will be populated. The third bit field will set the numberOfOwnDescriptors to 1, since we only have one property, and then descriptor array will populate the key, details, and value portions of the array with details relating to property x. The value for that descriptor will be set to 0. Why 0? Well, the In-Object properties and the Properties store are just an array. So, by setting the value of the descriptor to 0, V8 knows that the keys value will be at offset 0 of that array for any object of the same shape.
A visual example of what we just explained can be seen below.

Let’s see how this looks like within V8. To start let’s launch d8 with the --allow-natives-syntax parameter, and execute the following JavaScript code:
d8> var obj1 = {a: 1, b: 2, c: 3}
Once completed, we’ll utilize the %DebugPrint() command against our object to display it’s properties, map, and other information such as the instance descriptor. Once executed, notice the following:

In Yellow we can see our object obj1. In Red we have the pointer to our HiddenClass or Map. Within that HiddenClass we have the instance descriptor which points to the DescriptorArray. Using the %DebugPrintPtr() function against the pointer to that array we can see more details on how that array looks like in memory, which is highlighted in Blue.
Take note, we have three properties, which matches the number of descriptors in the instance descriptors section of the map. Below that, we can see that the descriptor array holds our property keys, and the const data field holds the offsets to their associated values within the property store. Now, if we follow the arrow back up from the offsets to our object, we will notice that the offsets do match, and each property has its correct value assigned.
Also, take note on the right side of those properties you can see the location for each of those properties; which are in-object as I previously mentioned. This pretty much proves to us that the offsets are to the properties within the In-Object and Properties store.
Alright, now that we understand why we are using offsets, let’s go back to our HiddenClass example from before. As we said before, by adding property x to obj1, we will now have a newly created HiddenClass called “C1” with the offset to x. Since we are creating a new HiddenClass, V8 will update C0 with a “class transition” which states that if a new object is created with the property of x, then the hidden class should switch directly to C1.
The process is then repeated when we execute obj1.y = 2. A new hidden class called C2 will be created, and a class transition is added to C1 stating that for any object with property x, if property y is added, then the hidden class should transition to C2. In the end, all of these class transitions create something known as a “transition tree”.

Adding on, one must note that class transitions are dependent on the order in which properties are added to an object. So, in case that z was added after y, the “shape” would no longer be the same and follow the same transition path from C1 to C2. Instead, a new hidden class will be created and a new transition path would be added from C1 to account for that new property, further expanding the transition tree.
Now that we understand this, let’s take a look into how objects look like in memory when a Map is shared between two objects of the same shape.
To start, launch d8 again with the --allow-natives-syntax parameter, and then enter the following two lines of JavaScript code:
d8> var obj1 = {x: 1, y: 2};
d8> var obj2 = {x: 2, y: 3};
Once completed, we’ll again utilize the %DebugPrint() command against each of our objects to display their properties, map, and other information. Once executed, notice the following:
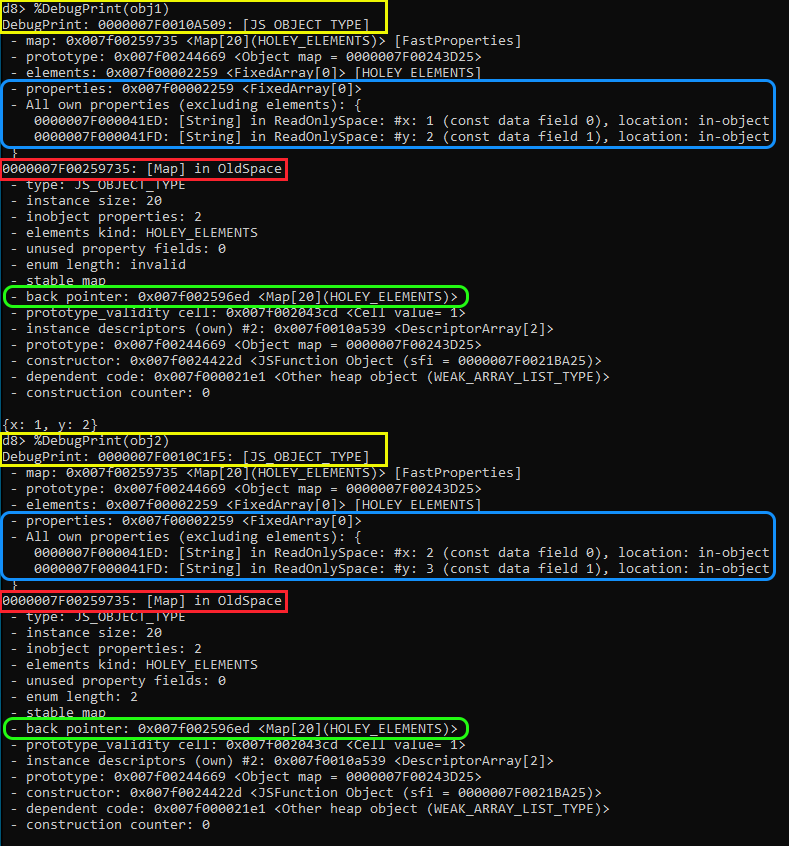
In Yellow we can see both of our objects, obj1 and obj2. Take note that each is a JS_OBJECT_TYPE with a different memory address in the heap, because obviously they’re separate objects with potentially different properties.
As we know, both of these objects share the same shape, since they both contain x and y in the same order. In that case, in Blue, we can see that the properties are in the same FixedArray with the offset for x and y being 0 and 1 respectively. The reason for this is because as we already know, same shaped objects share a HiddenClass (represented in Red) that will have the same descriptor array.
As you can see, most of the object’s properties and the Map addresses will be the same, all because both of these objects are sharing that single Map.
Now let’s focus on the back_pointer that’s highlighted in Green. If you look back into our C0 to C2 Map transition example, you’ll notice that we mentioned something called a “transition tree”. This transition tree is created in the background by V8 each time a new HiddenClass is created and allows V8 to link the new and old HiddenClasses together. This back_pointer is part of that transition tree as it points back to the parent map of where the transition occurred from. This allows V8 to walk the back pointer chain until it finds the map holding an objects properties, i.e. their shape.
Let’s use d8 to take a deeper look into how that works. We’ll use the %DebugPrintPtr() command again to print the details of an address pointer in V8. In this case we will take the back_pointer address to view its details. Once done, your output should be similar to mines.
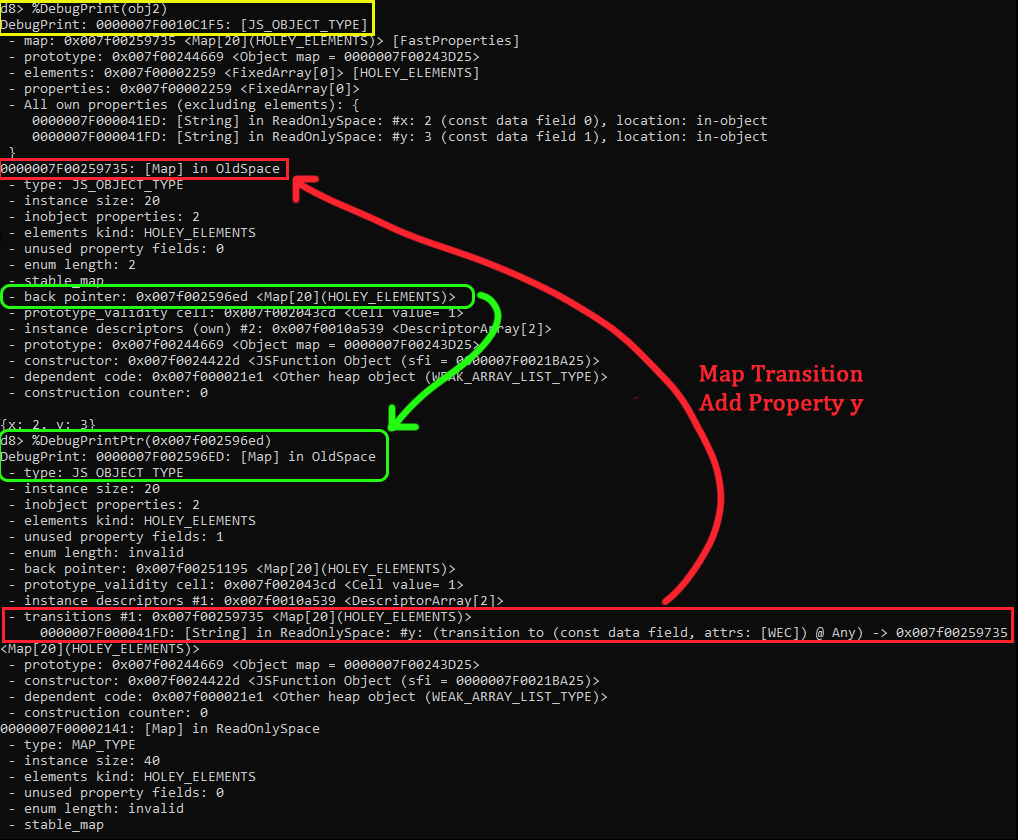
In Green we can see that the back_pointer resolves to a JS_OBJECT_TYPE in memory, which in fact turns out to be a Map! This map is that C1 map that we talked about previously. We know how a Map can backtrack to its previous Map, but how does it know what Map to transition to when there is a property added? Well, if we pay close attention to the information within that Map, we’ll notice that below the instance descriptor pointer there is a “transitions” section in Red. This transition section contains the information pointed to by the Raw Transition Pointer within the Map structure.
In V8, Map transitions use something called a TransitionsAccessor. This is a helper class that encapsulates access to the various ways a Map can store transitions to other maps in its respective field at Map::kTransitionsOrPrototypeInfo other known as the Raw Transition Pointer that we mentioned earlier. This pointer points to something known as a TransitionArray which again is a FixedArray that holds map transitions for property changes.
Looking back into the Red highlighted section, we can see that there is only one transition in that transition array. Within that array we can see that transition #1 details a transition for when the y property is added to the object. If y is added, it tells the map to update itself with the map stored in 0x007f00259735 which matches our current map! In the case that there was another transition, for example, z was added to x instead of y, then we would have two items within that transition array, each pointing to its respective map for that objects shape.
NOTE: If you would like to play around with Maps and have another visual representation of Map transitions, I recommend utilizing V8’s Indicium tool. The tools is a unified web interface that allows one to trace, debug and analyze patterns of how Maps are created and modified in real-world applications.
Now, what would happen to the transition tree if we deleted a property? Well, in this case there is a nuance to V8 creating a new map each time a property deletion occurs. As we know, maps are relatively expensive when it comes to memory usage, so at a certain point the cost of inheriting and maintaining a transition tree will get larger and slower. In the case the last property of an object is deleted, the Map will just adjust the back pointer to go back to its previous map, instead of creating a new one. But what happens if we delete the middle property of an object? Well in that case V8 will give up on maintaining the transition tree whenever we are adding too many attributes or deleting non-last elements, and it’ll switch to a slower mode known as dictionary mode.
So, what is this dictionary mode? Well, now that we know how V8 uses HiddenClasses to track the shape of objects, we can now go back full circle and dive into further understanding how these Properties and Elements are actually stored and handled in V8.
Properties
As explained previously, we know that JavaScript objects have two fundamental kinds of properties: named properties and indexed elements. We’ll start by covering named properties.
If you recall back to our discussion on Maps and the Descriptor Array, we mentioned named properties being stored either In-Object or within the Property array. What is this In-Object Property that we are talking about?
Well, in V8 this mode is a very fast method of storing properties directly on the object since they are accessible without any indirection. Although they are very fast, they are also limited to the initial size of the object. If more properties get added than there is space in the object, then the new properties are stored within the properties store - which adds one level of indirection.
In general, there are two “modes” that JavaScript engines use to store properties, and those are called:
- Fast Properties: Typically used to define the properties stored in the linear properties store. These properties are simply accessed by index in the properties store by consulting the Descriptor Array array within the HiddenClass.
- Slow Properties: Also known as “dictionary mode”, this mode is utilized when there are too many properties being added or deleted - resulting in a lot of memory overhead. As a result, an object with slow properties will have a self-contained dictionary as a properties store. All the properties meta information is no longer stored in the Descriptor Array in the HiddenClass but directly in the properties dictionary. V8 will then use a hash table to access these properties.
An example of how a Map would look like when it transitions to slow properties with the self-contained dictionary can be seen below.
One thing must be noted here as well. Shape transitions only work for fast properties and not slow properties due to the fact that dictionary shapes are used by a single object only, so they can’t be shared between different objects and therefore have no transitions.
Elements
Alright, at this point we pretty much covered named properties. Now let’s take a look at array-indexed properties or elements. One would think that the handling of indexed properties would be less complex… but you would be wrong to assume that. The handling of elements is no less complex then named properties. Even though all indexed properties are kept in the elements store, V8 makes a very precise distinction on what kind of elements each array contains. There is actually ~21 different types of elements that can be tracked within that store! This initially allows V8 to optimize any operations on the array specifically for that type of element.
What do I mean by that? Well, let’s take this line of code for example:
const array = [1,2,3];
In JavaScript if we run the typeof operation against this, it would say that the array contains numbers because JavaScript does not distinguish the difference between an integer, float, or double. However, V8 makes much more precise distinctions and will classify this array as a PACKED_SMI_ELEMENTS, with SMI referring to Small Integers.
So, what’s with the SMI? Well, V8 keeps track of what kind of elements each array contains. It then uses this information to optimize array operations for this type of element. Within V8 there are three distinct element types that we need to know about, and they are:
SMI_ELEMENTS- Used to represent an array that contains small integers, such as 1,2,3, etc.DOUBLE_ELEMENTS- Used to represent an array that contains floating-point numbers, such as 4.5, 5.5, etc.ELEMENTS- Used to represent an array that contains string literal elements or values that cannot be represented as an SMI or Double, such as ‘x’.
So how does V8 use these element types for an array? Are they set for the array or for each element? The answer is that the element type is set for the array. The important thing we have to remember is that element kinds have a “transition” that only go in one direction. We can view this transition tree from a “top down” approach as such.
![]()
For example, let’s take our array example from before:
const array = [1,2,3];
// Elements Kind: PACKED_SMI_ELEMENTS
As you can see, V8 tracks this array’s elements kind as a packed SMI (we’ll detail what packed is in a moment). Now, if we were to add a floating-point number, then the array’s elements kind would “transition” to the Double elements kind, as such.
const array = [1,2,3];
// Elements Kind: PACKED_SMI_ELEMENTS
array.push(3.337)
// Elements Kind: PACKED_DOUBLE_ELEMENTS
The reason for this transition is simple, operation optimizations. Because we have a floating-point integer, V8 needs to be able to perform optimizations on those values so it transitions down one step to DOUBLES because a set of numbers that can be represented as a SMI is a subset of the numbers that can be represented as a double.
Since elements kind transitions go one way, once an array is marked with a lower elements kind, such as PACKED_DOUBLES_ELEMENTS it can no longer go back “up” to PACKED_SMI_ELEMENTS, even if we replace or remove that floating-point integer. In general, the more specific an elements kind is when you create an array, the more fine-grained optimizations are enabled. The further down the elements kind you go, the slower manipulations of that object might be.
Next, we also need to understand the first major distinction that V8 has when it tracks element backing stores when an index is deleted, or empty. And those are:
PACKED- Used to represent arrays that are dense, meaning that all available elements in the array have been populated.HOLEY- Used to represent arrays that have “holes” in them, such as when an indexed element is deleted, or not defined. This is also known as making an array “sparse”.
So let’s take a closer look at this. For example, let’s take the following two arrays:
const packed_array = [1,2,3,5.5,'x'];
// Elements Kind: PACKED_ELEMENTS
const holey_array = [1,2,,5,'x'];
// Elements Kind: HOLEY_ELEMENTS
As you can see, the holey_array has “holes” in it, since we forgot to add the 3 to the index and just left it blank or undefined. The reason that V8 makes this distinction is because operations on packed arrays can be optimized more aggressively than operations on holey arrays. If you want to learn more about that, then I suggest you watch Mathias Bynens’s talk “V8 internals for JavaScript Developers” which details this very well.
V8 also implements the previously mentioned elements kind transitions on both PACKED and HOLEY arrays, which forms a “lattice”. A simple visualization of those transitions from the V8 blog can be seen below.

Again, we must remember that elements kinds have one-way downward transitions through this lattice. Such as adding a floating-point to an SMI array will mark it double, and similarly, once a hole is created in an array, it’s marked as holey forever, even when you fill it later.
V8 also has a second major distinction made on elements that we need to understand. In the element backing stores, just like in the properties store, elements can also be either fast or in dictionary-mode (slow). Fast elements are simply an array where the property index maps to the offset of the item in the elements store. As for slow array’s, this happens when there are large sparse arrays where only a few entries are occupied. In this case, the array backing store uses a dictionary representation such as we’ve seen in the properties store to save memory at the cost of performance. That dictionary will store the key, value, and element attributes within the dictionary triplet values.
Viewing Chrome Objects In-Memory
At this point we covered a lot of complex topics on both JavaScript and V8 internals. Hopefully at this point you have a somewhat decent understanding of some of the concepts that make V8 work under the hood. Now that we have that knowledge, it’s time we jump into observing how V8 and its objects look like in memory when observed via WinDBG and what type of optimizations are in use.
The reason we are using WinDBG is because when we will be writing exploits, debugging our POC, etc. we will mostly be using WinDBG in combination with d8. In that case, it’s good for us to be able to grasp and understand the nuances of V8’s memory structure. In case you’re not familiar with WinDBG, then I suggest you read and get familiar with the “Getting Started with WinDbg (User-Mode)” blog post from Microsoft and read “GDB commands for WinDbg Users” if you used GDB before.
I know that we already looked into memory structures of objects and maps, and have messed around with d8 - so we should have a general idea of what points to what and where things are in memory. But, don’t be fooled that it will be so easy. As with everything in V8, optimizations play a big part in allowing it to be fast and efficient, this also is true to how it handles and stores values in memory.
What do I mean by that? Well let’s take a quick look into a simple V8 object structure using d8 and WinDBG. To start, let’s initiate d8 again with the --allow-natives-syntax option, and create a simple object, such as:
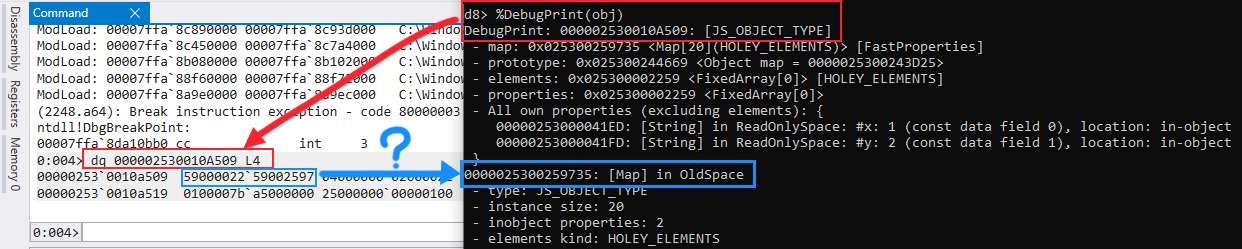
d8> var obj = {x:1, y:2}
Once done, let’s go ahead and use the %DebugPrint() function to print out the objects information.
d8> var obj = {x:1, y:2};
d8> %DebugPrint(obj)
DebugPrint: 000002530010A509: [JS_OBJECT_TYPE]
 - map: 0x025300259735 <Map[20](HOLEY_ELEMENTS)> [FastProperties]
 - prototype: 0x025300244669 <Object map = 0000025300243D25>
 - elements: 0x025300002259 <FixedArray[0]> [HOLEY_ELEMENTS]
 - properties: 0x025300002259 <FixedArray[0]>
 - All own properties (excluding elements): {
    00000253000041ED: [String] in ReadOnlySpace: #x: 1 (const data field 0), location: in-object
    00000253000041FD: [String] in ReadOnlySpace: #y: 2 (const data field 1), location: in-object
 }
0000025300259735: [Map] in OldSpace
 - type: JS_OBJECT_TYPE
 - instance size: 20
 - inobject properties: 2
 - elements kind: HOLEY_ELEMENTS
 - unused property fields: 0
 - enum length: invalid
 - stable_map
 - back pointer: 0x0253002596ed <Map[20](HOLEY_ELEMENTS)>
 - prototype_validity cell: 0x0253002043cd <Cell value= 1>
 - instance descriptors (own) #2: 0x02530010a539 <DescriptorArray[2]>
 - prototype: 0x025300244669 <Object map = 0000025300243D25>
 - constructor: 0x02530024422d <JSFunction Object (sfi = 000002530021BA25)>
 - dependent code: 0x0253000021e1 <Other heap object (WEAK_ARRAY_LIST_TYPE)>
 - construction counter: 0
Afterwards, launch WinDBG and attach it to the d8 process. Once the debugger is hooked in, we’ll execute the dq command followed by our object’s memory address (0x0000020C0010A509) to display its memory contents. Your output should be pretty similar to mines.
Looking into the WinDBG output, we can see that we are using the correct memory address for the object. But, when we look into the memory contents, the first address (which should be a pointer to the map - if you recall our JSObject structure) seems to be corrupted. Well, one would think it’s corrupted, the more experienced reverse engineers or exploit dev’s would maybe even think that there is an offset/alignment issue, and you would technically be close, but not correct.
This again my friends are V8’s optimizations at work. You can see why we need to discuss these optimizations, because to an untrained eye you would get seriously lost and confused as to what is going on in memory. What we’re actually seeing here are two things - Pointer Compression and Pointer Tagging.
We’ll start by first understanding Pointer or Value tagging in V8.
Pointer Tagging
So, what is pointer tagging and why do we use it? Well as we know it, in V8, values are represented as objects and allocated on the heap - no matter if they are an object, array, number, or string. Now, many JavaScript programs actually perform calculations on integer values, so if we constantly had to create a new Number() object in JavaScript each time we increment or modify a value then this results in an overhead of time for creating the object, heap tracking, and it increases the memory space used, making this very inefficient.
In that case, what V8 will do, is that instead of creating a new object each time, it will actually store some of the values inline. While this works, it creates a second problem for us. And that problem is, how do we differentiate an object pointer from a inline value? Well, this is where pointer tagging comes into play.
Pointer tagging’s technique is based on the observation that on x32 and x64 systems, allocated data must be at word-aligned (4 byte) boundaries. Because data is aligned this way, the least significant bits (LSB) will always be zero. Tagging will then use the two bottom bits or least significant bits to differentiate between a heap object pointer and an integer or SMI.
On an x64 architecture, the following tagging scheme is used:
            |----- 32 bits -----|----- 32 bits -------|
Pointer:    |________________address______________(w1)|
Smi:        |____int32_value____|000000000000000000(0)|
As you can see from the example, a 0 is used to represent a SMI, and a 1 is used to represent a pointer. Just one thing to note, is you are looking at SMI’s in memory, while they are stored inline, they are actually doubled to avoid a pointer tag. So, if you original value is 1, it will be 2 in the memory.
Within the pointer we also have a w in the second LSB which denotes a bit that is used to distinguish between a strong or weak pointer reference. If you’re not familiar with what a strong vs weak pointer is, I’ll explain. Simply a strong pointer is a pointer that indicates that the object pointed to must remain in memory (it represents an object), while a weak pointer is a pointer that simply points to data that might have been deleted. When the GC or garbage collector deletes an object, it has to delete the strong pointer as it’s the one that holds a reference count.
With this pointer tagging scheme, arithmetic or binary operations on integers can ignore the tag as the lower 32 bits will be all zeroes. However, when it comes to dereferencing a HeapObject then V8 needs to mask off the least significant bit first, which a special accessor is used for to that take care of clearing the LSB.
Knowing that now, let’s go back to our example in WinDBG and clear that LSB by subtracting 1 from the address. That should then provide us with valid memory addresses. Once done, your output should look like so.

As you can see, once we clear the LSB, we now have valid pointer addresses in memory! In particular we have the map, properties, elements, and then our inline objects. Again, note that SMI’s are doubled so x which holds 1 is actually 2 in memory, and same holds true for 2, as it is now 4.
To those with a keen eye, you might have noticed that only half of the pointer actually points to the object in memory. Why is that? If your answer was “another optimization” then you would be right. This is something called Pointer Compression, which we will now talk about.
Pointer Compression
Pointer Compression in Chrome and V8 makes use of an interesting property of objects on the heap, and that’s that heap objects are usually close to one another, so the most significant bits of the pointer will probably be the same. In that case, V8 only saves half of the pointer (the least significant bits) to memory and puts the most significant bits (upper 32 bits) of V8’s heap (known as the isolate root) into a root register (R13). Whenever we need to access a pointer, the register and the value in memory are just added together and we get our full address. The compression scheme is implemented within the /src/common/ptr-compr-inl.h source file in V8.
Basically, the goal that the V8 team was trying to accomplish was to somehow fit both kinds of tagged values into 32 bits on 64-bit architectures, specifically to reduce overhead in V8 to try and get back as many wasted 4 bytes as possible within the x64 architecture.
Closing
And that about does it for our deep dive into JavaScript and V8 internals! I hope you enjoyed this post and I sincerely hope it helped some of you learn the complexities of V8.
I know this was a lot to cover, and honestly, it’s very complex at first - so take your time to read through this and make sure you understand the basic concepts, because you’ll need to understand how all of this works under the hood before we can exploit it. Remember, to know how to break something, we first need to know how it works.
In part two of this blog post series, we’ll go back into further understanding the compiler pipeline, and explain what happens under the hood in Ignition, Spark-Plug, and TurboFan. We’ll also be focusing more on the JIT compiler, speculative guards, optimizations, assumptions and more which will then allow us to better understand common JavaScript engine vulnerabilities such as type confusions.
Kudos
I would like to sincerely thank maxpl0it and Fletcher for proofreading this blog post, providing critical feedback and adding in a few important details before it’s release. You guys are awesome for taking the time to review this post for accuracy and readability. Thank you!
References
- Attacking JavaScript Engines - A Case Study of JavaScriptCore and CVE-2016-4622
- A Tale of Types, Classes, and Maps by Benedikt Meurer
- A tour of V8: Object Representation
- Exploiting Logic Bugs in JavaScript JIT Engines
- Fast properties in V8
- How is Data Stored in V8 JS Engine Memory
- JavaScript Engine fundamentals: Shapes and Inline Caches
- JavaScript Engines Hidden Classes
- Javascript Hidden Classes and Inline Caching in V8
- Juicing V8: A Primary Account for the Memory Forensics of the V8 JavaScript Engine
- Learning V8
- Mathias Bynens - V8 Internals for JavaScript Developers
- Pointer Compression in V8
- SMIs and Doubles
- V8 / Chrome Architecture Reading List - For Vulnerability Researchers
- V8 Dev Blog
- V8 Engine JSObject Structure Analysis and Memory Optimization Ideas
- V8 Hidden Class
Leave a Comment