
In the past few weeks I finally found time to dig into my library and read some of the books that I’ve been meaning to read since like last year. One of the books that really warranted my attention was Attacking Network Protocols by James Forshaw.
So what does this book cover? Based on the description from the website the book:
Attacking Network Protocols is a deep dive into network protocol security from James Forshaw, one of the world’s leading bug hunters. This comprehensive guide looks at networking from an attacker’s perspective to help you discover, exploit, and ultimately protect vulnerabilities.
Generally this book was a great read! Although much of what it covered was a refresher for me, it still taught me a lot of new things. The book covered dynamic protocol analysis, common protocol structures, cryptography, and protocol security. It then shifted focus to finding and exploiting vulnerabilities in network protocols, followed by an overview of common bug classes, fuzzing, debugging, and exhaustion attacks.
Introduction
So what is Protocol Reverse Engineering and why should we learn it?
Overall, protocol reverse engineering is the process of extracting the application/network level protocol used by either a client-server or an application. Nowadays this task of Reverse Engineering protocols has become very important for network security. Knowledge of application and network level protocol formats is essential for many Security Engineers, Security Consultants, and even Developers.
But why? Why is it important?
Well it’s important for many reasons. Let’s say you’re a Security Consultant and were hired to test the underlying protocol of a trading system that will be used on Wall Street for trading/buying/selling stocks, and a plethora of other things. The client unfortunately doesn’t provide you with a Server, only a Client, and doesn’t even provide you with the applications source code… so what do you do?
Well, we know that this trading system will be client-server based, so there needs to be an underlying TCP Protocol being used to transport data between the Client and Server. And since we have access to the Client but not the Server, then we can easily (well… hopefully easily) intercept the traffic, reverse the protocol, learn how it’s structured, how it passes the data, and then look for exploits in the protocol which generally would attribute to vulnerabilities in the code.
So… now that we know the importance of Protocol Reverse Engineering, let’s get into learning how we can Reverse Engineer a Protocol.
But first… we need some tools!
Tools
So what tools will we need to accomplish this task? Well that really depends on the engagement or what we have access to. If you really want to learn more about specific capture techniques, vulnerabilities, and protocol analysis then I highly suggest you go out and buy Attacking Network Protocols.
But generally we would use tools such as Proxies for MitM, Packet Sniffers, and a Programming Language to write Socket Code.
Some tools might be :
- Wireshark
- Bettercap
- BinProxy
- Netzob
- CANAPE
- IDA Pro <– If we have access to a client or server
- Python or Ruby
- And more!
Capturing the Protocol Traffic
Alright, so now that we have our tools, let’s dig into actually capturing the network protocol traffic so we can then later analyze it.
For this post I will be using the SuperFunkyChat application, which is a C# binary protocol application that can be used to learn Protocol Reverse Engineering. This application was originally built by James Forshaw to teach CANAPE.
This application will run on Windows, Linux, and OS X. You can download the latest prebuilt applications and source code from GitHub. Just make sure to choose the release binaries appropriate for your platform.
I’m not going to go into detail or explain how to get this application up and running since it’s pretty easy and self-explanatory. What you will need though is to install .NET Core for your OS for the application to properly work.
Once you got everything installed and unpacked, you should see the following files in your SuperFunkyChat folder.
kkb@kkb-ubuntu:~/SuperFunkyChat$ ls
ChatClient.deps.json           ChatServer.dll
ChatClient.dll                 ChatServer.pdb
ChatClient.pdb                 ChatServer.runtimeconfig.json
ChatClient.runtimeconfig.json  LICENSE
ChatProtocol.dll               Microsoft.Extensions.CommandLineUtils.dll
ChatProtocol.pdb               README.md
ChatServer.deps.json
Before we can start capturing packets let’s start up the Chat Server. Since I’m on Linux I will be prepending my commands with dotnet so the application knows to use .NET Core to run the application.
kkb@kkb-ubuntu:~/SuperFunkyChat$ dotnet ChatServer.dll
ChatServer (c) 2017 James Forshaw
WARNING: Don't use this for a real chat system!!!
Running server on port 12345 Global Bind False
Alright, now that we have the server up and running, let’s start up Wireshark before we start up our client so we can start capturing the application protocol traffic.
Since I’m doing this all on my Linux VM - I will start sniffing the traffic on my localhost Ethernet adapter Loopback:lo. .Go ahead and double click on your local Ethernet adapter and make sure you’re capturing packets.

Awesome - now that we have that in place we can start up our Chat Client in another console and specify a Username that we want to use, along with a Hostname that we want to connect to.
In this case my username will be “test” and I will be connecting to my “locahost” instance since that’s where my Chat Server is located.
kkb@kkb-ubuntu:~/SuperFunkyChat$ dotnet ChatClient.dll test localhost
ChatClient (c) 2017 James Forshaw
WARNING: Don't use this for a real chat system!!!
Connecting to localhost:12345
>
If done correctly, you should see a similar output in your console where you have your Chat Server running.
Connection from 127.0.0.1:46251 to
Received packet ChatProtocol.HelloProtocolPacket
Hello Packet for User: test HostName: kkb-ubuntu
Now that a Client successfully connected to our Server, we should be able to see some network traffic in Wireshark.
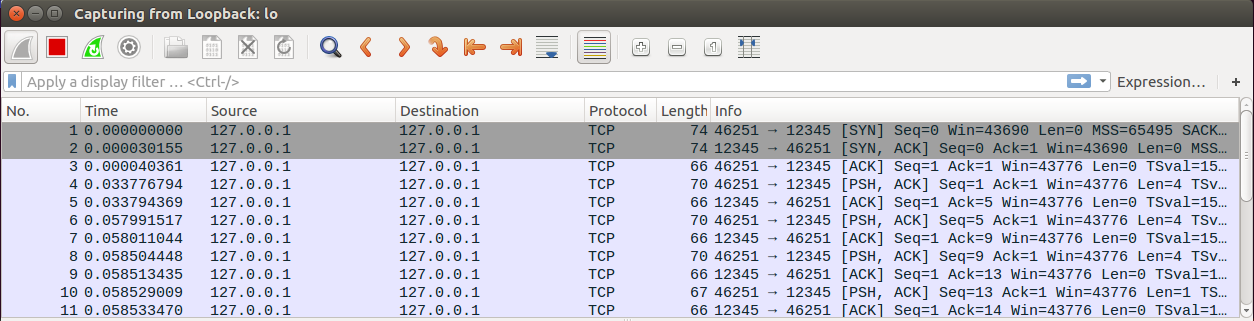
Nice! We were able to capture the connection traffic and should be able to see how a client connects and authenticates to the server. Just to make sure we have enough data to work with and analyze, let’s send some chat messages and then type /quit to disconnect and capture the disconnect traffic as well.
> This is a test message!
> Hello - testing!
> /quit
Server> : Don't let the door hit you on the way out!
In concurrence with the messages we sent and with us quitting the session you should see something in the Chat Server console that should look similar to the following output.
Received packet ChatProtocol.MessageProtocolPacket
Received packet ChatProtocol.MessageProtocolPacket
Received packet ChatProtocol.GoodbyeProtocolPacket
Closing Client
Now that we have generated some more network traffic via the application, let’s go ahead and stop capturing packets in Wireshark so we can start analyzing the applications protocol traffic.
Analyzing the Protocol Traffic
Let’s take a look at the traffic that we generated so we can get a general overview of the communication that occurred between the Client and Server.
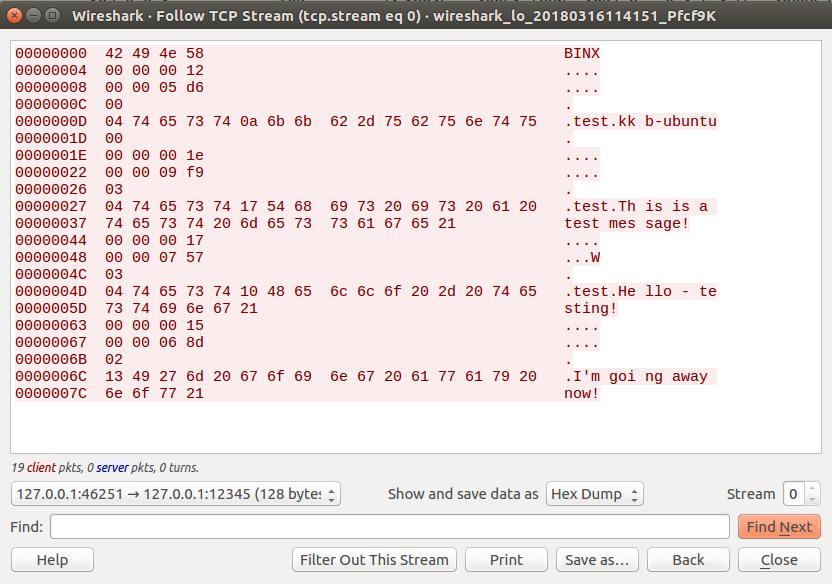
To do so, right click on the first Packet, and Follow the TCP Stream. This should provide us a HEX/ASCII representation of the traffic.

After following the TCP Stream you should see some text, including the name of our device, the messages we sent, and some of the server responses. The colors represent the direction of the traffic, Red being Client -> Server and Blue being Server -> Client.
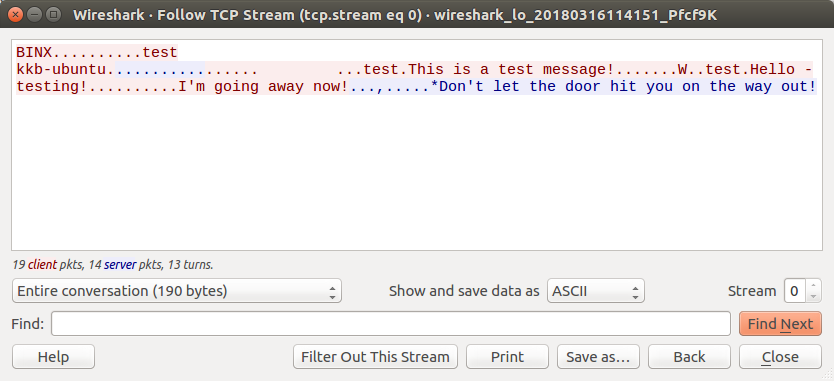
This is great as we can see the ASCII representation of the Network Protocol, but this isn’t what we need. Since we are going to be Reverse Engineer the Applications Protocol then we need to see everything that was included in the packets sent from the Client and Server.
You might be wondering - Why?
Well, take a look at the TCP Stream. Do you notice the . in the stream? Well this single dot character is a replacement of data that Wireshark wasn’t able to represent as ASCII. This makes it clear to us that the Network Protocol we are looking at isn’t an exclusive text-based protocol.
The only reason we are actually seeing text in this protocol is because this is a Chat application - which is primarily used to send… yup, you guessed it - text!
So overall this means that the control information being sent in the packets headers or body are possibly hexadecimal. Now that we know that, we can start digging into the protocol!
*NOTE*
Just take note that this binary protocol is pretty easily distinguishable. There are a ton of protocols that also work purely as text-based protocols, and there are some that are all binary/hex.
You also might be wondering - “Well what do I do if the protocol is encrypted?”
Well at that point there is a ton of work that needs to be done and it can become a very daunting task. In some cases it might be even impossible to break. Sure, you can probably look at trying to circumvent the encryption if it’s home grown (DON’T ROLL YOUR OWN CRYPTO!) but still it will take a lot of time and experience.
This is just a tutorial, and we are starting off by just learning the basics. If you want more practice then I suggest starting off with an already well-documented protocol. This might seem silly, but it’s a good way to get some experience and have a document to fall back on.
Also If you are unfamiliar with socket based software development then I would recommend a well-documented plaintext protocol such as the IRC protocol to start (RFC1459).
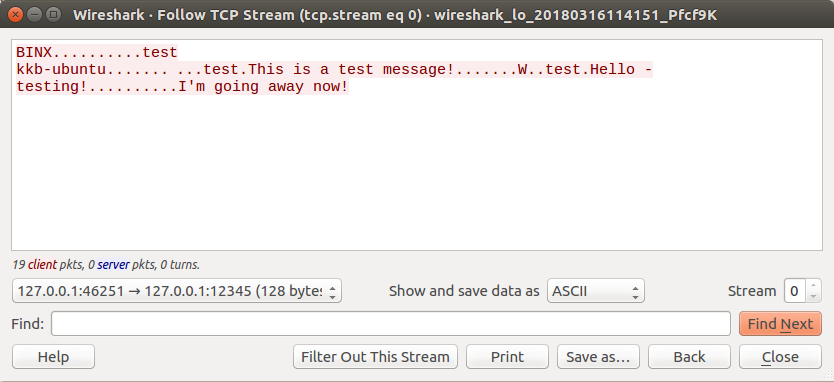
First - let’s begin by isolating our conversation to just the client. Remember, the Server listens on TCP 12345 so we want to to choose the conversation that was sending traffic to that port.
You can isolate the conversation by clicking the “Entire conversation (190 bytes)” drop down, and selecting our appropriate direction.

Once the conversation is isolated, you should only see red, which would be our Client -> Server traffic.
After we have our conversation isolated, now we can start digging into our packets. For us to be able to successfully Reverse Engineer the protocol we need to be able to see all the bytes that were sent by the protocol.
To do that, in the “Show and save data as” drop down, click and select “Hex Dump”.
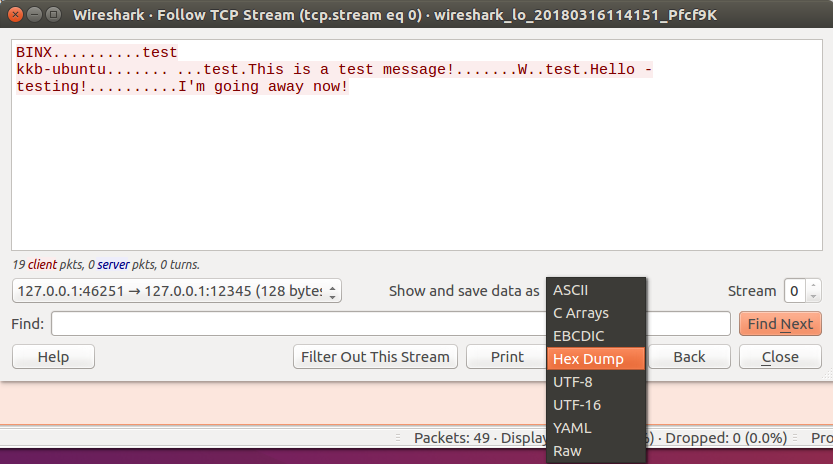
What this will do, is allow us to have both a Hexadecimal and ASCII representation of our traffic and each packet that was sent. This way we can at least get an idea of how the protocols packets are structured, what commands it uses, etc.
Determining the Protocol Structure
Alright - now that we know that this protocol is Text/Binary we can finally start determining the structure of the protocol by looking at the packets/hex.
Let’s start by taking a look at the first few packets.
00000000  42 49 4e 58                                        BINX
00000004  00 00 00 12                                        ....
00000008  00 00 05 d6                                        ....
0000000C  00                                                 .
0000000D  04 74 65 73 74 0a 6b 6b  62 2d 75 62 75 6e 74 75   .test.kk b-ubuntu
0000001D  00                                                 .
0000001E  00 00 00 1e                                        ....
00000022  00 00 09 f9                                        ....
00000026  03                                                 .
00000027  04 74 65 73 74 17 54 68  69 73 20 69 73 20 61 20   .test.Th is is a
00000037  74 65 73 74 20 6d 65 73  73 61 67 65 21            test mes sage!
Looking at the first block, we see its 4 bytes long and starts with four characters BINX. It doesn’t seem like these 4 characters are repeated in the rest of our packet data, so we can assume that this is a command used when we connect a client to the server to distinguish a valid connection.
The next two blocks are also 4 bytes long, followed by a 1 byte sized block, followed by a much larger block containing mostly readable text.
It also seems that the next block is a 1 byte sized block - which is a null byte \x00… but it also seems that this is part of the text block. This possibly is a string terminator for when the Hello Packet is sent.
Right, so knowing that - I can split the Hex Dump down into 3 separate packets. The Connection Packet, the Hello Packet, and the Chat Packet.
----------------------------------------------------------------------------- <- Connection Packet
00000000  42 49 4e 58                                        BINX
----------------------------------------------------------------------------- <- Hello Packet
00000004  00 00 00 12                                        ....
00000008  00 00 05 d6                                        ....
0000000C  00                                                 .
0000000D  04 74 65 73 74 0a 6b 6b  62 2d 75 62 75 6e 74 75   .test.kk b-ubuntu
0000001D  00                                                 .
----------------------------------------------------------------------------- <- Chat Packet
0000001E  00 00 00 1e                                        ....
00000022  00 00 09 f9                                        ....
00000026  03                                                 .
00000027  04 74 65 73 74 17 54 68  69 73 20 69 73 20 61 20   .test.Th is is a
00000037  74 65 73 74 20 6d 65 73  73 61 67 65 21            test mes sage!
After visualizing this, it seems that each packet this protocol sends had four parts to it, minus the one that was just a connection packet.
Since we now have that separated down and have some basic knowledge of the structure, let start by digging into each block and figuring out what they represent.
Let’s start by looking at the four byte block at 00000004.
We see 3 bytes are all null, so there really is no data in there. At the end we have the hexadecimal value of 0x12. Judging by the fact that Wireshark put a . character would mean that this isn’t ASCII data, otherwise we would see the ` ` symbol.
So if it’s not ASCII our next best bet would be Decimal. Converting 0x12 to decimal gives us 18. Hmm… 18? What could that represent?
Well to better understand this we first need to understand TLV or Type-Length-Value. It’s also known as Tag, Length Value. With TCP Protocols TLV is an encoding scheme used for optional information elements in certain protocols.
This is necessary in stream-based protocols like TCP because it allows the applications or Client & Server to know how much data it needs to read from a connection to process the protocol.
The type and length are fixed in size (typically 1-4 bytes), and the value field is of variable size. These fields are used as follows:
- Type: A binary code, often simply alphanumeric, which indicates the kind of field that this part of the message represents.
- Length: The size of the value field which is typically in bytes.
- Value: Variable-sized series of bytes which contains data for this part of the message.
Alright, so it does seem that the first block of the packet is specifying data length… but if were to count the data block 0000000D along with the data in block 0000001D then we would have 17 chars/bytes in total, and that doesn’t add up to the data length.
Now at times looking at these protocols and the data is confusing when stuff doesn’t add up. So to better understand why we only have 17 bytes of data instead of 18 bytes, we need to understand how Variable-Length Buffers are allocated on the stack.
For Variable-Length Buffers an application allocates a buffer of the correct size for the data being stored. Usually in TCP Protocols this is used so there are no fixed buffers which can lead to a Buffer Overflow if too much data is supplied for the buffer to hold.
However, if the application incorrectly calculates the buffer size, a buffer overflow can occur too. So going back to the protocol - the block allocated 18 bytes of data, 17 bytes for the data we pass, along with another byte which would usually be the Null Terminator that would prevent a buffer from reading passed the allocated data - thus preventing a buffer overflow from occurring.
Do note, that this is just an assumption at this point at time. Currently we aren’t trying to find vulnerabilities in the protocol, we are just trying to figure out its structure. Maybe I was wrong to assume that there is a null-terminator at the end of the string… who knows. We won’t know till we test it - but that unfortunately is out of scope for this blog post =)
If you would like to learn more about the vulnerabilities in Network Protocols, then definitely buy the book Attacking Network Protocols by James Forshaw.
Alright, so assuming the first block is the Length based off TLV, I can also assume that the text part is the value.
00000004  00 00 00 12                                        .... <- Length
00000008  00 00 05 d6                                        .... <- ?
0000000C  00                                                 . <- ?
0000000D  04 74 65 73 74 0a 6b 6b  62 2d 75 62 75 6e 74 75   .test.kk b-ubuntu <- Value
0000001D  00
So what are the other two blocks then? We can assume that since the first block was decimal then the second and third blocks should also be decimal representations since there is no ASCII representation for them due to the fact that Wireshark replaced the data with the . notation.
If we take the second’s block data of 0x05D6 and convert that to decimal, then we get 1494. What the… 1494? What the heck is that related to?
Also if we look at the next block we see 0x00 which is simply 0.
Alright… Now I’m utterly confused as to what these blocks pertain to. At this point what we need to do is compare each packet to on another by writing a parser, which should parse our data packets and write out it’s values so we can compare them to other packets in the stream.
This at the same time would also help in solidifying our already made assumptions for the other blocks in the packet and further helping us understand the other portions.
Parsing the Protocol
For this portion I will be using Python to read and parse the Wireshark PCAP file. But before we can do that, we need to export all the packets bytes into a file.
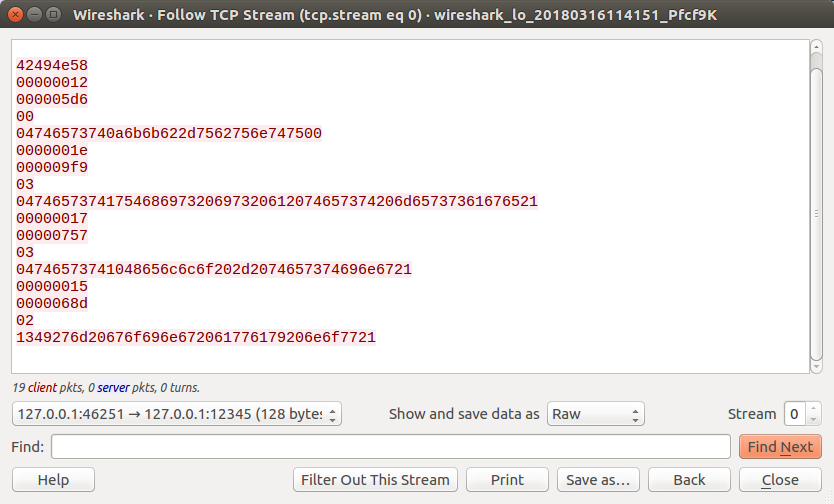
To do so, in the “Show and save data as” portion of our stream window, click the drop down and select “Raw”.
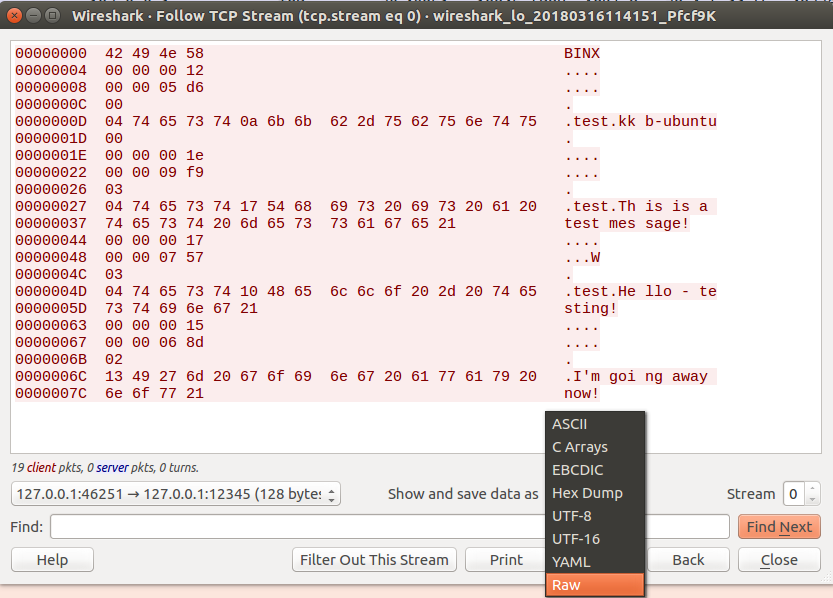
You should now only see the RAW Binary Data of the Network Protocol.
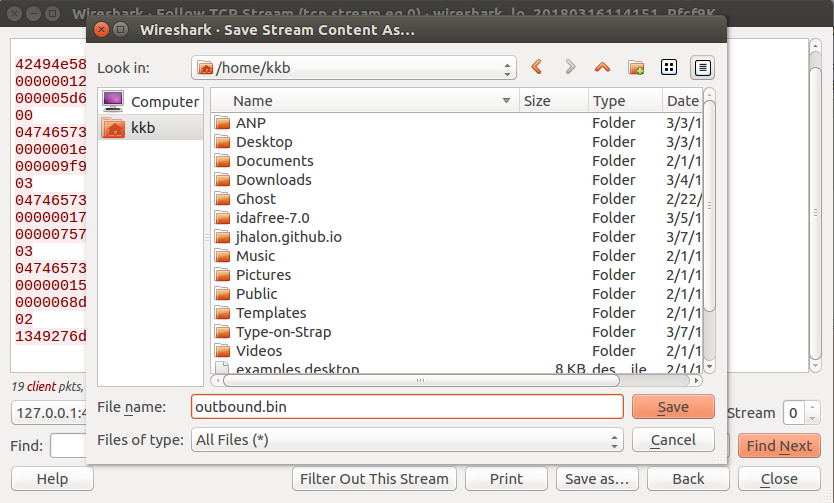
Once done, just click on “Save as…” and save the file as “outbound.bin”.
After you have saved the file, let’s open up a terminal console and check if we successfully dumped the data we needed by using the xxd tool against out bin file.
kkb@kkb-ubuntu:~$ xxd outbound.bin
00000000: 4249 4e58 0000 0012 0000 05d6 0004 7465  BINX..........te
00000010: 7374 0a6b 6b62 2d75 6275 6e74 7500 0000  st.kkb-ubuntu...
00000020: 001e 0000 09f9 0304 7465 7374 1754 6869  ........test.Thi
00000030: 7320 6973 2061 2074 6573 7420 6d65 7373  s is a test mess
00000040: 6167 6521 0000 0017 0000 0757 0304 7465  age!.......W..te
00000050: 7374 1048 656c 6c6f 202d 2074 6573 7469  st.Hello - testi
00000060: 6e67 2100 0000 1500 0006 8d02 1349 276d  ng!..........I'm
00000070: 2067 6f69 6e67 2061 7761 7920 6e6f 7721   going away now!
Great, we were able successfully save all our protocol traffic from the pcap. Now we can start writing our Python script which will read in our bin file, and read the binary data in network byte order.
Now do note that “network byte order” is in Big Endian, unlike Little Endian that is used in x86 and x64 processes.
Our Python script will look similar to the one below:
from struct import unpack
import sys
import os

# Read a fixed number of bytes, dictated by "l"
def read_bytes(f, l):
    bytes = f.read(l)
    if len(bytes) != l:
        raise Exception("Not enough bytes in stream")
    return bytes

# Unpack a 4 byte integer in network byte order
def read_int(f):
    return unpack("!i", read_bytes(f, 4))[0]

# Read a single byte
def read_byte(f):
    return ord(read_bytes(f, 1))

filename = sys.argv[1]
file_size = os.path.getsize(filename)

f = open(filename, "rb")
print ("Connection: %s" % read_bytes(f, 4))

# Keep reading until file is empty.
while f.tell() < file_size:
    length = read_int(f)
    val1 = read_int(f)
    val2 = read_byte(f)
    data = read_bytes(f, length - 1)
    print("Len: %d, Val1: %d, Val2: %d, Data: %s" % (length, val1, val2, data))
This script should be self-explanatory but let’s quickly break it down so we have a better understanding of what’s going on.
First we create three new definitions:
- read_bytes: which takes in two parameters; the file from which to read the bytes from, and the amount of bytes to read in which is passed on from “l”.
- read_int: which unpacks four bytes and reads it in as an integer.
- read_byte: which simply just reads in a single byte of data.
Afterwards we set “filename” to the equal the filename passed by the user from the command line and set that to “f”.
Once the file is opened, we read in the first 4 bytes which should be our connection command “BINX” and then print it to the console.
Next, we iterate through the file until it’s empty and there are no more bytes that we can read. While iterating through the file we do a few things;
- Unpack the first four bytes of the packet in network byte order to read the bytes as an integer and set that to length. This technically should be the first block of the packets that dictates data length, just as we assumed during our structure analysis.
- Unpack the next four bytes of the packet, read them as an integer and set it to “Val1 which would be our first unknown value.
- Read in the next block which is a single byte and set that to “Val2” which would be our second unknown value.
- Read in the rest of the packet data by using the length we found in block one, minus one. Remember, we need to subtract that additional byte that was added - in which we assumed was the null string terminator.
- Print out the Length, Unknown Value 1 & 2, and the Data on a single line which would represent a single packet.
Overall the script is pretty straightforward and will allow us to quickly parse all the data in the packets which we can then use to compare to the other packets.
So let’s go ahead and run the Python script and include the name of our bin file in the command as well. I suggest you also utilize Python v3 since it does way better at printing out Byte data then Python v2.
kkb@kkb-ubuntu:~$ python3 protocol_parse.py outbound.bin
Connection: b'BINX'
Len: 18, Val1: 1494, Val2: 0, Data: b'\x04test\nkkb-ubuntu\x00'
Len: 30, Val1: 2553, Val2: 3, Data: b'\x04test\x17This is a test message!'
Len: 23, Val1: 1879, Val2: 3, Data: b'\x04test\x10Hello - testing!'
Len: 21, Val1: 1677, Val2: 2, Data: b"\x13I'm going away now!"
Awesome! So as you can see we have the length, unknown values, and data from each packet printed out in an easy to read format for us. We can now continue determining the protocols structure.
Determining the Protocol Structure Cont.
Now that we have our protocol data parsed, let’s go back and look at the first Connection Packet that we sent:
Len: 18, Val1: 1494, Val2: 0, Data: b'\x04test\nkkb-ubuntu\x00'
Our assumptions were right about the first block and the fact that it was supplying the length of our sent data +1 for the null terminator! Just don’t get confused with the \x00 in the packet as the null-terminator, because it’s not! The null-terminator is supplied by the Server once it receives the packet.
We can also see that the non-printable data from Wireshark is now actually displayed to us in hex thanks to our script. This allows us a better view of how the protocol is structured and what data it passes.
If we look closely at the “Data” portions of the packet we see three bytes in hexadecimal; \x04, \n and \x00. Let’s pay attention to where these bytes are located. If we were to convert \x04 to decimal then that would equal 4, which would be the exact length of our username! \n is just a newline character and \x00 is a terminator for the string - in this case a terminator for the username and device that connected to the chat server.
So judging by this it seems that the first byte in data is the length of the username. We can verify this by looking at the next packet that we sent, which was our Chat Message.
Len: 30, Val1: 2553, Val2: 3, Data: b'\x04test\x17This is a test message!'
As you can see \x04 shows up again because our username “test” is 4 characters long! Looking further down we also see another byte in hexadecimal, this time it’s \x17 which when converted to decimal is 23 which is the exact length of the message that we sent.
Awesome, so now we know that the Data Portion of the Packet also has it’s on TLV which lets the Server know how much data it needs to be allocated for the username and message to fit on the stack - preventing a buffer overflow.
Okay so now that we know that those provide the length of the data, let’s do some math to see if that actually fits in with what the Length Value displays. So 4 characters for the username, and 23 for the data would be 4 + 23 = 27. Wait, 27? But the Length packet shows 30… what are we missing?
Is the Length also adding the value in Val2? It would make sense, because 4 + 23 + 3 = 30. Right, so now we know that the Length is calculated like so: Val2 + Username Length + Message Length = Data Length.
So now our question would be, what is Val2 representing? Well let’s look back at our parsed data and compare the Val2 values for each packet.
kkb@kkb-ubuntu:~$ python3 read_protocol.py outbound.bin
Connection: b'BINX'
Len: 18, Val1: 1494, Val2: 0, Data: b'\x04test\nkkb-ubuntu\x00'
Len: 30, Val1: 2553, Val2: 3, Data: b'\x04test\x17This is a test message!'
Len: 23, Val1: 1879, Val2: 3, Data: b'\x04test\x10Hello - testing!'
Len: 21, Val1: 1677, Val2: 2, Data: b"\x13I'm going away now!"
Hmm - that’s interesting! Take a look at Packet 2 and 3. The Val2 value is the same - both of them display 3. While the other packets display other values, but they seem to be in a range of 0-9.
Packet 1 and 2 were both Chat Messages, I believe that we can safely assume that Val2 is a representation of the command that the Client/Server is carrying out. 3 being a Chat Message, 0 possibly being the connection command, and 2 would be the quit command!
| Command # | Direction | Description |
|---|---|---|
| 0 | Outbound | Connection of Client to Server |
| 2 | Both | Sent when /quit command is used for both server/client |
| 3 | Both | Sent when a message is sent to the server and received by clients |
Alright - so we got like 90% of the protocol structure determined, all that’s left is to figure out what Val1 is.
After some thinking I came to ask myself - What’s the chance that this value is a checksum?. It could be possible, since we are sending chat messages there has to be some sort of checksum to verify that the data sent from the Client to the Server was not modified or corrupted in anyway… at least I would hope so!
Before we continue on, let’s talk a little about Checksums.
Checksums as I already stated are generally used to ensure the integrity of the data passed by the network protocol. It’s a great way for a server to prevent Man-in-the-Middle attacks if the protocol is in clear text… just like this one.
Now, if this protocol utilized SSL then we could just have given up right away unless we found some sort of Padding Oracle Attack which would allow us to pass encrypted or clear text data and get opposite, allowing us to see how the encryption functions.
Now, Checksums should technically be using a secure hashing algorithm such as SHA1 or SHA2… and if you’re thinking about MD5… shame!
But yah, if a Checksum is using a secure hashing algorithm with a complex input then trying to intercept the data and change it, or even craft our own packets would be near impossible. But if the network protocol is using an easy to guess or custom rolled Checksum then protections would technically be non-existent if we were to figure out how it functions.
For example let’s take the following two examples:
Checksum using Secure Hashing Algorithm with complex Input:
Let’s assume that a banking system is using a checksum for each transaction made. It calculates the checksum of each packet by taking the following from the users sessions and appending them in a string as so: username;hostname;time
Once the values are provided it generates a SHA1 hash of the string which in turn gives us: fd8f04e9c574b265fa07a69d164f3cd8c2665f84.
Good luck trying to figure this checksum out or even trying to crack it! This technically should be how a checksum is calculated.
Checksum using Custom Rolled Algorithm:
Let’s assume that the banking system thought that using the secure checksum would be too resource intensive… so they decided to opt in for their own custom rolled checksum generator… bad idea!
This Checksum simply takes in each byte of data in the message, converts the bytes to decimal, and finally sums them up.
So let’s say the message that was passed was test which in hexadecimal is 74 65 73 74. Convert that to decimal and we get 116 + 101 + 115 + 116 = 448
It’s seems pretty easy to guess since the number is an integer. So as an attacker if we know that, the integrity of that data would not be safe since we could easily edit or create our custom packets with a valid checksum!
Okay… so now that we explained that in detail you might be wondering why the second “Custom Rolled Algorithm” looks pretty similar to the Val1 value in the packets from the Chat protocol.
Well, what’s the chances that the Chat Application is utilizing the same checksum we just detailed? I don’t know… but let’s find out if it is!
Let’s look back at our parsed packet, specifically the Connection Packet since it’s smaller and will be easier for us to test.
Len: 18, Val1: 1494, Val2: 0, Data: b'\x04test\nkkb-ubuntu\x00'
The value for Val1 is 1494. So, let’s take the hexadecimal representation of our data and convert it to decimal. The following is the hexadecimal representation of our data:
04 74 65 73 74 0a 6b 6b 62 2d 75 62 75 6e 74 75 00
Now let’s convert that to a decimal representation, which should be as follows:
4 116 101 115 116 10 107 107 98 45 117 98 117 110 116 117 0
Adding those integers up we get 1494 which is the exact same value that Val1 is! Awesome, so we verified our assumption that Val1 is the checksum which is calculated by taking the decimal value of each byte and summing it up… not as secure as I was hoping it to be.
Protocol Structure Diagram
Alright, now that figured out how the protocol is structured, we can create a simple diagram which we can use as a visual aid to how the packets for the network protocol are structured.
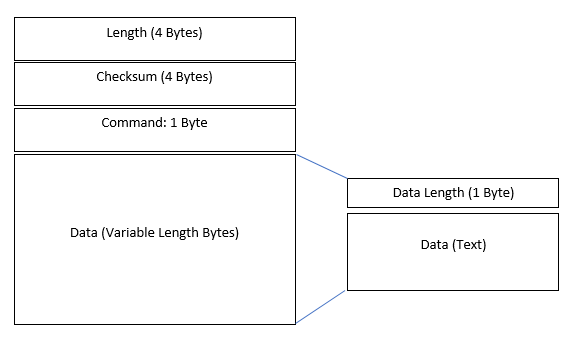
Awesome! So after a ton of work we finally have decent knowledge of how the outbound packets for the chat application are structured and what they contain. We can assume they are similar to the inbound ones.
I will leave it to you to practice and try to figure out if the inbound packets are similar - hint hint you will need to make some code changes, but not much!
From this point we can start intercepting the packets and begin looking for vulnerabilities in the protocol such as buffer overflows, integer overflows, command injection, etc.
If you really want to learn more about the vulnerabilities and how to exploit them then I highly suggest you buy the book Attacking Network Protocols by James Forshaw if you want to learn more!
Leave a Comment