
As the dust settles on this year’s Flare-On challenge, I finally found some time time to sit down and write about one of the more interesting challenges from this year: Challenge 5 - NTFSM. This challenge stood out to me because it not only provided me with an excellent opportunity to refine my reverse engineering skills, but it also allowed me to dig into a specific execution technique used in binaries and malware.
For those unfamiliar with Flare-On, it’s basically an annual CTF for reverse engineers hosted by Mandiant’s (now Googles) FLARE team. This years CTF had 9 stages of increasingly difficult challenges for single players to solve in sequence. Unfortunately for me, life got in the way and I only made it to Challenge 6 - but even with that, they were a blast.
Initially I solved this challenge using IDA Pro, as I had been using it for years, but I couldn’t shake the desire to try solving it with Binary Ninja instead. Why? Well, I really wanted to get my hands dirty with Binary Ninja’s powerful scripting capabilities, and this seemed like the perfect opportunity to do it.
So in this post, I’ll walk through not only the concepts and techniques behind cracking the NTFSM challenge, but also how I leveraged Binary Ninja’s API to solve it. I’ll break down the process, the logic, and the small “aha!” moments along the way - hopefully in a way that’s easy to follow, even if you’re newer to reverse engineering!
Overview
Upon accessing the challenge we are provided with the following description:
I’m not here to tell you how to do your job or anything, given that you are a top notch computer scientist who has solved four challenges already, but NTFS is in the filename. Maybe, I don’t know, run it in windows on an NTFS file system?
After downloading and unzipping the archive, you’ll find a single executable: ntfsm.exe. Now, before running any random PE file, I personally like to do some simple static analysis just to see what I’m dealing with. For this I prefer using either Binary Refinery, PE-Bear, or pestudio.
Opening the binary with PE-Bear, we can see it’s a valid C++ executable. Additionally, the strings table contains a lot of interesting strings like "No seriously, i hope it can not be bruteforced", "Sandboxes hate this one weird trick", several rickroll links, and random quotes from Hackers - which makes me believe there is a lot of junk code and it’s most likely obfuscated in some way.
After sorting and filtering out duplicate strings, we find something actually useful:
usage: ./ntfsm <password> to reset the binary in case of weird behavior: ./ntfsm -r.
So the program clearly expects a password (16 characters, as we’ll see), and it also accepts a -r flag that appears to reset the binary. A bit odd, but worth keeping that in mind.
The challenge description mentions NTFS, which immediately makes me think of of ADS (Alternate Data Streams) as malware tends to use that to hide itself or it’s configurations. If we try to enter a random 16 character password, we’ll notice that the binary spawns a few command windows and text boxes saying “Hello Hacker” before printing wrong! in the console. This sort of behavior hints that the binary’s logic and execution path are directly tied to the input… interesting.
After running the binary, let’s check and see if it’s creating any Alternate Data Streams (ADS) by using PowerShell’s Get-Item cmdlet.
PS C:\Users\User\Desktop\flare\5_-_ntfsm> Get-Item -Path .\ntfsm.exe -Stream *


PSPath        : Microsoft.PowerShell.Core\FileSystem::C:\Users\User\Desktop\flare\5_-_ntfsm\ntfsm.exe::$DATA
PSParentPath  : Microsoft.PowerShell.Core\FileSystem::C:\Users\User\Desktop\flare\5_-_ntfsm
PSChildName   : ntfsm.exe::$DATA
PSDrive       : C
PSProvider    : Microsoft.PowerShell.Core\FileSystem
PSIsContainer : False
FileName      : C:\Users\User\Desktop\flare\5_-_ntfsm\ntfsm.exe
Stream        : :$DATA
Length        : 20151296

PSPath        : Microsoft.PowerShell.Core\FileSystem::C:\Users\User\Desktop\flare\5_-_ntfsm\ntfsm.exe:input
PSParentPath  : Microsoft.PowerShell.Core\FileSystem::C:\Users\User\Desktop\flare\5_-_ntfsm
PSChildName   : ntfsm.exe:input
PSDrive       : C
PSProvider    : Microsoft.PowerShell.Core\FileSystem
PSIsContainer : False
FileName      : C:\Users\User\Desktop\flare\5_-_ntfsm\ntfsm.exe
Stream        : input
Length        : 16

PSPath        : Microsoft.PowerShell.Core\FileSystem::C:\Users\User\Desktop\flare\5_-_ntfsm\ntfsm.exe:position
PSParentPath  : Microsoft.PowerShell.Core\FileSystem::C:\Users\User\Desktop\flare\5_-_ntfsm
PSChildName   : ntfsm.exe:position
PSDrive       : C
PSProvider    : Microsoft.PowerShell.Core\FileSystem
PSIsContainer : False
FileName      : C:\Users\User\Desktop\flare\5_-_ntfsm\ntfsm.exe
Stream        : position
Length        : 8

PSPath        : Microsoft.PowerShell.Core\FileSystem::C:\Users\User\Desktop\flare\5_-_ntfsm\ntfsm.exe:state
PSParentPath  : Microsoft.PowerShell.Core\FileSystem::C:\Users\User\Desktop\flare\5_-_ntfsm
PSChildName   : ntfsm.exe:state
PSDrive       : C
PSProvider    : Microsoft.PowerShell.Core\FileSystem
PSIsContainer : False
FileName      : C:\Users\User\Desktop\flare\5_-_ntfsm\ntfsm.exe
Stream        : state
Length        : 8

PSPath        : Microsoft.PowerShell.Core\FileSystem::C:\Users\User\Desktop\flare\5_-_ntfsm\ntfsm.exe:transitions
PSParentPath  : Microsoft.PowerShell.Core\FileSystem::C:\Users\User\Desktop\flare\5_-_ntfsm
PSChildName   : ntfsm.exe:transitions
PSDrive       : C
PSProvider    : Microsoft.PowerShell.Core\FileSystem
PSIsContainer : False
FileName      : C:\Users\User\Desktop\flare\5_-_ntfsm\ntfsm.exe
Stream        : transitions
Length        : 8
From the output, we can see that the binary is in fact using ADS to store data in streams named input, position, state, and transitions. While these might look meaningless at first glance, the presence of state and transitions immediately suggests that we’re dealing with a FSM or a Finite Sate Machine - and that kind of makes sense if you look at the challenge name, NT(FSM). Cheeky.
But, before we can dive into the binary and figure out how to solve it, let’s take a moment to understand what a Finite State Machine is and how it works.
Finite State Machines (FSM)
So what is a Finite State Machine? Well put simply, an FSM is a computational model used to design systems that can be in one of a limited number of states at any given time. A state represents a specific condition the system can be in, such as “idle”, “active” or “waiting for input” for example. The FSM responds to various inputs or events, which cause it to transition from one state to another. In addition to moving between states, an FSM may produce outputs based on the current state or the inputs it receives, allowing it to drive behavior in systems like games, protocols, or even vending machines.
Imagine a simple vending machine. At any moment, the machine could be in states like “waiting for payment”, “dispensing item”, or “out of stock.” When a customer inserts money or presses a button (inputs), the machine transitions between states. The result is either the item being dispensed or an error message (outputs)..
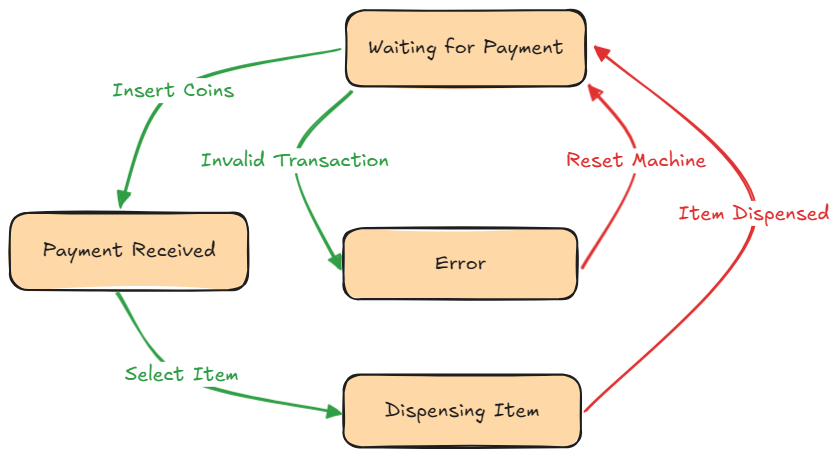
Now this might sound like a glorified switch statement, but the important difference to note is that FMSs needs to track where they currently are (the current state) and decide how to move or transition from one state to another based on events. That statefulness is what makes them useful and what makes them interesting when you find one in a binary.
If an FSM’s state or transition data is stored insecurely, then there is a possibility of tampering with with the data to force the machine into a chosen state. In our case, ntfsm.exe persists its state in an Alternate Data Stream (ADS). So, in theory, we could modify the stored data and change the sequence of states the program follows, potentially steering it toward the behavior we want.
That said, tampering with ADS like that isn’t the intended solution for this challenge - but it’s a useful technique to remember when you encounter an FSM next time you are reverse engineering malware.
Static Analysis
Alright, now that we know what an FSM is, let’s dig into the binary and try to solve this challenge. We already know the password must be 16 characters and the binary persists its state and transitions in ADS. Let’s fire up Binary Ninja and dig into how the program validates input and how it loads/uses the data for the FSM.
Once ntfsm.exe is loaded in Binary Ninja, start by searching for cross‑references to the string wrong!. This will take us directly into the main function routine. Upon inspecting the main function using Binary Ninja’s High Level IL, we will see the following code:
int64_t main(int32_t arg1, void* arg2)
    j___chkstk(0x59390)
    void var_59398
    int64_t rax_1 = __security_cookie ^ &var_59398
    void var_110
    j_sub_140ff1700(&var_110, "state")
    void var_e8
    j_sub_140ff1700(&var_e8, "input")
    void var_c0
    j_sub_140ff1700(&var_c0, "position")
    void var_98
    j_sub_140ff1700(&var_98, "transitions")
    int64_t var_8e8 = 0
    int64_t var_8e0 = 0
    void var_480
    j_sub_140ff0fe0(j_sub_140ff1640(&var_480, &var_c0), &var_8e8)
    void var_458
    int64_t rdx_4 = j_sub_140ff0fe0(j_sub_140ff1640(&var_458, &var_98), &var_8e0)

    if (var_8e8 == 0x10)
        if (var_8e0 != 0x10)
            j_sub_140ff4ec0("wrong!\n", rdx_4)
            void var_340
            int64_t* rax_22 = j_sub_140ff1640(&var_340, &var_98)
            void var_318
            int64_t* rax_25 = j_sub_140ff1640(&var_318, &var_e8)
            void var_2f0
            int64_t* rax_28 = j_sub_140ff1640(&var_2f0, &var_c0)
            void var_570
            j_sub_14000b100(j_sub_140ff1640(&var_570, &var_110), rax_28, rax_25,
                rax_22)
            j_exit(1)
        else
            j_sub_140ff4ec0("correct!\n", rdx_4)
            void var_30
            __builtin_memset(dest: &var_30, ch: 0, count: 0x11)
            void var_430

            if (zx.d(j_sub_14000af00(j_sub_140ff1640(&var_430, &var_e8), &var_30,
                    0x10)) != 0)
                void var_70
                j_sub_140ff1700(&var_70, &var_30)
                j_sub_14000b2a0(&var_70)
                j_sub_140ff2040(&var_70)

            void var_3e0
            int64_t* rax_10 = j_sub_140ff1640(&var_3e0, &var_98)
            void var_3b8
            int64_t* rax_13 = j_sub_140ff1640(&var_3b8, &var_e8)
            void var_390
            int64_t* rax_16 = j_sub_140ff1640(&var_390, &var_c0)
            void var_368
            j_sub_14000b100(j_sub_140ff1640(&var_368, &var_110), rax_16, rax_13,
                rax_10)
            j_exit(0)

    uint8_t var_48[0x7]
    __builtin_memset(dest: &var_48, ch: 0, count: 0x11)
    void var_2a0
    int64_t rdx_19 =
        j_sub_140ff0fe0(j_sub_140ff1640(&var_2a0, &var_110), &data_14132d480)

    if (data_14132d480 == -1)
        if (arg1 == 2)
            if (j_strcmp(*(arg2 + 8), &data_141217e98) == 0)
                void var_278
                int64_t* rax_38 = j_sub_140ff1640(&var_278, &var_98)
                void var_250
                int64_t* rax_41 = j_sub_140ff1640(&var_250, &var_e8)
                void var_228
                int64_t* rax_44 = j_sub_140ff1640(&var_228, &var_c0)
                void var_200
                j_sub_14000b100(j_sub_140ff1640(&var_200, &var_110), rax_44, rax_41,
                    rax_38)
                j_exit(2)

            void* rax_51
            int64_t rdx_25
            rax_51, rdx_25 = j_strlen(*(arg2 + 8))

            if (rax_51 != 0x10)
                j_sub_140ff4ec0("input 16 characters", rdx_25)
                j_exit(1)

            j_strcpy(&var_48, *(arg2 + 8))
            void var_1d8
            j_sub_14000ade0(j_sub_140ff1640(&var_1d8, &var_e8), &var_48, 0x10)
            void var_1b0
            j_sub_140ff1190(j_sub_140ff1640(&var_1b0, &var_c0), 0)
            void var_188
            j_sub_140ff1190(j_sub_140ff1640(&var_188, &var_98), 0)
            void var_160
            j_sub_140ff1190(j_sub_140ff1640(&var_160, &var_110), 0)
        else
            j_sub_140ff4ec0(
                "usage: ./ntfsm <password>\nto reset the binary in case of weird behavior: "
            "/ntfsm -r",
                rdx_19)
            j_exit(1)

    void var_138
    int64_t rdx_34 = j_sub_14000af00(j_sub_140ff1640(&var_138, &var_e8), &var_48, 0x10)
    char var_59368 = var_48[var_8e8]
    int64_t var_680
    __builtin_memset(dest: &var_680, ch: 0, count: 0x20)

    if (data_14132d480 == -1)
        data_14132d480 = 0

    int64_t rax_66 = data_14132d480

    if (rax_66 u<= 0x1629c)
        jump(&__dos_header.e_magic[zx.q(jump_table_140c687b8[rax_66])])

    j_sub_140ff4ec0("Something went wrong!", rdx_34)
    void var_548
    int64_t* rax_67 = j_sub_140ff1640(&var_548, &var_98)
    void var_520
    int64_t* rax_70 = j_sub_140ff1640(&var_520, &var_e8)
    void var_4f8
    int64_t* rax_73 = j_sub_140ff1640(&var_4f8, &var_c0)
    void var_4d0
    j_sub_14000b100(j_sub_140ff1640(&var_4d0, &var_110), rax_73, rax_70, rax_67)
    j_exit(1)
    void var_4a8
    j_sub_140ff1190(j_sub_140ff1640(&var_4a8, &var_c0), var_8e8 + 1)
    void var_408
    j_sub_140ff1190(j_sub_140ff1640(&var_408, &var_98), var_8e0)
    int64_t var_668
    void var_2c8

    if (var_668 != 0)
        j_sub_140ff1190(j_sub_140ff1640(&var_2c8, &var_110), var_668)
    j_sub_14000b050(*arg2)
    int32_t var_8f0 = 0
    j_sub_140ff2040(&var_98)
    j_sub_140ff2040(&var_c0)
    j_sub_140ff2040(&var_e8)
    j_sub_140ff2040(&var_110)
    j___security_check_cookie(rax_1 ^ &var_59398)
    return zx.q(var_8f0)
At first glance the code looks scary, but don’t let that throw you off! It’s actually pretty straightforward once you break down the key functions and understand how the variables are used. Since we know that the FSM stores it’s state data in ADS, we can infer that the j_sub_140ff1700 function is responsible for reading this data from the streams. When the binary runs, it reads the state, input, position, and transitions streams into var_110, var_e8, var_c0 and var_98 variables respectively.
If we look toward the end of the main function, we can see these variables being used within the j_sub_140ff2040 function. We can reasonably assume that this function is responsible for writing the FSM data back into the streams.
Going back to the top of the function, we notice two interesting variables, var_8e8 and var_8e0 (both initialized to 0). These are populated with the position and transitions data read from the ADS streams. They are then checked to see if they are equal to 0x10 (16 in decimal). If they are, the binary prints correct! and calls what we assume is the function that handles printing the flag.
So, at this point, we have a very basic understanding of what successful execution looks like: we need to provide a valid 16 character input that results in 16 valid transitions. But how is this input validated? And how does it drive the FSM?
To answer that, we can dig into the middle of the code.
uint8_t var_48[0x7]
__builtin_memset(dest: &var_48, ch: 0, count: 0x11)
void var_2a0
int64_t rdx_19 = j_sub_140ff0fe0(j_sub_140ff1640(&var_2a0, &var_110), &data_14132d480)
This section of code is responsible for populating the data_14132d480 section in the binary with the current state variable (var_110). This state is then stored in rax_66. Before using it, the program checks if the state isn’t greater then 0x1629c (90780 in decimal). If it’s not,rax_66 is used as an offset into a jump table, which determines the address the program should jump to next.
int64_t rax_66 = data_14132d480

    if (rax_66 u<= 0x1629c)
        jump(&__dos_header.e_magic[zx.q(jump_table_140c687b8[rax_66])])
Take note of the following potential Binary Ninja quirks to watch out for!
A quick side note for those following along: if you haven’t allowed Binary Ninja to fully analyze the binary, you might not see a complete jump table. Instead, you might only see a section of data that is unanalyzed. For example, you might encounter HLIL that looks like this:
if (rax_66 u<= 0x1629c)
	jump(&__dos_header.e_magic[zx.q(*((rax_66 << 2) + &data_140c687b8))])
To fix this, you’ll need to manually adjust the variable type. Select the data variable, press Y, and change the type to uint32_t const [0x1629c]. This informs Binary Ninja that we’re working with an array of uint32_t values, where the array size is 0x1629c (since that’s the maximum size for the state). After making this change, Binary Ninja should now correctly populate the jump table, and you’ll see something like this:
uint32_t const data_140c687b8[0x1629c] =
{
    [0x00000] =  0x00860241
    [0x00001] =  0x00a158fb
    [0x00002] =  0x001f4f57
    [0x00003] =  0x00759e4c
    [0x00004] =  0x003b1a3b
    [0x00005] =  0x009fa0db
    [0x00006] =  0x003c67dd
    [0x00007] =  0x00a7256d
    [0x00008] =  0x0025a1e9
    [0x00009] =  0x0081b44a
    [0x0000a] =  0x00a89d69
... snip ...
As another side note - even when the jump table is analyzed, Binary Ninja sometimes only displays a chunk of it (you might see a partially filled table or truncated view).
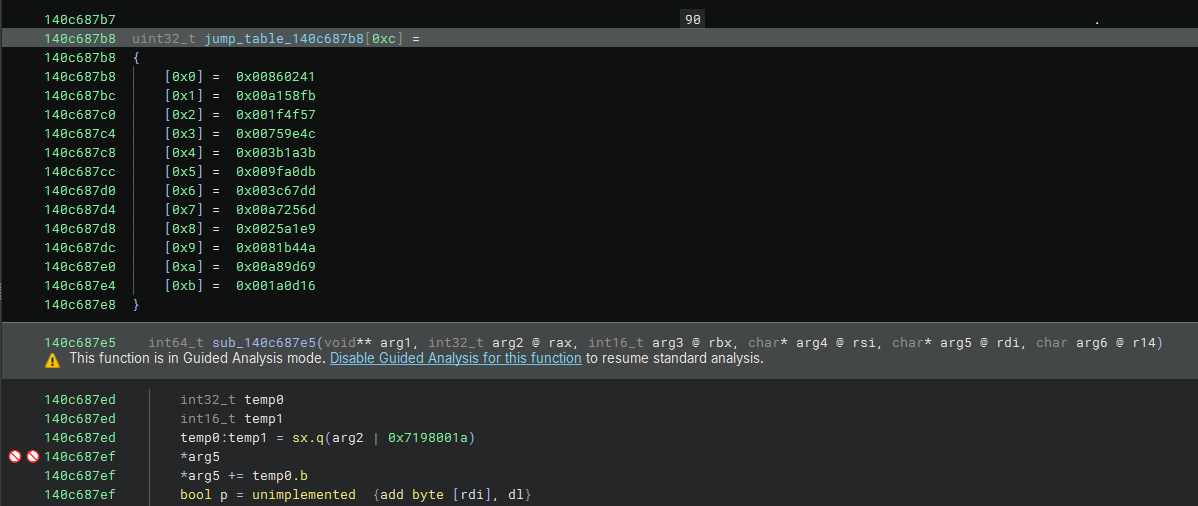
This issue often arises because Binary Ninja doesn’t automatically detect the correct size of the jump table array or may limit it to a smaller default size. To fix this, just modify the size of the jump table array to 0x1629c as mentioned above and it will now populate the rest of the table.
Okay, now that we have a valid jump table with offsets, the next question is: how do these branches actually work? Where do they jump to?
Well, we already know that the DOS header is dereferenced, and the jump table offset is used to calculate the next address. So, if we take the first value 0x00860241 (state 0) and add it to the base address 0x140000000, we get the address of the first jump table function: 0x140860241. From here, press G type in the address, press enter, and that should land us in a function.
For those who haven’t analyzed the binary yet, you’ll probably see some un-analyzed bytes. To fix that, just press U to undefine the area of the address, and then press c to define it as code. After doing that, the assembly for the “zero state” branch function should appear and look something like this:
140860241  rdtsc
140860243  shl     rdx, 0x20
140860247  or      rax, rdx
14086024a  mov     qword [rsp+0x58d18], rax
140860252  rdtsc
140860254  shl     rdx, 0x20
140860258  or      rax, rdx
14086025b  mov     qword [rsp+0x58d20], rax
140860263  mov     rax, qword [rsp+0x58d18]
14086026b  mov     rcx, qword [rsp+0x58d20]
140860273  sub     rcx, rax
140860276  mov     rax, rcx
140860279  cmp     rax, 0x12ad1659 ; 313333337
14086027f  jl      0x140860252
140860281  movzx   eax, byte [rsp+0x30]
140860286  mov     byte [rsp+0x3bb8c], al
14086028d  cmp     byte [rsp+0x3bb8c], 0x4a ; J
140860295  je      0x1408602ce
140860297  cmp     byte [rsp+0x3bb8c], 0x55 ; U
14086029f  je      0x1408602ef
1408602a1  cmp     byte [rsp+0x3bb8c], 0x69 ; i
1408602a9  je      0x1408602ad
1408602ab  jmp     0x140860310
1408602ad  mov     qword [rsp+0x58d30], 0x1
1408602b9  mov     rax, qword [rsp+0x58ab8]
1408602c1  inc     rax
1408602c4  mov     qword [rsp+0x58ab8], rax
1408602cc  jmp     0x14086033f
1408602ce  mov     qword [rsp+0x58d30], 0x2
1408602da  mov     rax, qword [rsp+0x58ab8]
1408602e2  inc     rax
1408602e5  mov     qword [rsp+0x58ab8], rax
1408602ed  jmp     0x14086033f
1408602ef  mov     qword [rsp+0x58d30], 0x3
1408602fb  mov     rax, qword [rsp+0x58ab8]
140860303  inc     rax
140860306  mov     qword [rsp+0x58ab8], rax
14086030e  jmp     0x14086033f
140860310  mov     dword [rsp+0x28], 0x5
140860318  mov     qword [rsp+0x20], 0x0
140860321  lea     r9, [rel 0x141252940]
140860328  lea     r8, [rel 0x141252a08]
14086032f  lea     rdx, [rel 0x141252a94]
140860336  xor     ecx, ecx
140860338  call    qword [rel 0x14133b408]
14086033e  nop
14086033f  jmp     0x140c685ee
The assembly is fairly easy to read and understand, but if you want to make it a bit cleaner and easier to read, then you can do the following. Select the start address (0x140860241), and press P to mark the location as the start of a function. After that, you should see something similar to this:
int64_t sub_140860241(char arg1, int64_t arg2)
    int0_t tsc
    int32_t temp0_1
    int32_t temp1_1
    temp0_1, temp1_1 = _rdtsc(tsc)
    int32_t temp0
    int32_t temp1

    do
        temp0, temp1 = _rdtsc(tsc)
    while (
        (zx.q(temp0) | zx.q(temp1) << 0x20) - (zx.q(temp0_1) | zx.q(temp1_1) << 0x20)
        s< 0x12ad1659)
    int64_t arg_58d30

    if (arg1 == 0x4a) // J
        arg_58d30 = 2 // State == 2
        arg2 += 1 // inc position
    else if (arg1 == 0x55) // U
        arg_58d30 = 3 // State == 3
        arg2 += 1 // inc position
    else if (arg1 == 0x69) // I
        arg_58d30 = 1 // State == 1
        arg2 += 1 // inc position
    else
        ShellExecuteA(hwnd: nullptr, lpOperation: "open", lpFile: "cmd.exe",
            lpParameters: " /c msg * Hello there, Hacker", lpDirectory: nullptr,
            nShowCmd: SW_SHOW)
    return sub_140c685ee() __tailcall
Let’s break down what this branch function does. The function starts with a call to rdtsc and enters a loop to intentionally slow down execution - it basically loops until 0x12ad1659 (313333337) CPU cycles have passed. This isn’t important to us, so we can skip it.
Next, there’s a movzx instruction that loads a byte from [rsp+0x30] into eax, and stores that in [rsp+0x3bb8c]. We can assume that this byte is a single character from our input. This byte is then compared against three possible characters, J, U, and i. Depending on the match, the variable at [rsp+0x58d30] is set to 2, 3, or 1 respectively. Afterwards, the variable stored at [rsp+0x58ab8] in incremented via the inc operation. From this behavior we can assume that [rsp+0x58d30] stores the state of the program, and [rsp+0x58ab8] is the position of our input, as it’s only incremented once.
If none of the expected characters match, a new command is executed that outputs the message “Hello there, Hacker” - which matches the behavior we observed when running the program. Finally, the function jumps to 0x140c685ee, which is responsible for writing all of the FSM data into ADS and then spawning a new child process of the binary to continue the input validation and next state transition.
Alright, so we know how each branch of the jump table works… or do we? Just to make sure, let’s validate if each branch is similar. If we jump to the third offset (state 2) we’ll see something like this:
int64_t sub_1401f4f57(char arg1, int64_t arg2)
    int0_t tsc
    int32_t temp0_1
    int32_t temp1_1
    temp0_1, temp1_1 = _rdtsc(tsc)
    int32_t temp0
    int32_t temp1

    do
        temp0, temp1 = _rdtsc(tsc)
    while (
        (zx.q(temp0) | zx.q(temp1) << 0x20) - (zx.q(temp0_1) | zx.q(temp1_1) << 0x20)
        s< 0x12ad1659)

    if (arg1 == 0x59) // Y
        int64_t arg_58d30 = 6 // State == 6
        arg2 += 1 // inc position

    return sub_140c685ee() __tailcall
As we can see, the structure of this function is very similar to the first one. It starts with the same rdtsc loop and ends with a call to 0x140c685ee. But, there’s a key difference, this function only accepts Y as valid input, which transitions the state to 6. If the input is invalid, no state change happens, and the position isn’t incremented, essentially preventing us from reaching a valid state.
Knowing this, we can now move forward with actually solving the challenge… but how? Well, the plan is simple. What we need to do is iterate through each branch in the jump table and extract two things - the character accepted by the specific branch, and the state it transitions to when that character is supplied. With that data we can build a transitions map, and then write a map solver (usually BFS) to find a 16 byte input that produces 16 consecutive valid transitions through the FSM.
Scripting with Binary Ninja
Now that we have a solid understanding of the challenge, and have a plan to solve it, the next step is to extract the necessary data from the binary. This is where Binary Ninja’s powerful scripting API comes into play. Using Python and the Binary Ninja API, we can automate the process of extracting the jump table, parsing each branch, and building the transition map.
Let’s start by writing some Python code to extract each branch from the jump table. But first, let’s have a quick overview of the Binary Nina API. Binary Ninja uses the concept of a BinaryView, which provides a queryable interface to a binary file. This interface allows us to interact with the file by parsing file formats, reading and writing memory, and analyzing disassembled code.
BinaryViews are plugins in Binary Ninja, and they’re automatically registered at startup - as such, we don’t instantiate them directly. Instead, we can access them through either calling the current_view or bv function within the Python console. This provides us with the BinaryView for the file that’s currently loaded and analyzed in Binary Ninja.
If you haven’t already, I highly recommend checking out “Binary Ninja API Documentation” and “Magic Console Variables” to get more familiar with how all of this works - and look at the examples provided by them!
Now, knowing that our jump table starts at virtual address 0x140C687B8, we can use the get_data_var_at() function from our current binary view to retrieve the data at that address by using the following code.
>>> jmp_tbl = bv.get_data_var_at(0x140C687B8).value
>>> jmp_tbl[0]
8782401
With our array of jump table branches, we can now start parsing the individual functions. To do that, we’ll use the get_function_at() function along with the virtual address of each branch. This will return a Function” object, which we can then use to analyze the function’s variables, comments, and assembly instructions.
>>> func = bv.get_function_at(0x140000000 + jmp_tbl[0])
>>> func
<func: x86_64@0x140860241>
Once we have the function object, we can start parsing it - but before we do, let’s understand some Binary Ninja API basics.
When viewing function in the GUI, Binary Ninja offers several “Linear View” options, including Low Level IL, Medium Level IL, and High Level IL. These views represent different levels of abstraction in Binary Ninja’s Intermediate Language (BNIL), which is a semantic representation of assembly instructions.
BNIL is actually a family of intermediate languages that work together, each providing functionality at different abstraction layers. For our particular use case, we’ll be using High Level IL (HLIL), which is Binary Ninja’s decompiled output. HLIL gives us a cleaner, more readable representation of the code after they undergone transformations like expression folding and simplification. This makes it much easier to parse the logic of the program unlike Low Level IL (LLIL), which stays much closer to raw assembly.
To extract the HLIL for a function, we can use the hlil property of the function object, followed by the instructions property.
>>> for ins in func.hlil.instructions:
... 	ins
...
<HighLevelILVarDeclare: int0_t tsc>
<HighLevelILVarDeclare: int32_t temp0_1>
<HighLevelILVarDeclare: int32_t temp1_1>
<HighLevelILAssignUnpack: temp0_1, temp1_1 = _rdtsc(tsc)>
<HighLevelILVarDeclare: uint64_t i>
<HighLevelILVarDeclare: uint64_t rdx_2>
<HighLevelILVarDeclare: int32_t temp0>
<HighLevelILVarDeclare: int32_t temp1>
<HighLevelILAssignUnpack: temp0, temp1 = _rdtsc(tsc)>
<HighLevelILAssign: rdx_2 = zx.q(temp1) << 0x20>
<HighLevelILAssign: i = (zx.q(temp0) | rdx_2) - (zx.q(temp0_1) | zx.q(temp1_1) << 0x20)>
<HighLevelILDoWhile: do while (i s< 0x12ad1659)>
<HighLevelILVarDeclare: int64_t entry_r8>
<HighLevelILVarDeclare: int64_t entry_r9>
<HighLevelILVarDeclare: int64_t arg_58d30>
<HighLevelILIf: if (arg2 == 0x4a)>
<HighLevelILAssign: arg_58d30 = 2>
<HighLevelILAssign: arg3 += 1>
<HighLevelILIf: if (arg2 == 0x55)>
<HighLevelILAssign: arg_58d30 = 3>
<HighLevelILAssign: arg3 += 1>
<HighLevelILIf: if (arg2 == 0x69)>
<HighLevelILAssign: arg_58d30 = 1>
<HighLevelILAssign: arg3 += 1>
<HighLevelILAssign: arg1 = 5>
<HighLevelILAssignUnpack: i, rdx_2, entry_r8, entry_r9 = ShellExecuteA(nullptr, "open", "cmd.exe", " /c msg * Hello there, Hacker", nullptr, SW_SHOW)>
<HighLevelILTailcall: return sub_140c685ee(i, rdx_2, entry_r8, entry_r9, arg1, arg2) __tailcall>
As you can see, these instructions are much easier to understand compared to raw assembly or even LLIL. Such simplification makes HLIL ideal for parsing the logic of the function and identifying key behaviors like state transitions or input checks.
Each of these HLIL instructions are represented as objects that inherit from the HighLevelILInstruction class. These instruction objects have specific types that correspond to different high-level operations (HighLevelILOperation) and constructs. For example, the HighLevelILIf operation type represents a conditional branch or an “if” statement in the decompiled code.
Each HLIL operation also exposes useful properties to us, such as the condition property for the HighLevelILIf operation. This property allows us to extract the condition type used in the if statement, such as HighLevelILCmpE if we are comparing two variables (arg2 == 0x4a).
>>> for ins in func.hlil.instructions:
... 	if isinstance(ins, HighLevelILIf):
... 		ins.condition
...
<HighLevelILCmpE: arg2 == 0x4a>
<HighLevelILCmpE: arg2 == 0x55>
<HighLevelILCmpE: arg2 == 0x69>
Because BNIL is a tree-based, architecture-independent intermediate representation of machine code, we can access each side of an expression using the left and right attributes. So, if we have arg2 == 0x4a inside an if condition, calling condition.right against it will return the constant being compares against, or in this case 0x4a.
>>> for ins in func.hlil.instructions:
... 	if isinstance(ins, HighLevelILIf):
... 		ins.condition.right
...
<HighLevelILConst: 0x4a>
<HighLevelILConst: 0x55>
<HighLevelILConst: 0x69>
Similarly, for other operation types like HighLevelILAssign, we can also call src and dest against the instruction to extract the source and destination operands.
>>> for ins in func.hlil.instructions:
... 	if isinstance(ins, HighLevelILAssign):
... 		ins.src
...
<HighLevelILLsl: zx.q(temp1) << 0x20>
<HighLevelILSub: (zx.q(temp0) | rdx_2) - (zx.q(temp0_1) | zx.q(temp1_1) << 0x20)>
<HighLevelILConst: 2>
<HighLevelILAdd: arg3 + 1>
<HighLevelILConst: 3>
<HighLevelILAdd: arg3 + 1>
<HighLevelILConst: 1>
<HighLevelILAdd: arg3 + 1>
<HighLevelILConst: 5>
Now that we’ve got a feel for how to parse HLIL operations, let’s put that knowledge to work. We’ll write a small script to extract the state transitions for each input in our first jump table function. We’ll be using a dictionary to store all transitions, as this will eventually serve as the foundation for building a full transition map for each state.
So, how can we extract each input and its corresponding transition? Well, let’s take another look at the HLIL output for our branch function and focus on the important part:
<HighLevelILIf: if (arg2 == 0x4a)>
<HighLevelILAssign: arg_58d30 = 2>
<HighLevelILAssign: arg3 += 1>
<HighLevelILIf: if (arg2 == 0x55)>
<HighLevelILAssign: arg_58d30 = 3>
<HighLevelILAssign: arg3 += 1>
<HighLevelILIf: if (arg2 == 0x69)>
<HighLevelILAssign: arg_58d30 = 1>
<HighLevelILAssign: arg3 += 1>
If you pay attention, you can see a clear pattern here, where each HighLevelILIf operation is followed by a HighLevelILAssign operation that defines the corresponding state transition. Initially, I thought that we could simply locate every if instruction and grab the next one by index to build our transition map. But, unfortunately for us, hlil.instructions is a generator, which means it can’t be indexed directly.
After thinking it through, I decided to take a simpler route. For each function, we’ll loop through its HLIL instructions while also keeping track of the previous instruction. That way, we can use Python’s isinstance to check if the current instruction is a HighLevelILAssign operation and if so, check if the previous instruction is a HighLevelILIf operation. When both conditions match, we can assume that we’ve found an input check and its transition. From there, we can extract the constant on the right side of the HighLevelILIf condition (the input character being matched), and the constant from the assignment’s source (the state being transitioned to).
Following this logic, our python code to parse the first branch will look like so:
>>> transitions = {}
... prev_ins = None
... for ins in func.hlil.instructions:
... 	if isinstance(prev_ins, HighLevelILIf) and isinstance(ins, HighLevelILAssign):
... 		char = chr(prev_ins.condition.right.constant)
... 		transitions[char] = ins.src.constant
... 	prev_ins = ins
...
>>> transitions
{'J': 2, 'U': 3, 'i': 1}
Awesome - it works! Now that we can extract transitions for a single function, let’s scale it up to enumerate transitions across all of the jump table addresses within the binary.
Here’s what the code will look like once we scale it up:
>>> state_transitions = {}
... for state_index, jmp_addr in enumerate(jmp_tbl):
... 	func = bv.get_function_at(0x140000000 + jmp_addr)
... 	if func is None:
... 		continue
... 	transitions = {}
... 	prev_ins = None
... 	for ins in func.hlil.instructions:
... 		if isinstance(prev_ins, HighLevelILIf) and isinstance(ins, HighLevelILAssign):
... 			char = chr(prev_ins.condition.right.constant)
... 			transitions[char] = ins.src.constant
... 		prev_ins = ins
... 	state_transitions[state_index] = transitions
Basically, this code walks through each address in the jump table, retrieves the corresponding function, and applies the same HLIL parsing logic we used earlier to build a state transition map. We’re using two dictionaries here: state_transitions, which stores the branches we’ve already parsed and associates them with their respective states, and transitions which holds the individual transitions for the current state being processed. The state_index keeps track of our current position within the jump table so we can properly map each parsed function back to its corresponding state.
Now, we can run this code… but there’s a slight problem! This code runs pretty slow (around 5+ minutes) when enumerating all the jump table entries. There are definitely more efficient approaches (and probably more “proper” ways to parse instructions, like iterating over basic blocks), but for now, as someone still getting comfortable with the Binja API, this approach works just fine. It gets the job done and produces usable results.
After we run this code, we can dump the state transitions into a file to review them. Upon looking at the output, we’ll notice that a few states are missing transitions, as you can see below.
{
	"0":{"J":2,"U":3,"i":1},
	"1":{"L":4,"q":5},
	"2":{},
	"3":{"P":7,"Z":8},
	"4":{"A":9,"T":10},
	"5":{"7":12,"g":11,"y":13},
	"6":{},
	"7":{"6":15,"e":16},
	"8":{"5":19,"R":17,"x":18},
	"9":{"Z":21,"z":20},
	"10":{"Q":22,"b":23},
	"11":{"0":25,"M":24},
	"12":{}
	... snip ...
}
We know from earlier manual inspection that state 2 checks for the input character 'Y' and transitions to state 6. But that transition doesn’t appear in our output? This is probably happening because our current logic isn’t catching every case, so let’s dig into why that might be happening.
>>> func = bv.get_function_at(0x140000000 + jmp_tbl[2])
>>> for ins in func.hlil.instructions:
... 	ins
...
<HighLevelILVarDeclare: int0_t tsc>
<HighLevelILVarDeclare: int32_t temp0_1>
<HighLevelILVarDeclare: int32_t temp1_1>
<HighLevelILAssignUnpack: temp0_1, temp1_1 = _rdtsc(tsc)>
<HighLevelILVarDeclare: int32_t temp0>
<HighLevelILVarDeclare: int32_t temp1>
<HighLevelILAssignUnpack: temp0, temp1 = _rdtsc(tsc)>
<HighLevelILDoWhile: do while ((zx.q(temp0) | zx.q(temp1) << 0x20) - (zx.q(temp0_1) | zx.q(temp1_1) << 0x20) s< 0x12ad1659)>
<HighLevelILIf: if (arg1 == 0x59)>
<HighLevelILVarInit: int64_t arg_58d30 = 6>
<HighLevelILAssign: arg2 += 1>
<HighLevelILTailcall: return sub_140c685ee() __tailcall>
Upon inspecting the second branch, we can see that the state transition isn’t represented by a standard HighLevelILAssign operation, but by a HighLevelILVarInit (variable initialization) operation instead.
To fix this, we can extend our scripts condition to check whether the current instruction is of type HighLevelILAssign or HighLevelILVarInit. Also, while we’re at it, let’s add a sanity check to make sure the character constant is valid before calling chr - this helps prevent any unexpected crashes.
The updated code will look like so:
>>> state_transitions = {}
... for state_index, jmp_addr in enumerate(jmp_tbl):
... 	func = bv.get_function_at(0x140000000 + jmp_addr)
... 	if func is None:
... 		continue
... 	transitions = {}
... 	prev_ins = None
... 	for ins in func.hlil.instructions:
... 		if isinstance(prev_ins, HighLevelILIf) and isinstance(ins, HighLevelILAssign) or isinstance(ins, HighLevelILVarInit):
... 			char_val = prev_ins.condition.right.constant
... 			if 0 <= char_val <= 0x10FFFF:
... 				char = chr(char_val)
... 				transitions[char] = ins.src.constant
... 			else:
... 				continue
... 		prev_ins = ins
... 	state_transitions[state_index] = transitions
After running the updated script and dumping the output, we can see that our data now includes all the expected transitions from the parsed jump tables!
{
	"0":{"J":2,"U":3,"i":1},
	"1":{"L":4,"q":5},
	"2":{"Y":6},
	"3":{"P":7,"Z":8},
	"4":{"A":9,"T":10},
	"5":{"7":12,"g":11,"y":13},
	"6":{"C":14},
	"7":{"6":15,"e":16},
	"8":{"5":19,"R":17,"x":18},
	"9":{"Z":21,"z":20},
	"10":{"Q":22,"b":23},
	"11":{"0":25,"M":24},
	"12":{"_":26}
	... snip ...
}
Writing a BFS Solver
At this point, we have a fully populated state transition map, great! But… how do we utilize it to solve the challenge? Well to understand that, let’s dive a bit into Graph Theory.
If we examine our state transition map, we’ll notice that it’s essentially just a graph structure. Each state in the map can be represented as a node, and every transition (triggered by an input character) becomes a directed edge leading to the next node. Using this data, we can construct a non-trivial graph that captures all possible state transitions.
If we visualize some of the data we extracted as a graph, then it will look something like this:
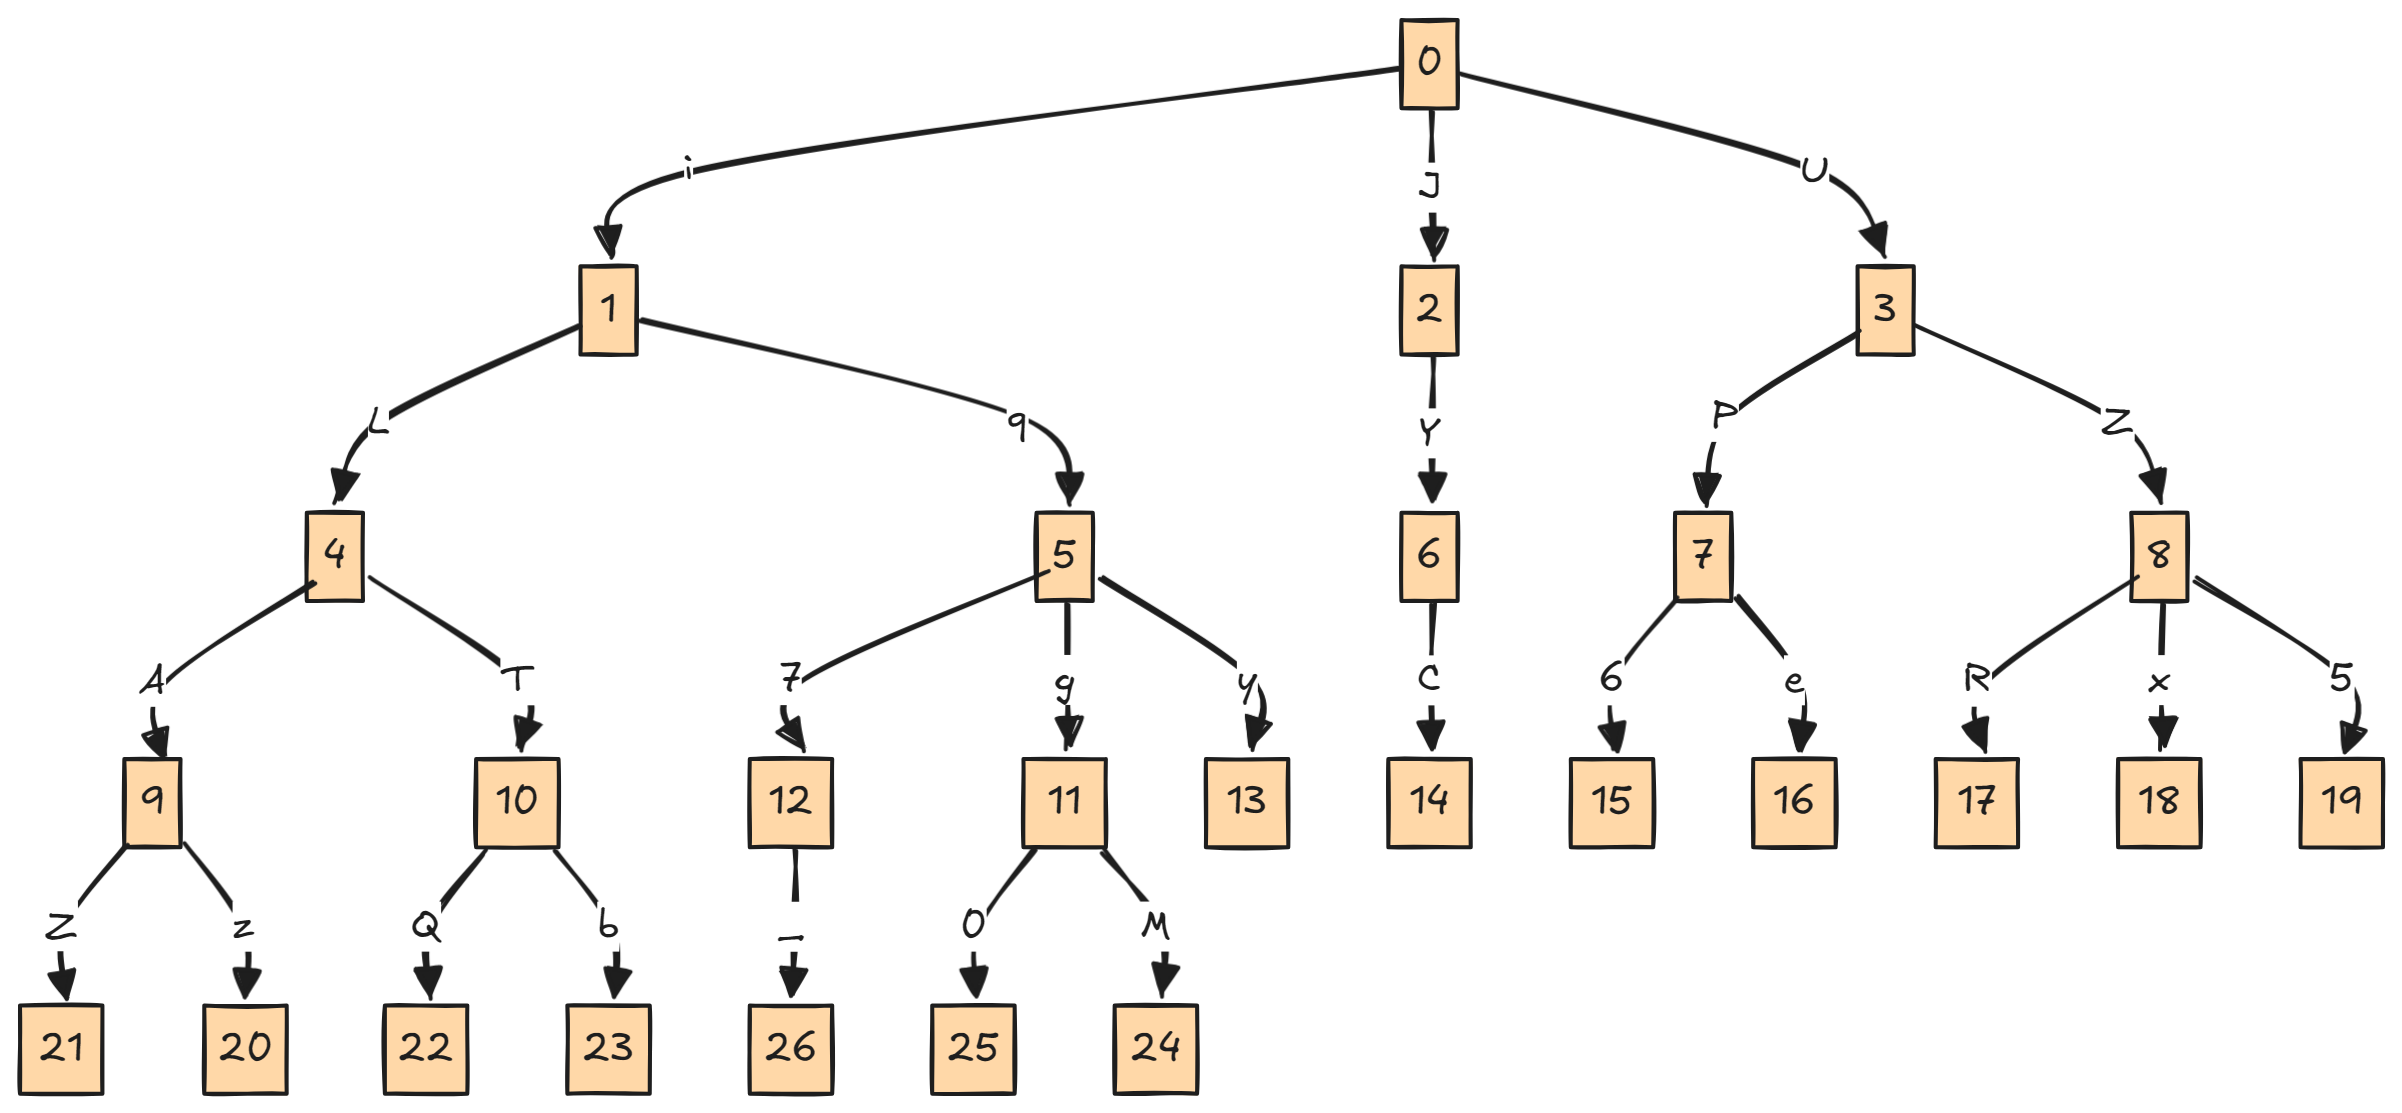
Let’s break down this graph in more depth. At the start, we have our first node at state 0. This node has three edges (arrows) each representing a transition triggered by a specific input character - for example, from state 0 to state 1 with 'i', or from state 0 to state 2 with 'J'. Visually we can start seeing what input will lead to valid transitions, and which won’t. For instance, using just this subset of data, if our password needed to be four characters long with four valid transitions, then then sequence JYC would land us in state 14, which has no valid outgoing transition - making it an invalid path (or entry).
So what does this mean for us? Well, in graph theory terms it means that we can now treat this finite state machine (FSM) as a directed graph and utilize common graph traversal algorithms to explore possible input paths.
In our case, we want to find a path from the starting state (0) that leads to a valid sequence of 16 transitions, which when interpreted as characters, forms the correct password. Since each state transition depends on one character and all transitions are uniform in “cost,” we can use a Breadth-First Search (BFS) traversal algorithm to find the shortest valid path (i.e., the correct password).
We can implement this algorithm pretty easily in python to find a valid password. Here’s how the code for that will look:
import json
from collections import deque

def bfs_solver(fsm):
    # Initialize the queue with the starting state, empty password, and depth of 0
    queue = deque([(0, [], 0)])
    while queue:
        current_state, password, depth = queue.popleft()
        # If we've already found 16 characters, return the password
        if depth == 16:
            return ''.join(password)
        # Explore each transition from the current state
        for char, next_state in fsm.get(str(current_state), {}).items():
            # Append the new state and password to the queue
            queue.append((next_state, password + [char], depth + 1))
    # If no valid password is found, return None
    return None

with open('C:\\Users\\User\\Desktop\\transitions.txt', 'r') as f:
    fsm = json.load(f)
    password = bfs_solver(fsm)
    if password:
        print(f"Found valid password: {password}")
    else:
        print("No valid password found.")
Let’s break down how the bfs_solver function works. This function takes in only one parameter, which is our JSON data containing the exported state transitions from Binary Ninja. Inside the solver we will be using a queue to manage the states we need to explore.
Why a queue? Well, the reason we do this is because a queue works on a First-In, First-Out (FIFO) principle, meaning the first state we add is the first one we process. In BFS, this ensures we explore nodes in the order they were discovered. When a node is processed, its unvisited neighbors are added to the back of the queue - which ensures that we fully explore all nodes at the current level before moving deeper.
We initialize the queue starting at state 0, with an empty password and a depth counter of 0. At each step, we process the current state, check all possible next characters (basically all outgoing edges from that node), and add them to the queue along with the updated password and new state. Since BFS moves level by level, the first 16 character sequence it finds (at depth 16) is guaranteed to be correct password!
If the queue empties and no valid password is found, that indicates something is missing or inconsistent in our transition data.
Alright, now that we have our state transition data, and our BFS solver, let’s run it and see if it works!
C:\Users\User\Desktop\flare\5_-_ntfsm> python .\solver.py
Found valid password: iqg0nSeCHnOMPm2Q

C:\Users\User\Desktop\flare\5_-_ntfsm> .\ntfsm.exe iqg0nSeCHnOMPm2Q
correct!
Your reward: f1n1t3_st4t3_m4ch1n3s_4r3_fun@flare-on.com
And there we have it - the script worked pretty instantaneously! We cracked the challenge and got a valid flag!
Closing
Alright, that about does it for this small technical post! In all honesty this challenge was a blast because it provided me with an excellent opportunity to refine my reverse engineering skills, and allowed me to tackle an FSM for the first time.
I’ve seen state machines and CFF (Control Flow Flattening) used in malware during my time as a researcher, but never really found the opportunity to tackle solving/unflattening them - mostly because they seemed like a pretty daunting task. But in the end, it turned out to be pretty straightforward… especially after seeing how user friendly and powerful the Binary Ninja API is. What took about 100+ lines of code in IDA was only about like 18 lines in BN!
Now, of course there were some caveats in using Binary Ninja, and I still prefer IDA for heavy reverse engineering tasks. But for scripting and cleanup of obfuscated code? Binary Ninja is definitely going to be my favorite moving forward.
I hope this post was useful to some of you and that you learned something new along the way!
Thanks for reading, and cheers!
Leave a Comment